Source : https://www.britmodeller.com/forums/index.php?/topic/235074409-swiss-delta-mirage-iiis/ et le pas-à pas : https://www.britmodeller.com/forums/index.php?/topic/235059783-mirage-iiis-conversion-modelsvit-172/
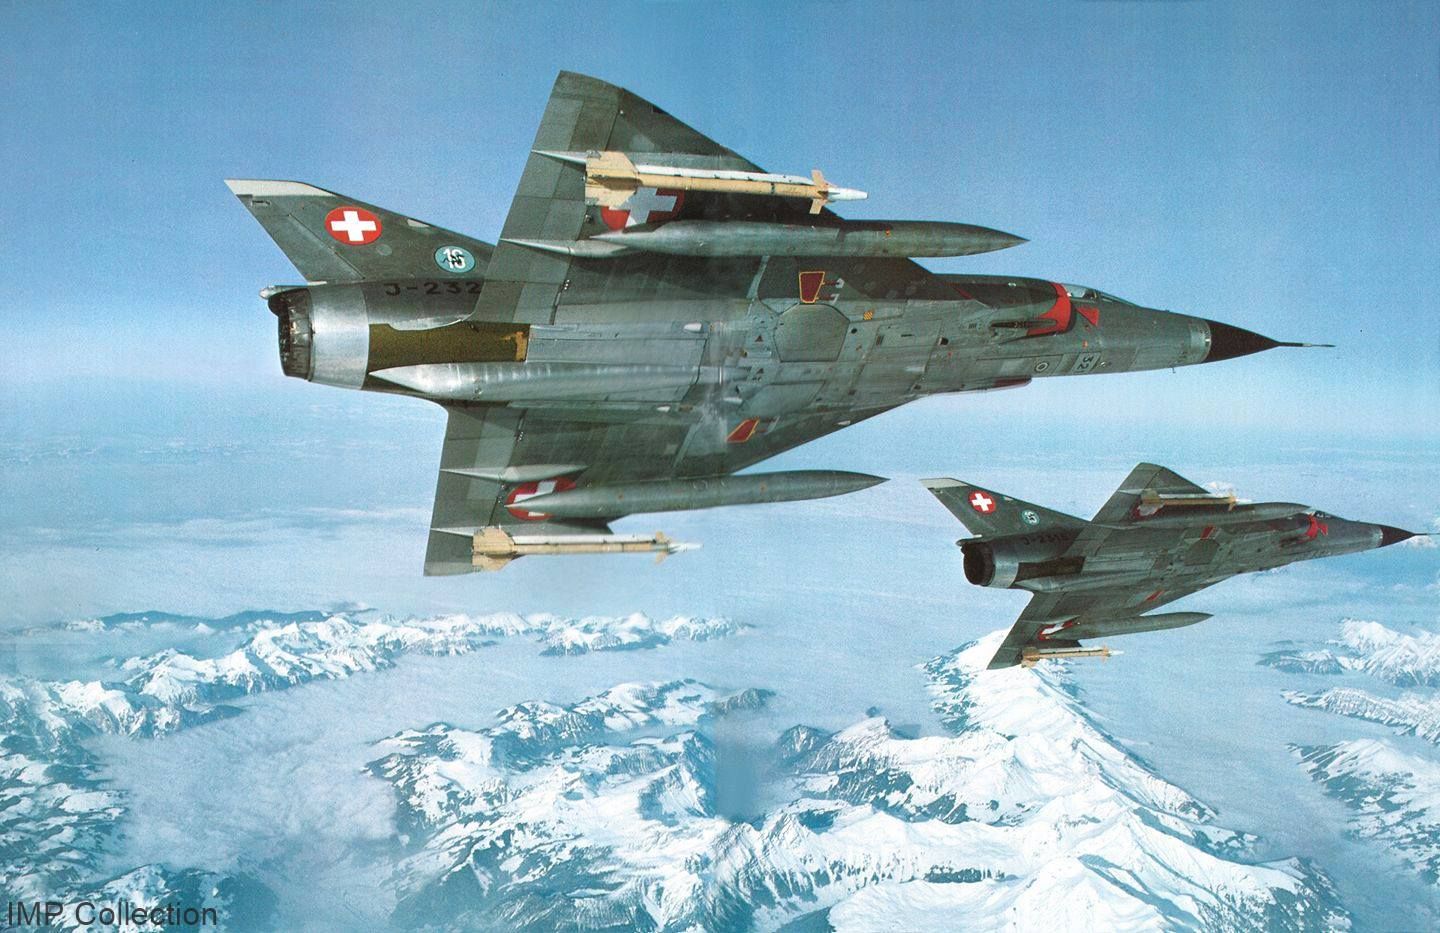
After getting the Modelsvit Mirage IIIE a few months ago I've decided to build it as a Swiss Mirage IIIS. For me this is the most interesting derivative of the Mirage III series and a very capable fighter when introduced with the combo of the Hughes Taran 18 radar and Aim-26B missile. What a job it must have been flying one of these beauties through the Swiss Alps!
For some context a nice video can be found here if you have a few minutes to spare (the footage is great regardless if you speak French): https://notrehistoire.ch/entries/kOPYgj3dWyz
We have the dedicated Kinetic kit in 1/48 scale, however after doing the sums on how much the build would cost me knowing I'd throw a lot of aftermarket at it, I decided I'd prefer to do my ultimate IIIS in 1/32 using the Revell/Italeri kit as basis as the work and expenditure would be similar (I already have numerous AM for it already anyways). That long term 1/32 build is for another day however when I have a new modelling area all set up. Until then I've decided to make a 1/72 version for now and I'll apply what I've learnt here to that build, particularly the NMF which I think will be done by Alclad (not sure yet).
PJ productions has recently released a 1/72 Mirage IIIS/RS kit aimed at the later updated variants. A while ago I made a Mirage IIIRS using the original PJ conversion kit on the old Heller kit, to which I had the IIIS resin nose left over with the aim of doing something like this one day. There are various modifications that need to be done to produce an early IIIS from the IIIE, however not nearly as many as the upgraded later versions to which I think the new PJ kit would be the way to go in this scale. I have chosen the Modelsvit kit as the details are unbelievable in the scale, I think the most detailed kit I've had in my hands in 1/72, it's like a very good 1/48 or 1/32 kit hit with a shrink ray in many places. Also I quite like the much disputed rivet detail on the model, maybe under a camo scheme I agree it would look too much in 1/72, but for a NMF it could look very nice, well we will find out.
I've got quite a bit of AM for this build too,
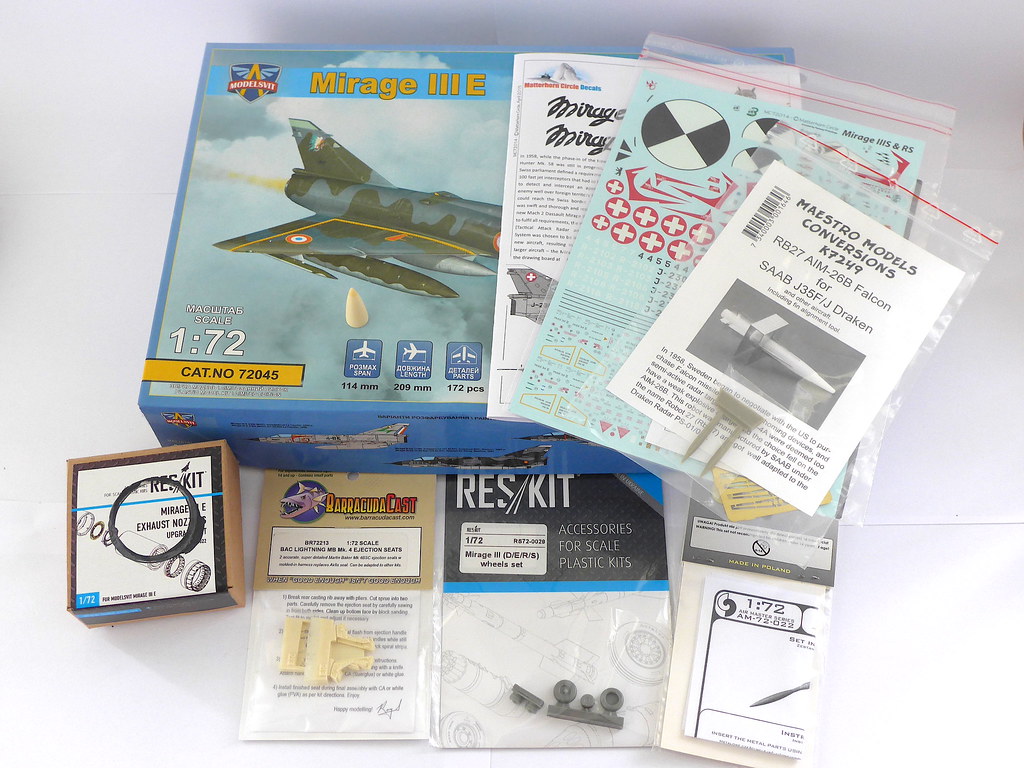
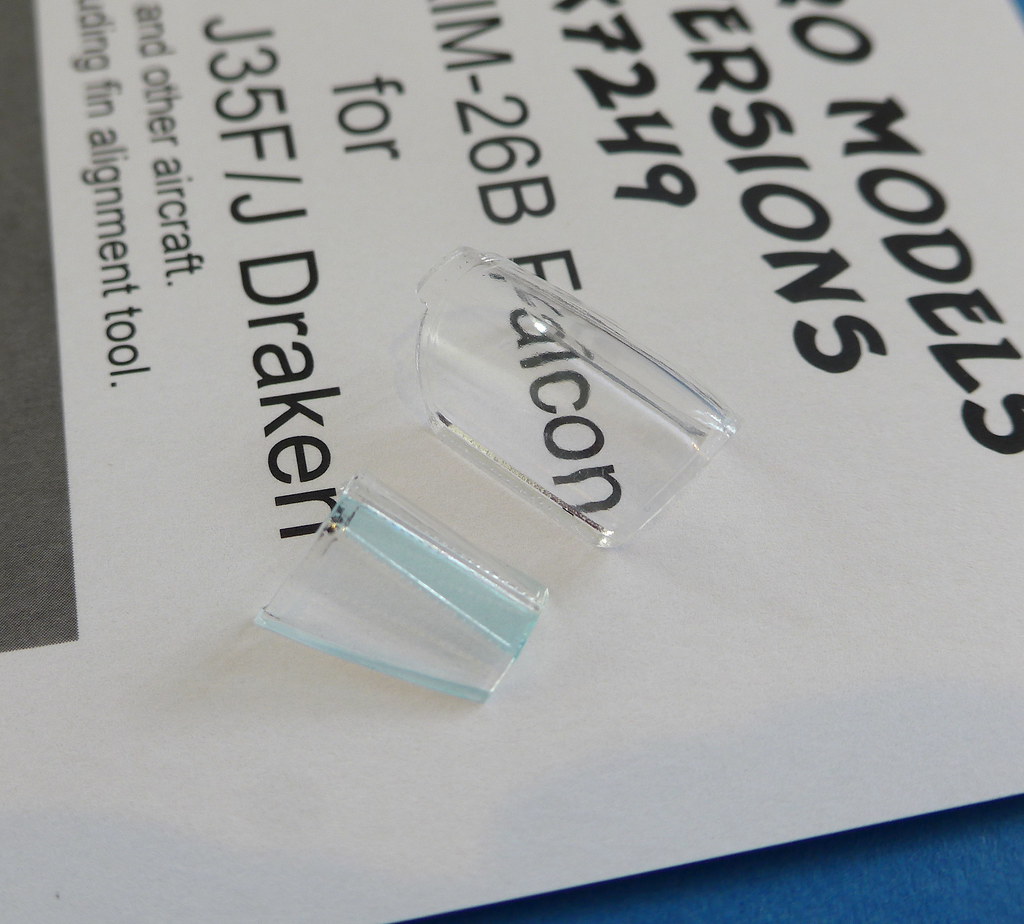
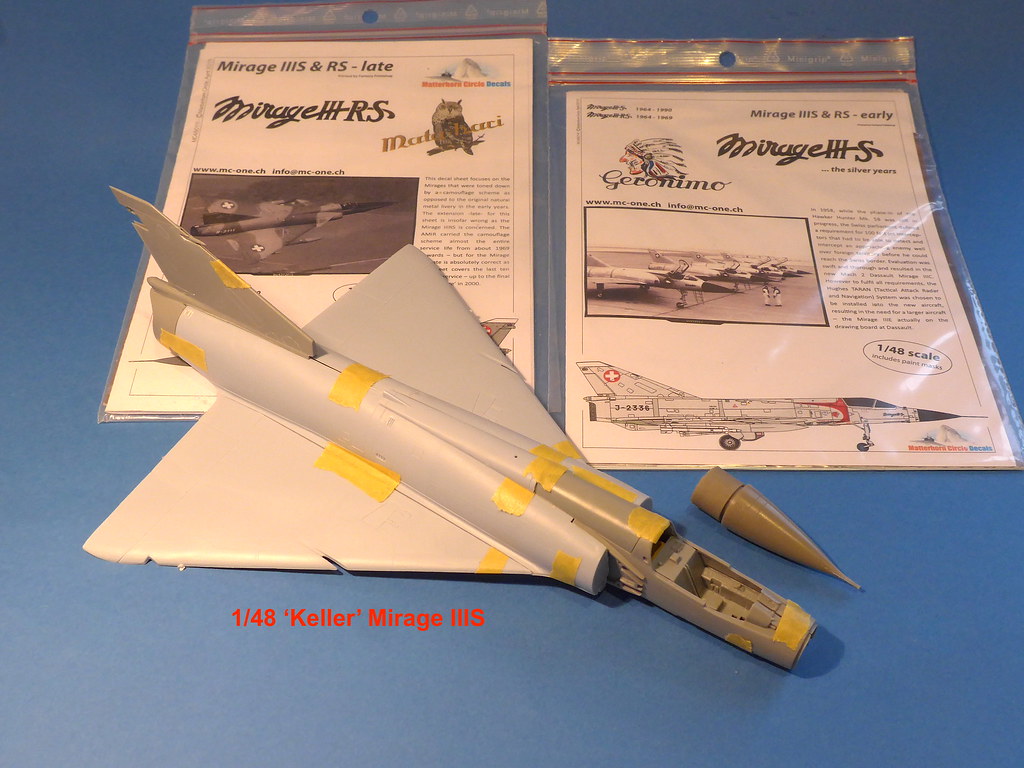
Matterhorn Circle decals, Reskit Mirage IIIE exhaust (please ignore the paint mark on the box, that was me!), Barracuda Mk.4 seat, Reskit wheels, Master pitot, Maestro Aim-26B or HM-55 in Swiss service and the PJ resin IIIS nose. I know quite a bit but I thought what the heck, my build rate is so slow I just threw everything at it tbh wanting to build the best one I could. The rest of the IIIS conversion work will be scratch built.
I would like to make an early example soon after delivery in the mid 60's in a QRA set up with pairs of live Aim-9Bs and Aim-26Bs and supersonic tanks. Maybe 'Geronimo' if I can find when the artwork was applied and is applicable in this period, does anybody know?
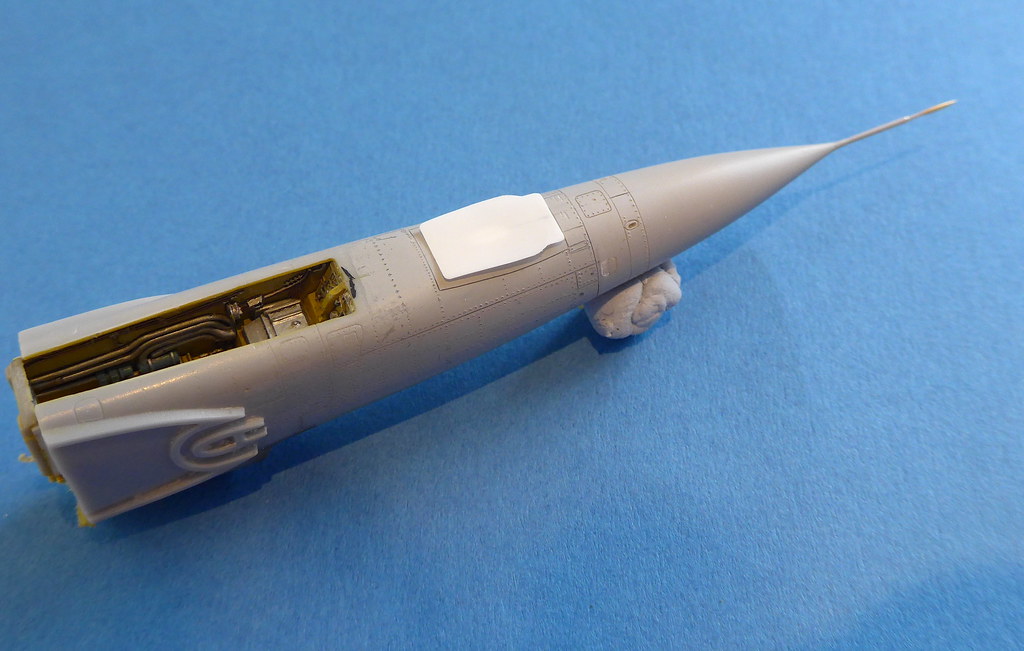
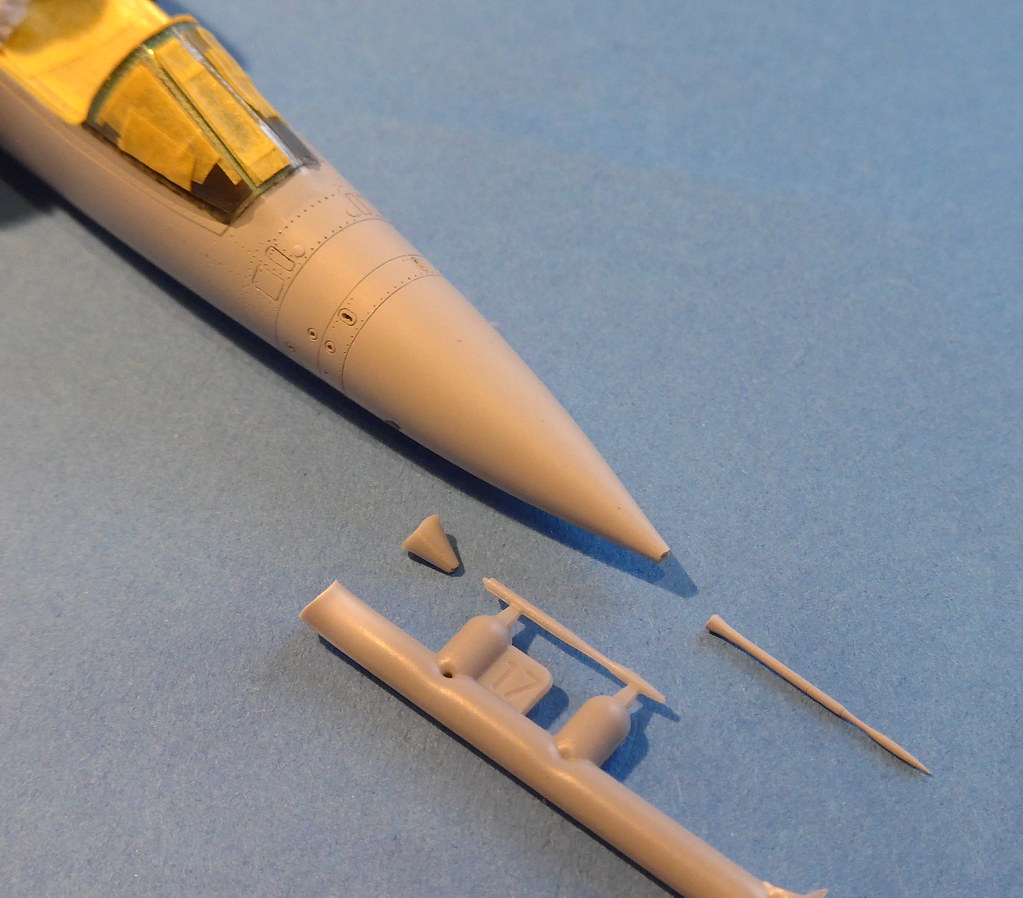
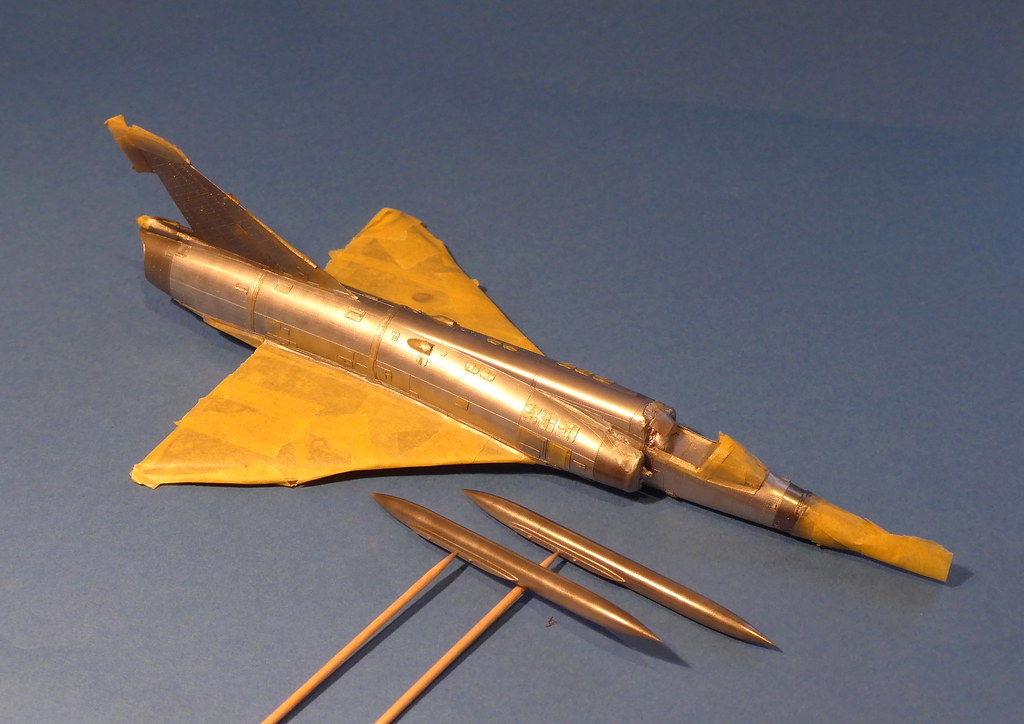
First up was to remove the Doppler radar under the nose area, AFAIK the Taran radar could ground map also allowing all weather navigation. Modelsvit made this integral and hollow to the front fuselage pieces so after some careful cutting I then glued in some thick plasticard to then shape to the surface contours of the nose area, this is yet to be refined until I glue the halves together to get a nice symmetrical shape. The nose gear bay and door (not pictured) is being extended to take the longer modified IIIS nose leg/fork. I'm using dimensions taken from a real IIIS using an article I found online ages ago that doesn't seem to be around on the 'www' anymore, saves to plan ahead and save interesting articles via pdf for future use!
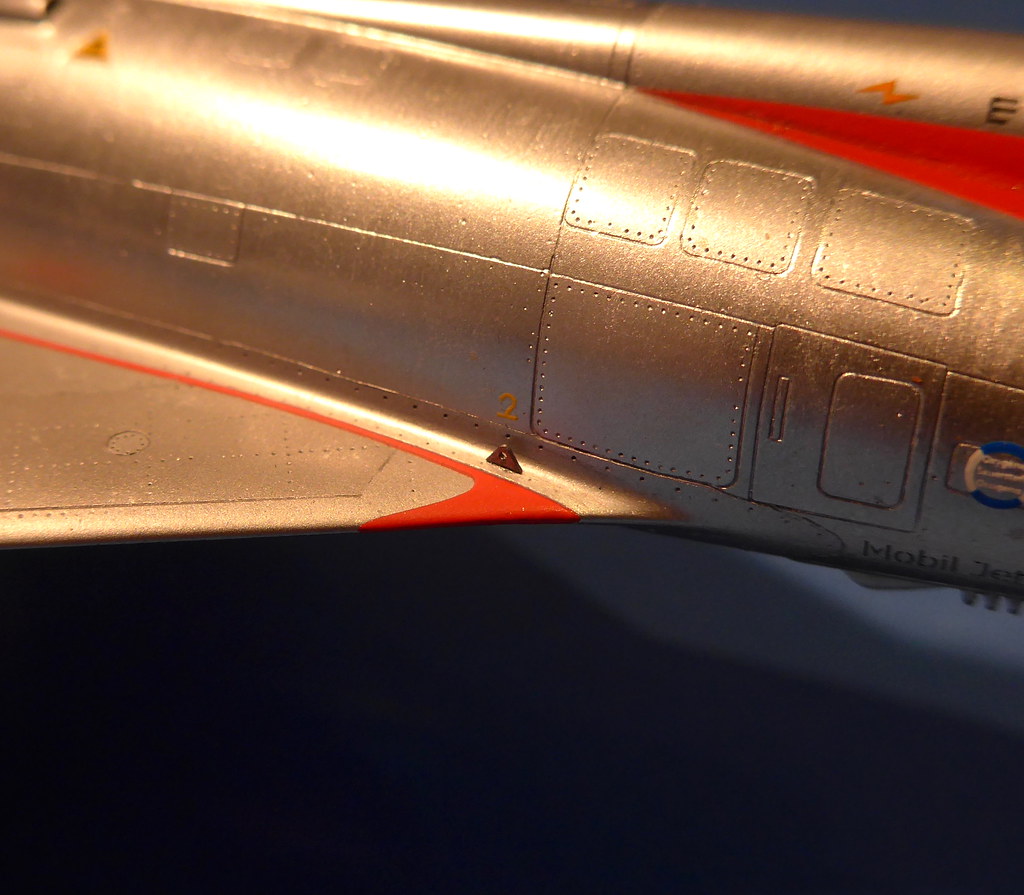
After finding some good images of the underside of an early IIIS I began removing various antennae not present (still some to do) and opening up all the air scoops and drilling the cannon ports,
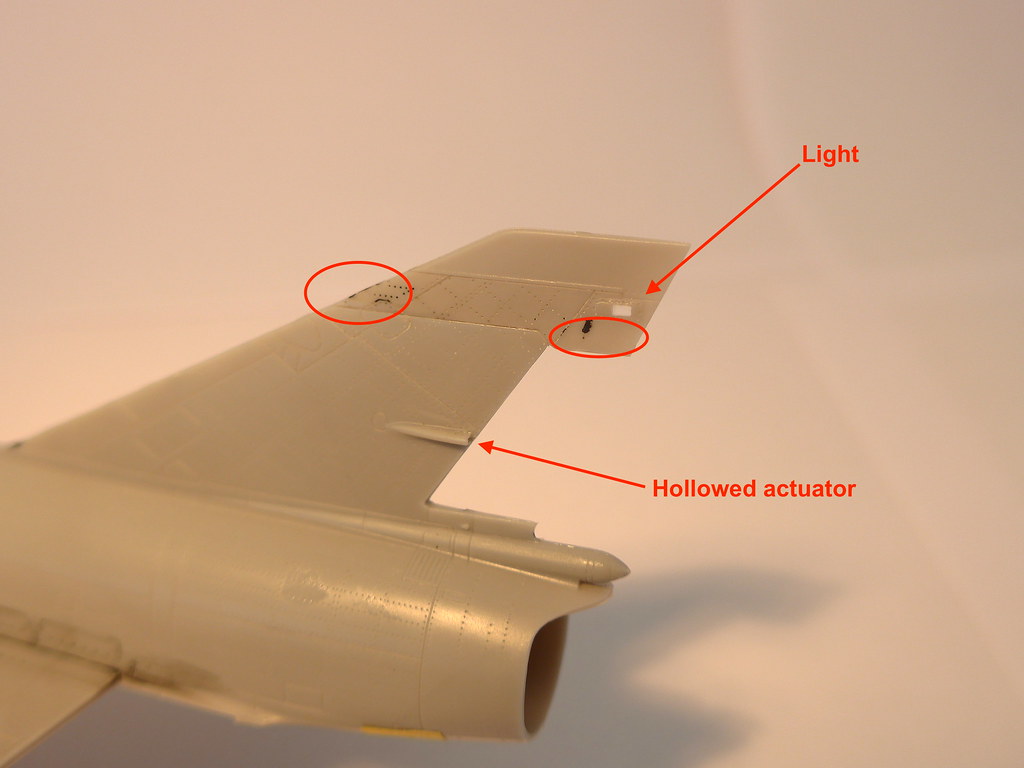
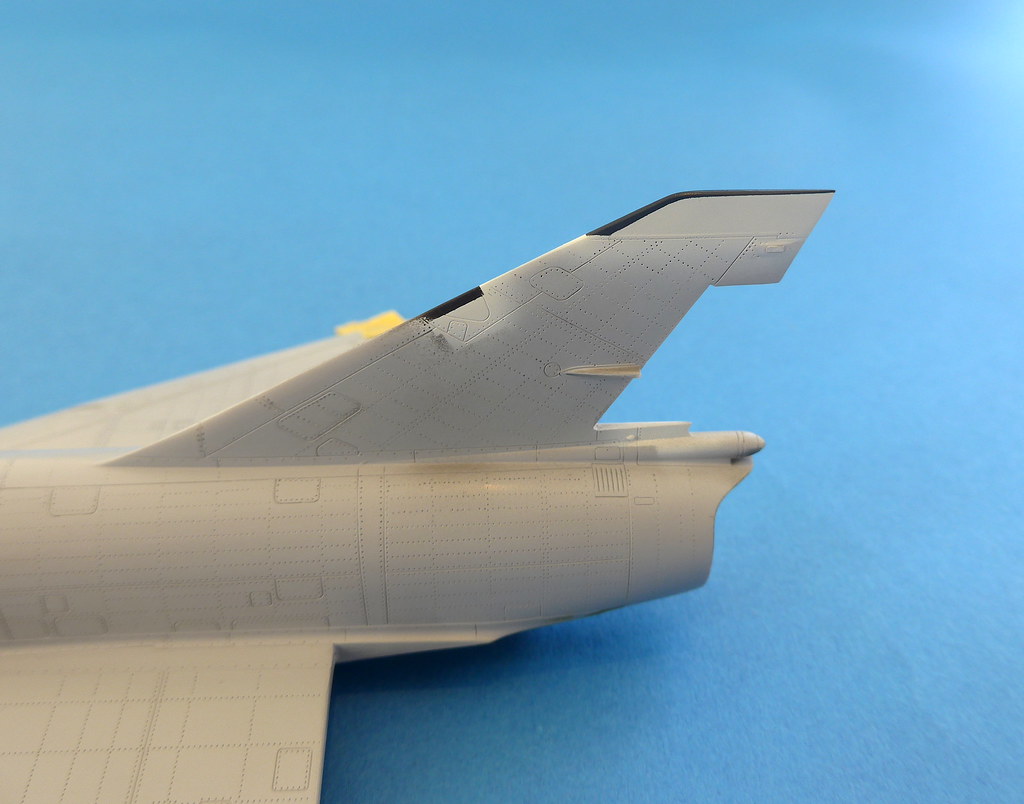
More antennae removed from the fin. I've cut the rudder out in order to build the actuator linkage and displace it although it seems at rest it does look to usually be in the neutral position. Clear light also drilled/installed and blended in, bloody small job in this scale! The exhaust area will have to be thinned quite a bit to get the Reskit exhaust nozzle in which is no bad thing as it is quite thick and overscale imho here.
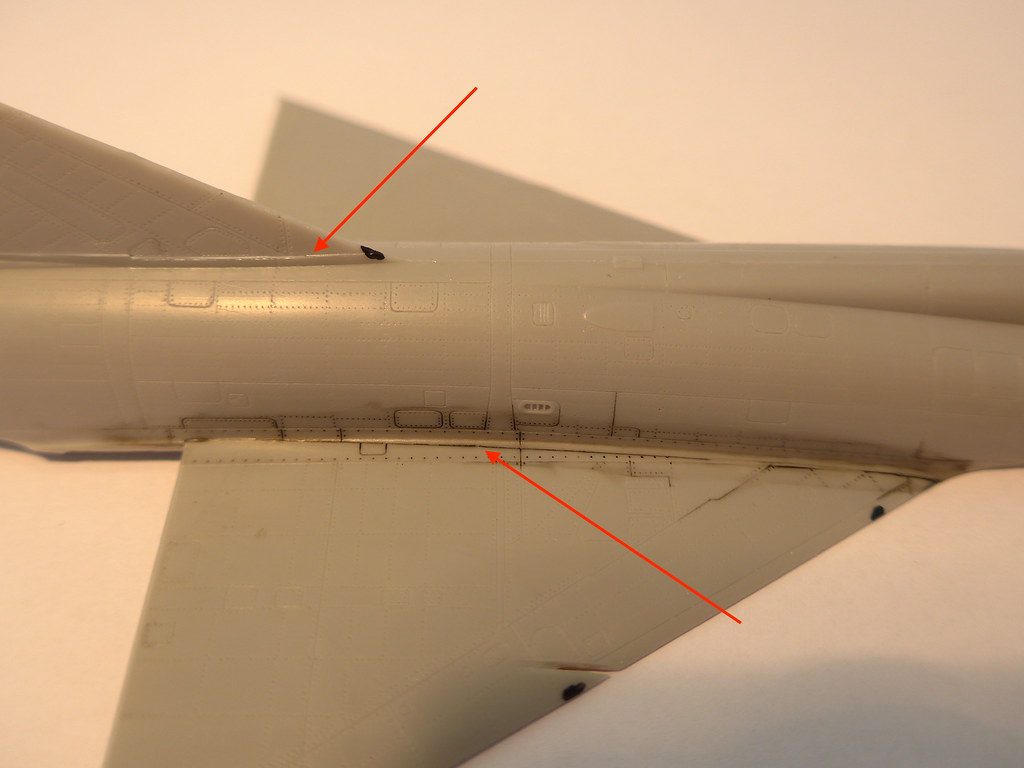
After gluing the rear fuselage halves together I then attached the wings to get the best join I could before attaching the lower piece against the instructions. A black wash shows the join, not bad compared to what I have seen online on many other Mirage builds, this will be filled with Zap a Gap I think. Modelsvit seems to have made a lot of the joining parts not on panel lines which I think is quite a smart way to do it (except the front canopy unfortunately), for me it is easier to fill and eliminate a join opposed to doing the same then rescribing back the panel line on it as most manufactures do. I found I needed some plastic shims on the other side of the vertical fin join. Hopefully the pic also gives an idea of how fine the rivet detail is.
Fuselage progress so far. I cut and installed clear lights on the wing tips that will be sprayed with Tamiya green/red clears when painting comes around. If it wasn't for the IIIS modifications I'm doing I think this would be a very quick model to assemble.

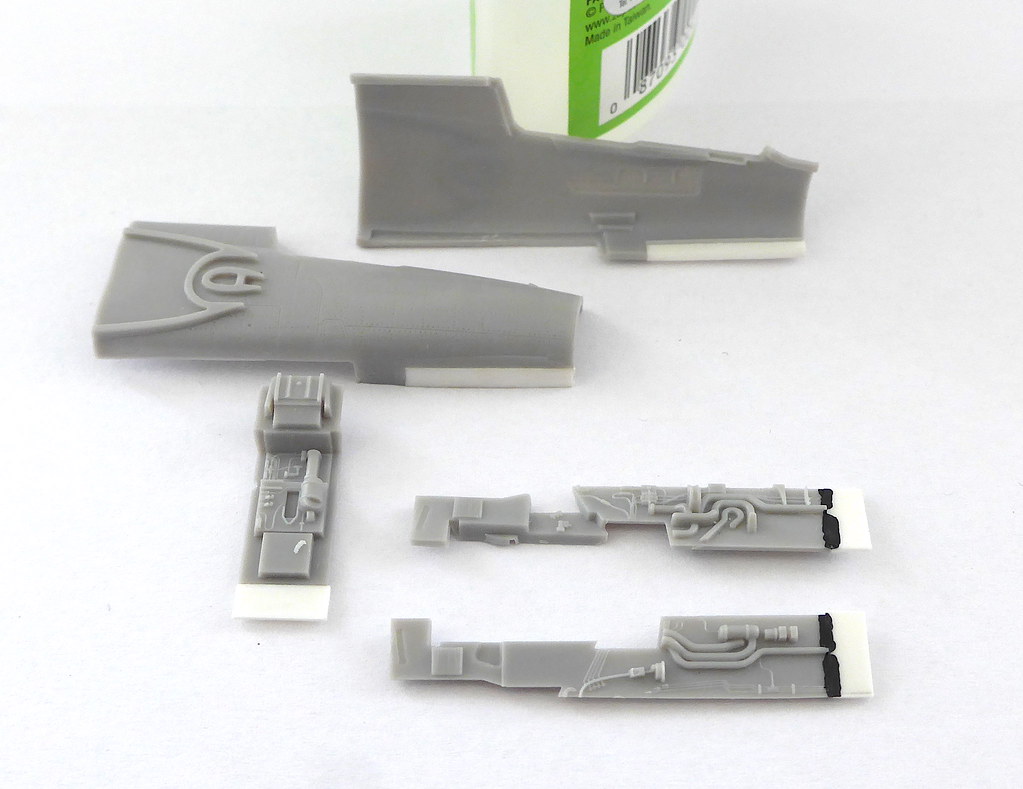
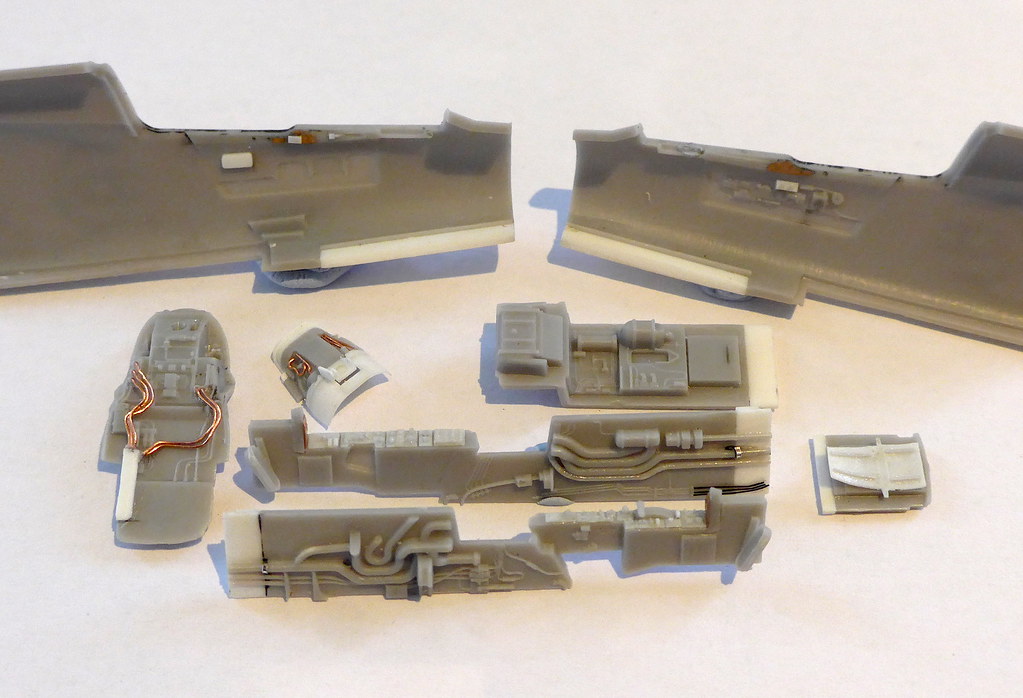
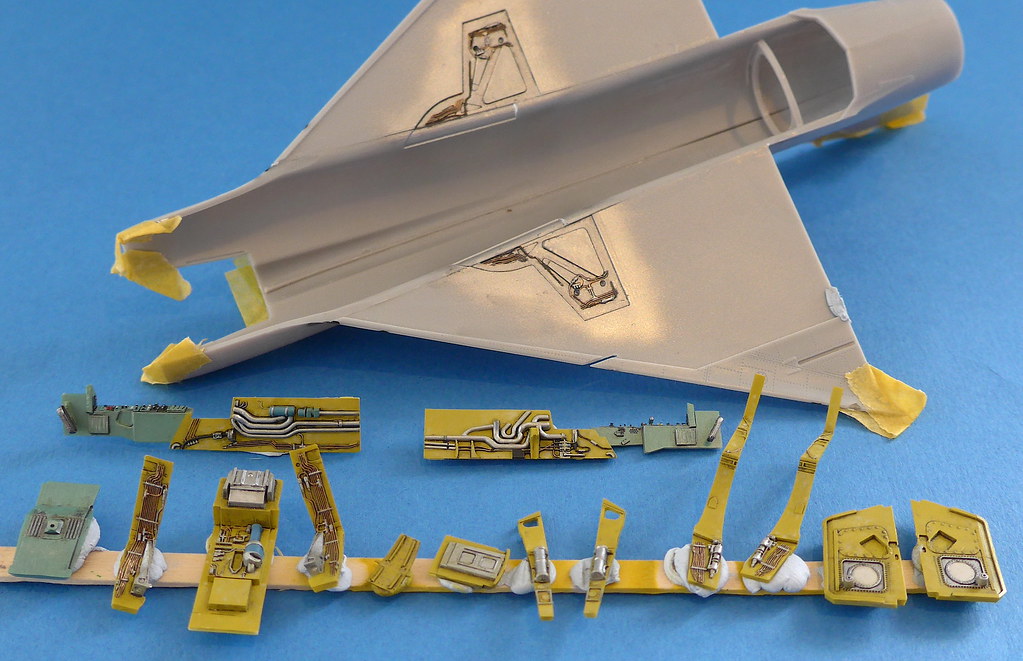
I've made some good progress on a lot of the internal parts so the main construction can now motor along pretty quickly, a big wordy update!
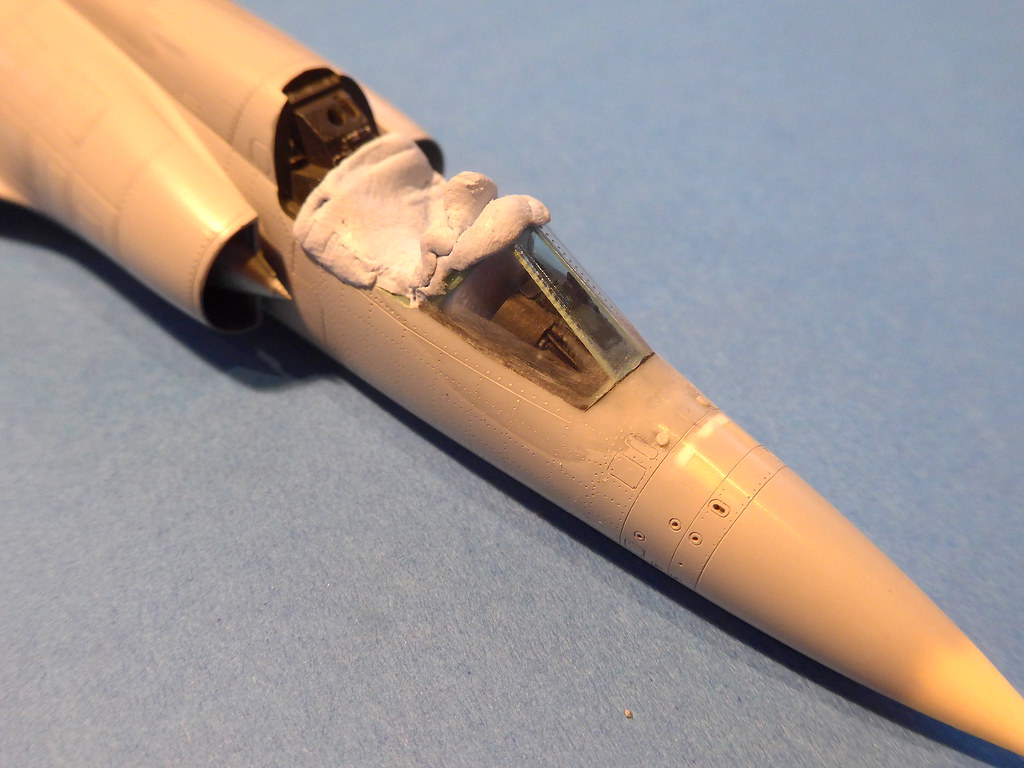
After extending the front gear well, the plumbing etc..was extended also to match. Modelsvit's cockpit OOB is pretty fantastic for the scale and would be more than enough for a typical black Mirage cockpit as not much is seen, however the Swiss used a bright metallic grey-green colour that shows up details quite well. With this in mind I went about replacing the (inaccurate for IIIS) etch cockpit sidewalls with my own plasticard versions and placing in tiny switches from stretched sprue. My eyes didn't like it but it sure makes it more busy than original etch panels. Additional wiring added in various places according to references.
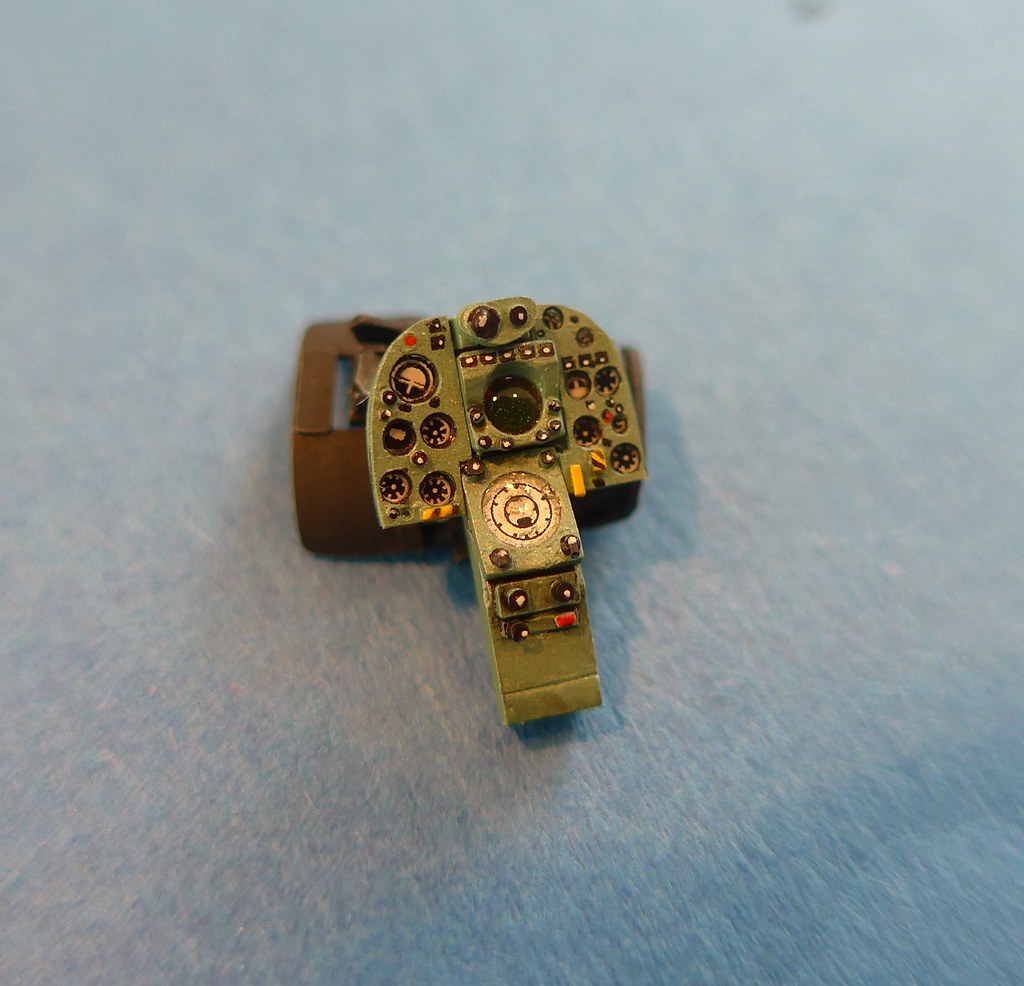
The more I looked at the IIIS IP the more differences I saw between it and the IIIE, including the IP coaming which originally seemed much too short. I ended up modifying it too and extending it as the Swiss version seems to come out further with a larger glare shield. The pic below is before extension.
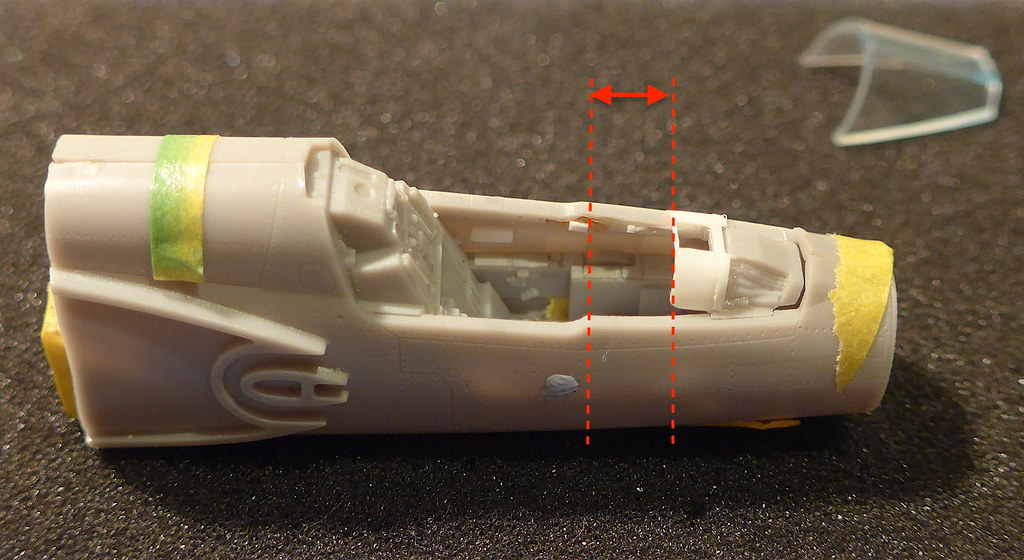
Modelsvit Mirage IIIE IP provided OOB is nice,

But the Swiss version on the IIIS looks like this, https://www.airliners.net/photo/Switzerland-Air-Force/Dassault-FW-Emmen-Mirage-IIIS/876193/L . Actually there are some further differences from the linked image as this represents a late IIIS IP after the update program. I used another reference for an early IIIS IP but I can't post it due to copyright.
I initially made this, taking a page from Eduards book in using clear sheet as 'glass.' Sorry for the crappy photo but I just couldn't get a good one. Since this picture it was refined some more, but it was extremely difficult to drill such small holes using very thin plasticard and required 'a few' attempts.

Since the cockpit parts and front gear bay are one of the same I painted them both simultaneously. First up the gear wells were painted a chromate colour matched to photos,
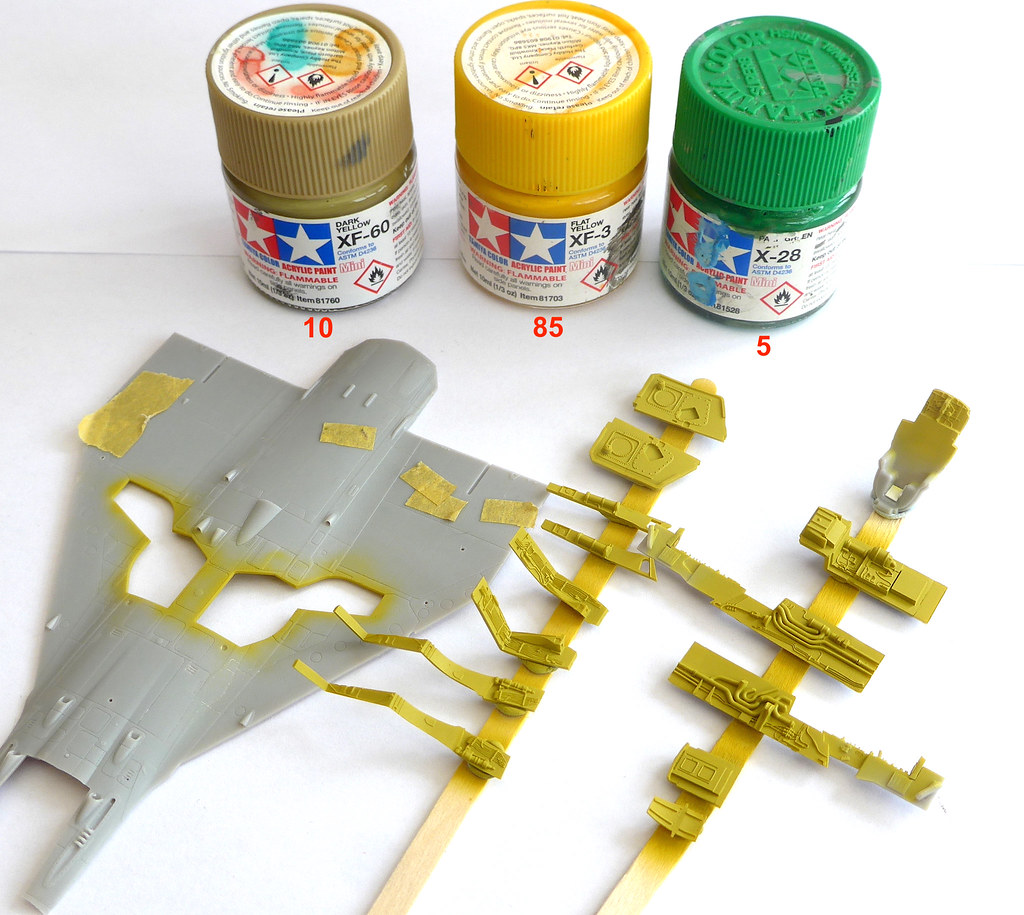
Then the cockpit parts were painted the Swiss 'Metallic, minty, greyish green' colour. I used Mr Color 008 silver as a base as the metallic pigment is extremely fine then added Tamiya X-28 green and some blue and a little white to get the tone I wanted, which I used his image: http://master194.com/photo_avion/mirage3-suisse/pages/cockpit02_jpg.htm . I made the metallic hue too strong at first chancing that further varnish layers will tone it down to about right and mixed a good amount into an empty Tamiya jar for my planned 1/32 Swiss Mirage. Due to the metallic nature the exact hue is very difficult to photograph but the general idea is there.
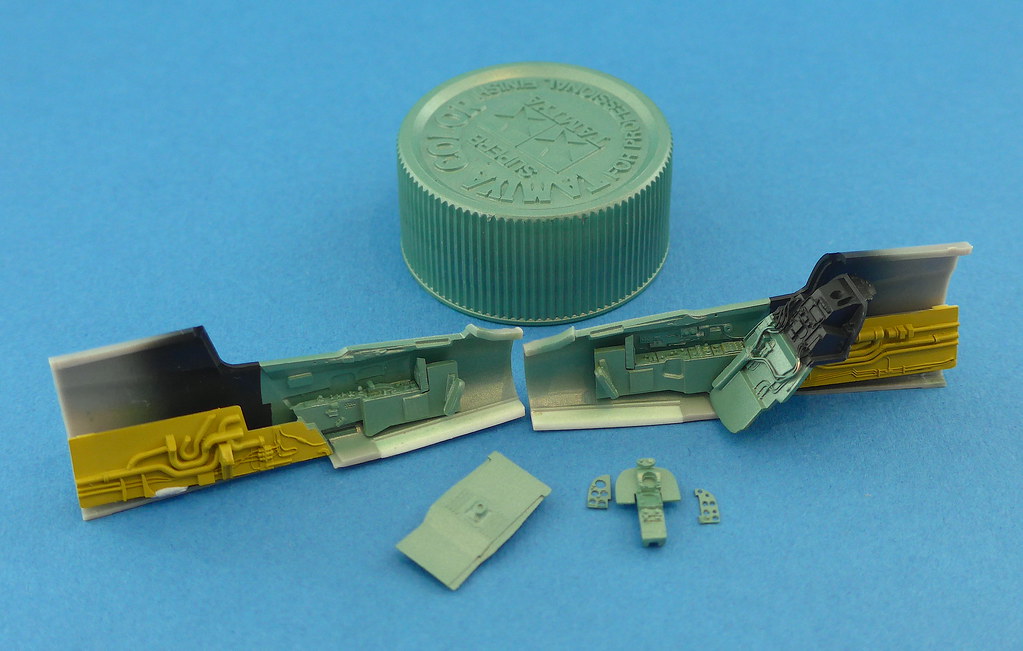
The gear bays in this kit are quite complex for a 1/72 model but the detail in hydraulic lines etc...provided is the best I've seen in this scale, almost too small to paint tbh! You certainly need a very very fine paint brush at hand to do this model justice.
The cockpit parts painted up.
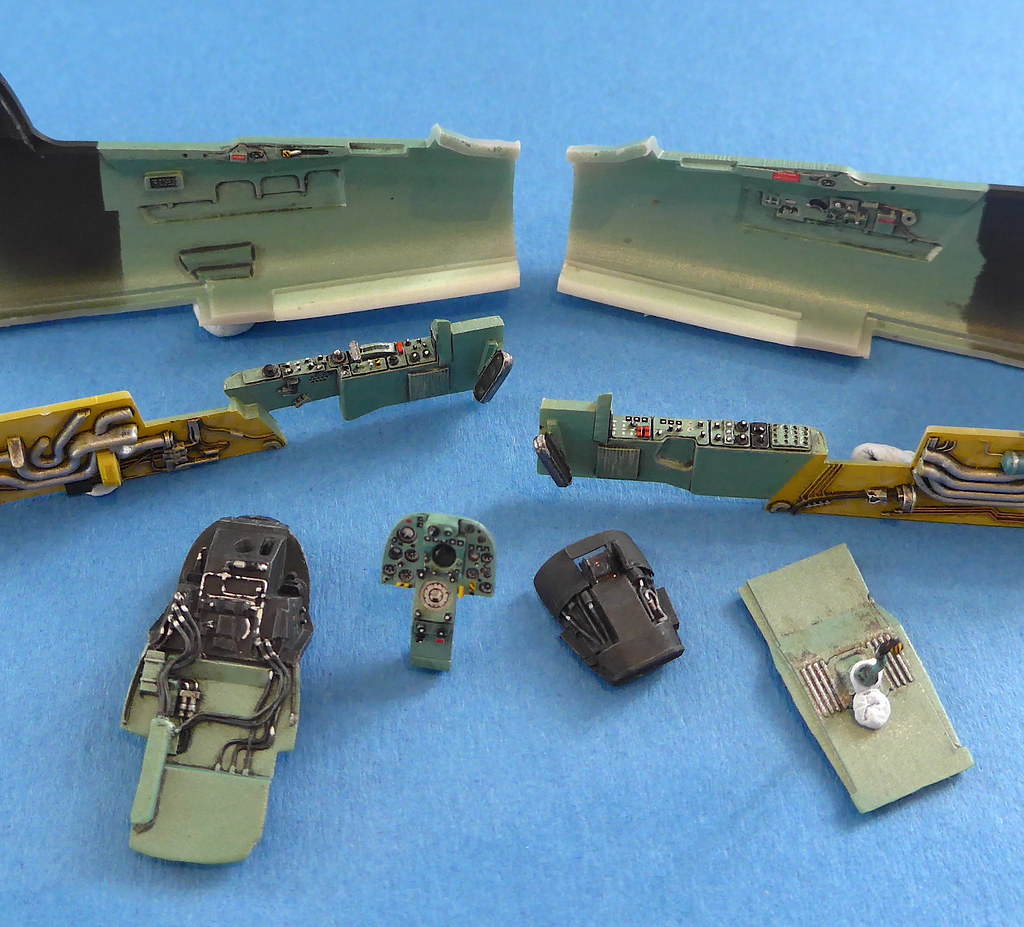

I'm pleased about how the new IP turned out (hence too many photos!), although the close ups don't look so neat in real life I'm really chuffed! The dials were taken from various spare decal sheets.

The 'glass' worked too,
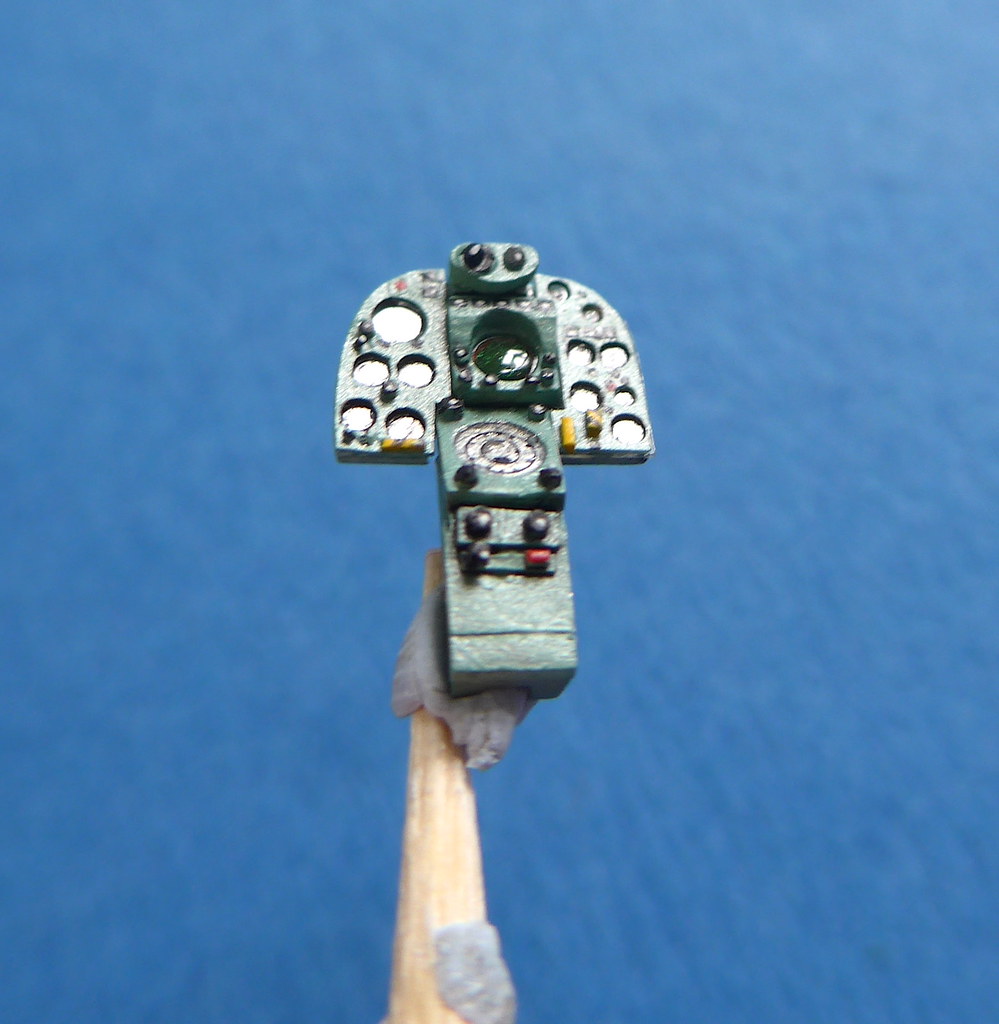
Close enough!
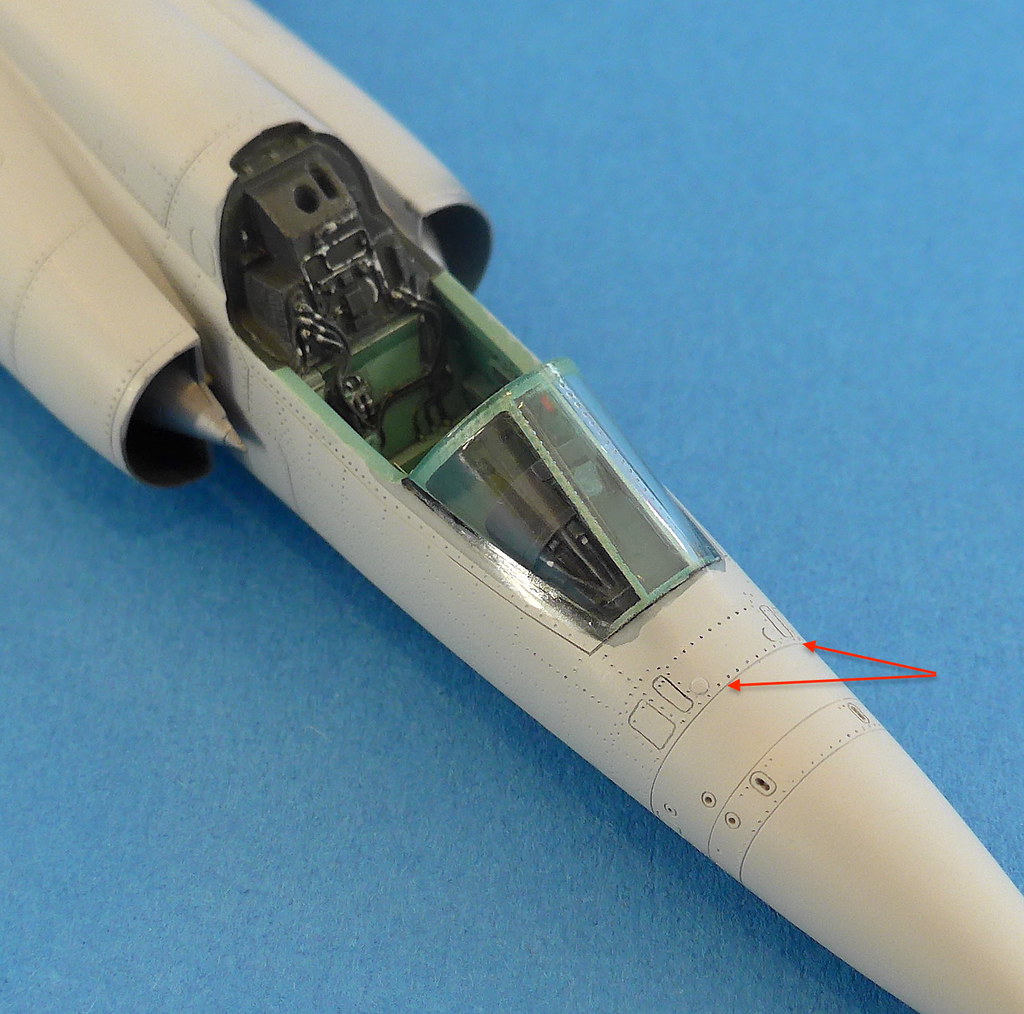
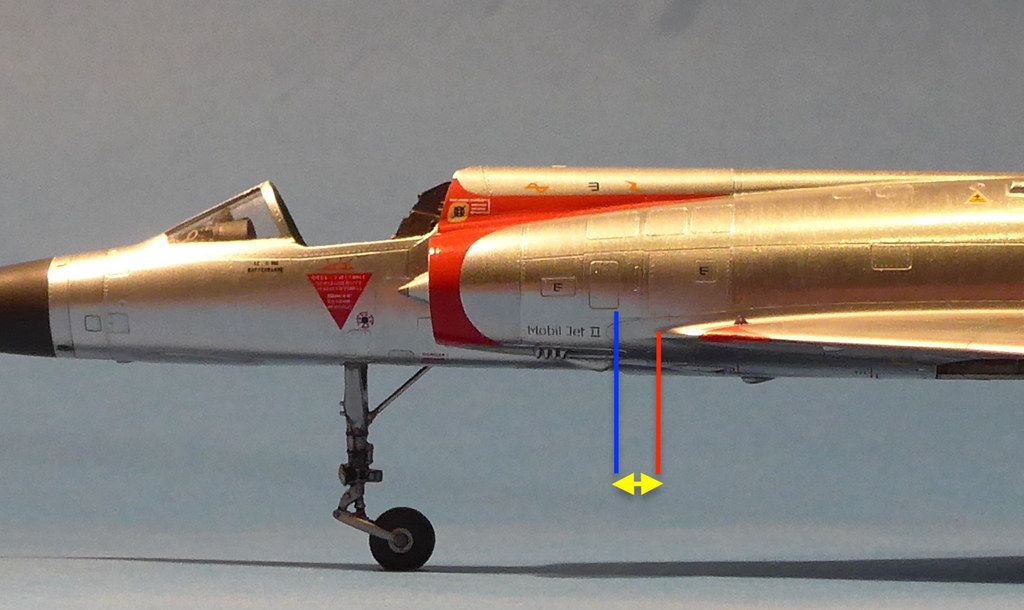
The front gear gear bay extension required the cutting off of some of the lower fuselage, something in the order of the red lines,

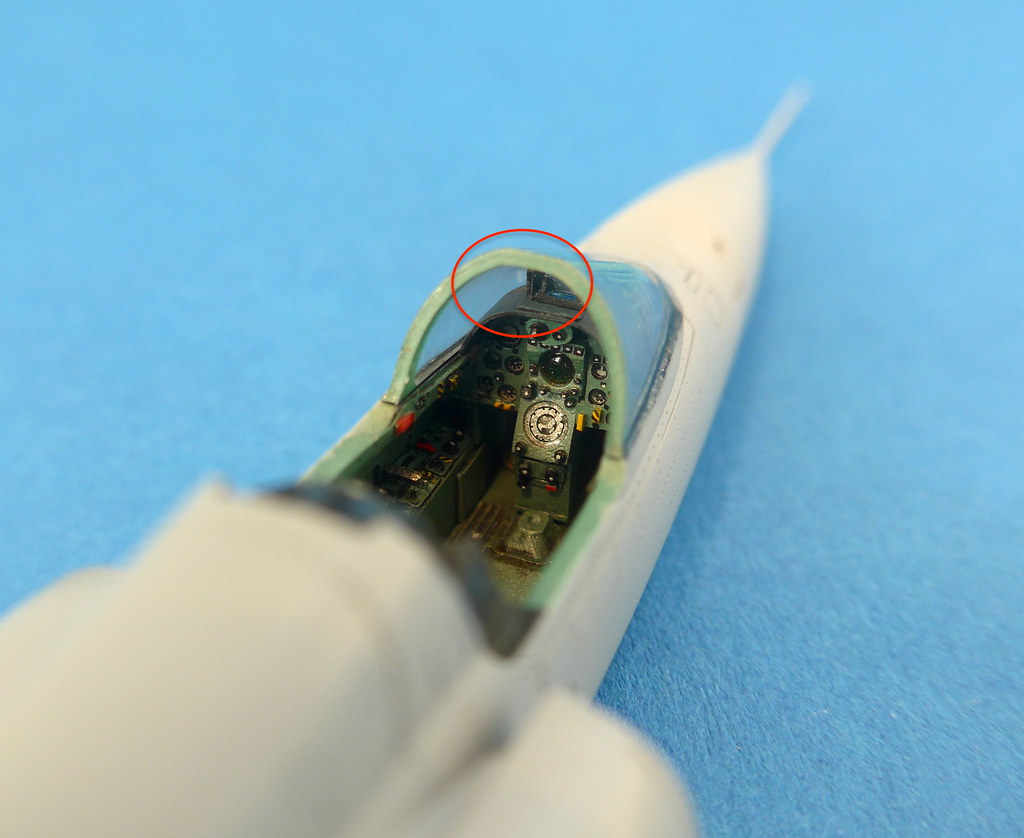
I noticed in a few images the centre panel of the fixed canopy had a blueish tint to it, I assume armoured glass but I"m not certain. It is very subtle however so I just sprayed a single pass of a Tamiya clear blue/green mix. Over a white background is about the only way I could get my camera to pic it up,
Over the dark IP coaming it almost disappears which seems to be the case on the real deal, honestly in the flesh it is very subtle.
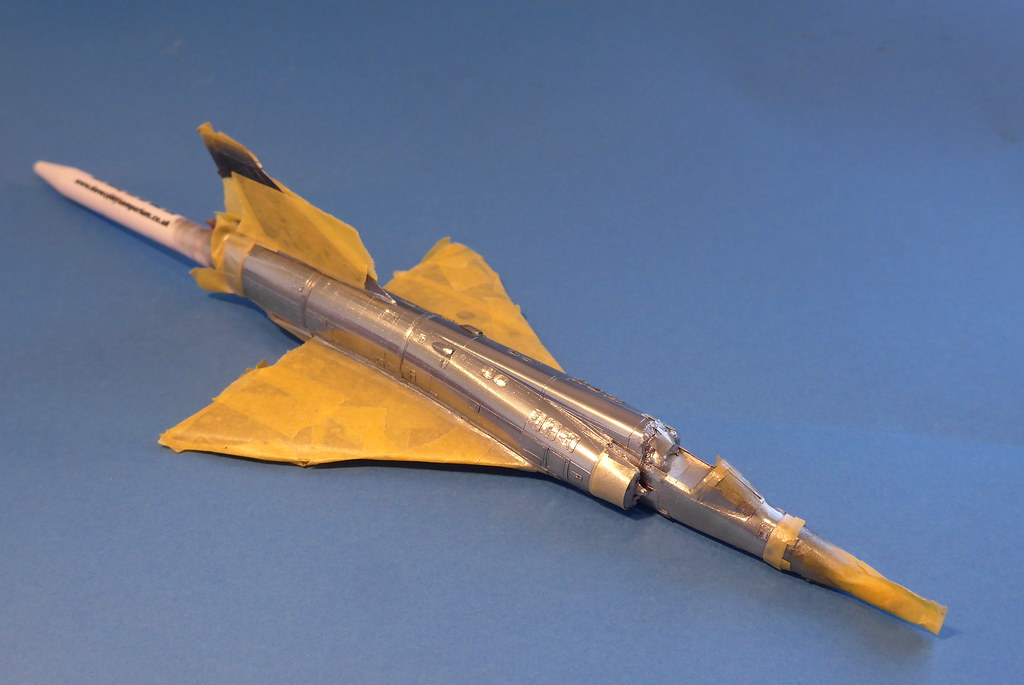
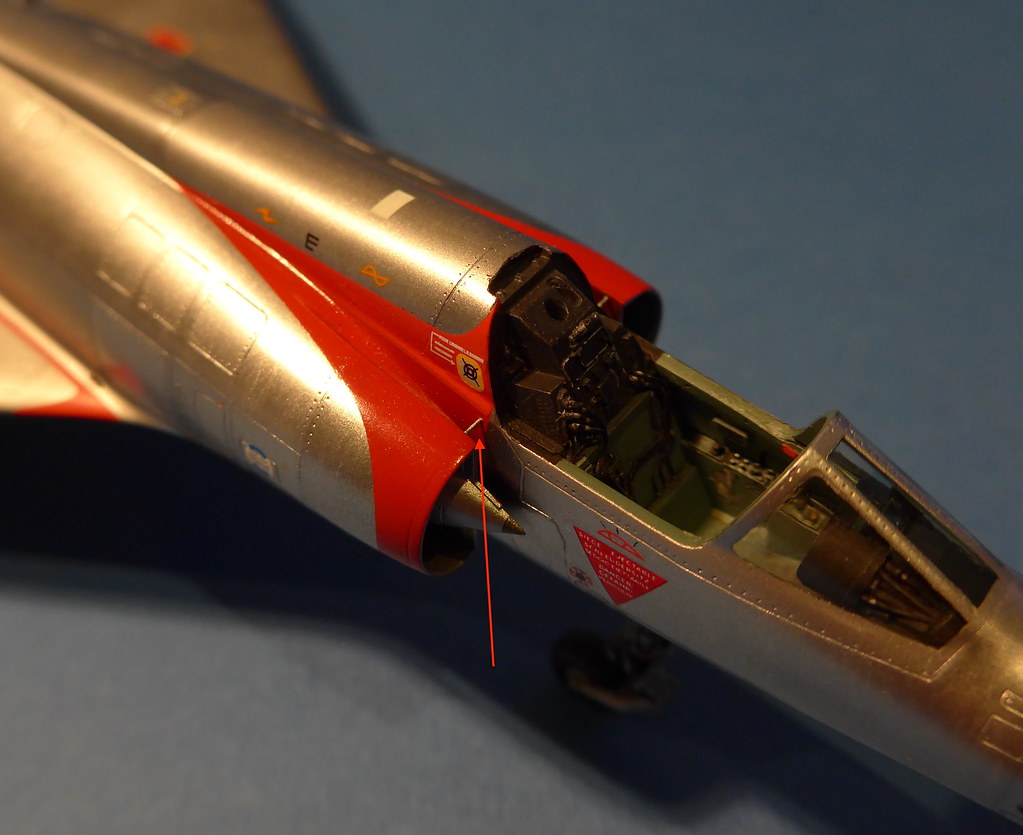
Before closing up the fuselage further I needed to check the Reskit nozzle. It needed a lot of thinning of the rear exhaust area to get it in which was no bad thing as this area is rather thick as done by Modelsvit and a tad out of scale. The Reskit exhaust has a larger diameter than the kit version but also is in a more 'shut off' position (not totally either unfortunately), the Modelsvit exhaust seems to be done in 'full dry power' for whatever reason. It now can simply slide in at the end of the build and is held by friction.
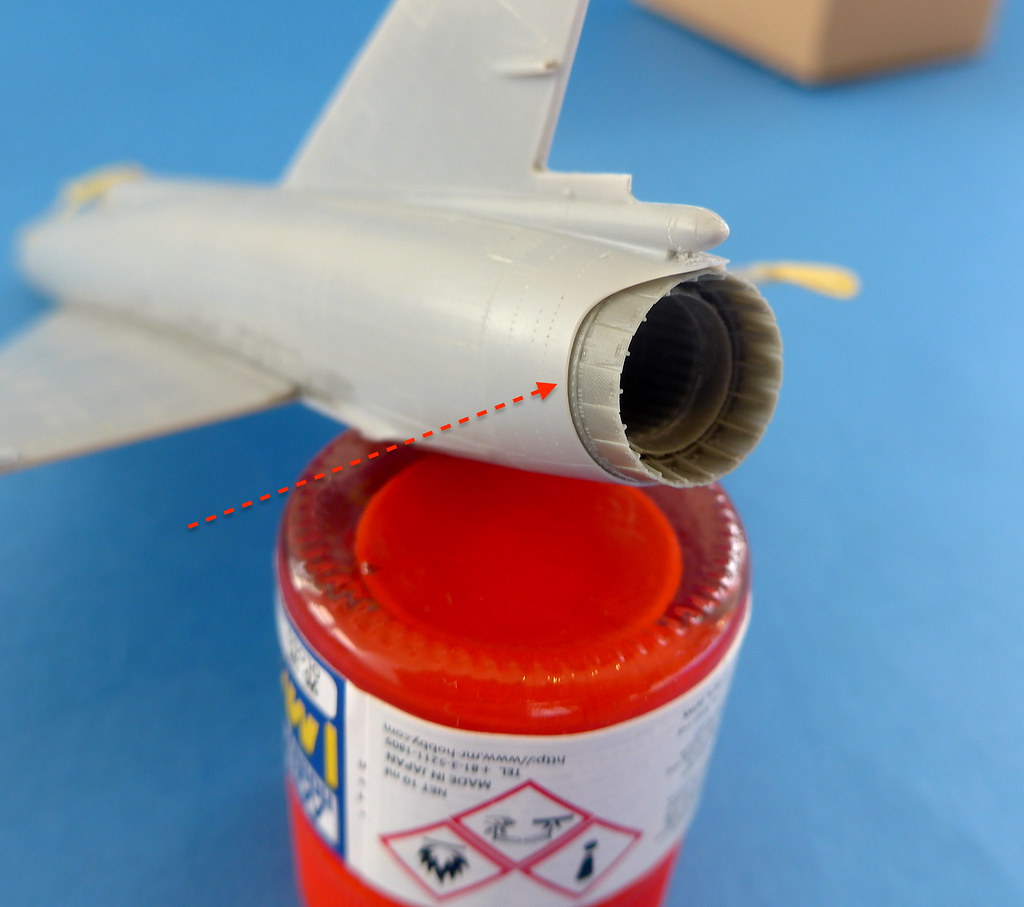
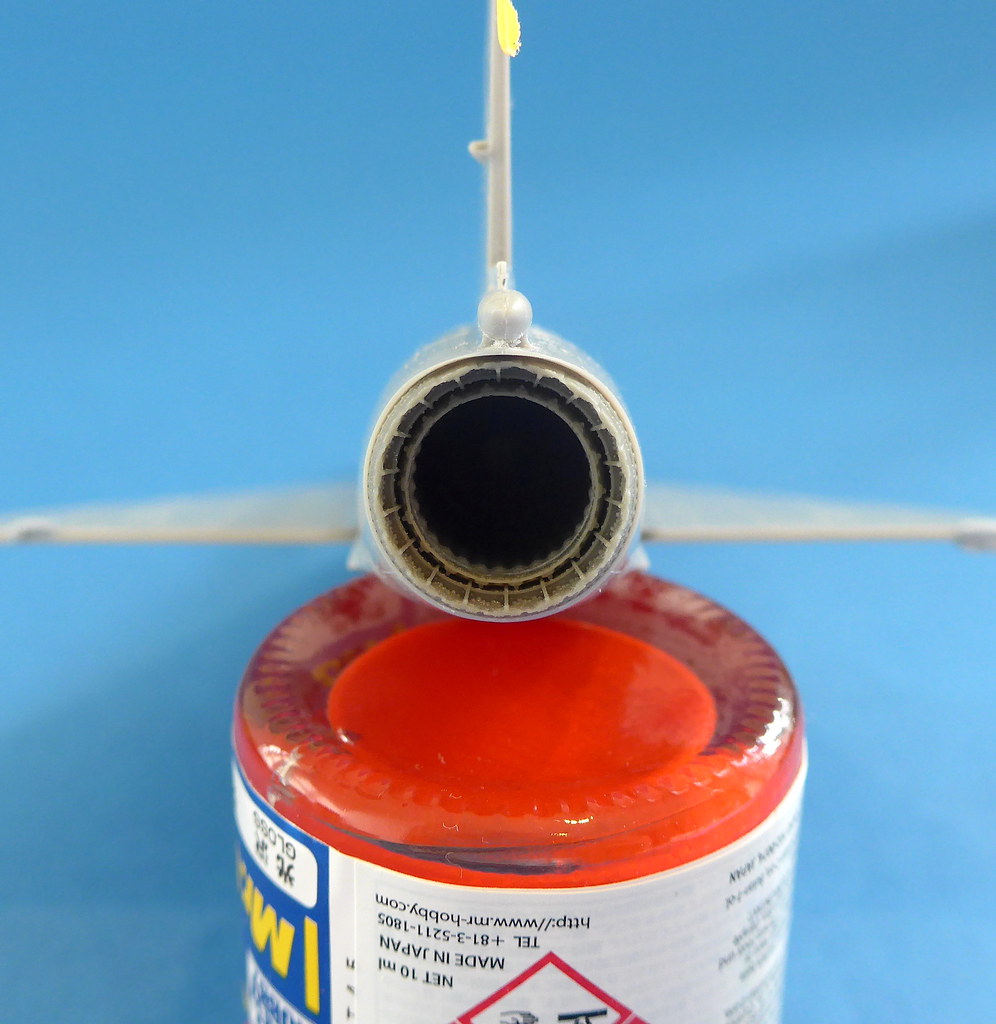
The Reskit exhaust is full length so it needed a mounting plate. The rear turbine face of the supplied Modelsvit exhaust provided a great mount after being hollowed out.

Finally I've been playing around with Alclad testing various things. Below is a pic of two spare tanks sprayed with Polished Aluminium. The tank above primed with Mr.Color gloss black, the bottom with Humbrol 21 enamel. The difference in shine was distinct, the enamel being much superior, almost chrome really. However I then dry brushed a silver over it in order to introduce some texture and graining which reduced the shine somewhat. I'd like to know your guys opinions here, as I'm not sure tbh. Does it look like metal grain or is it a bit messy in this scale? Maybe more testing needed but I have been thinking about using this technique on the main fuselage which is quite shiny, not sure.
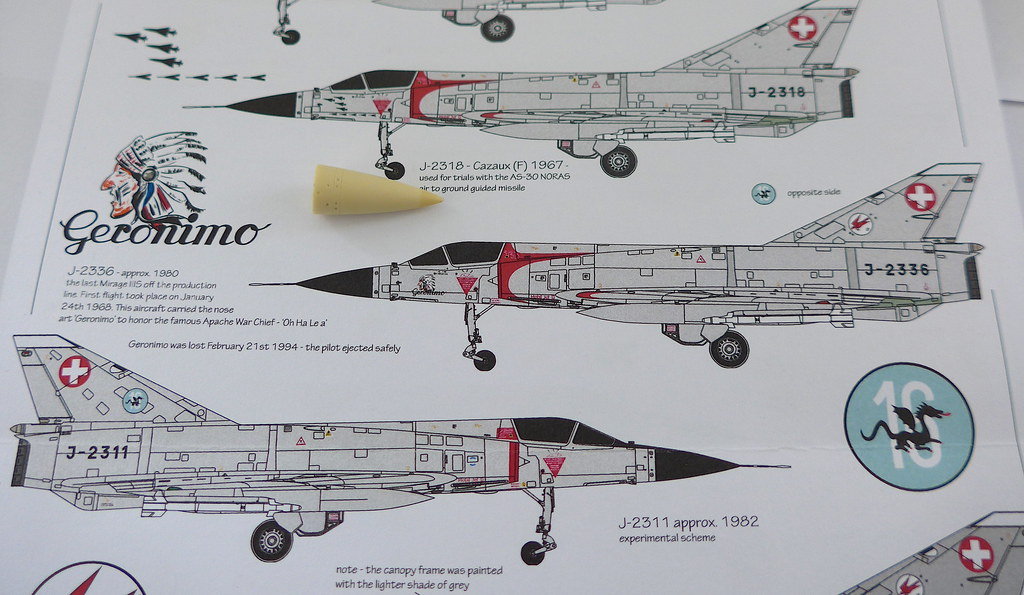
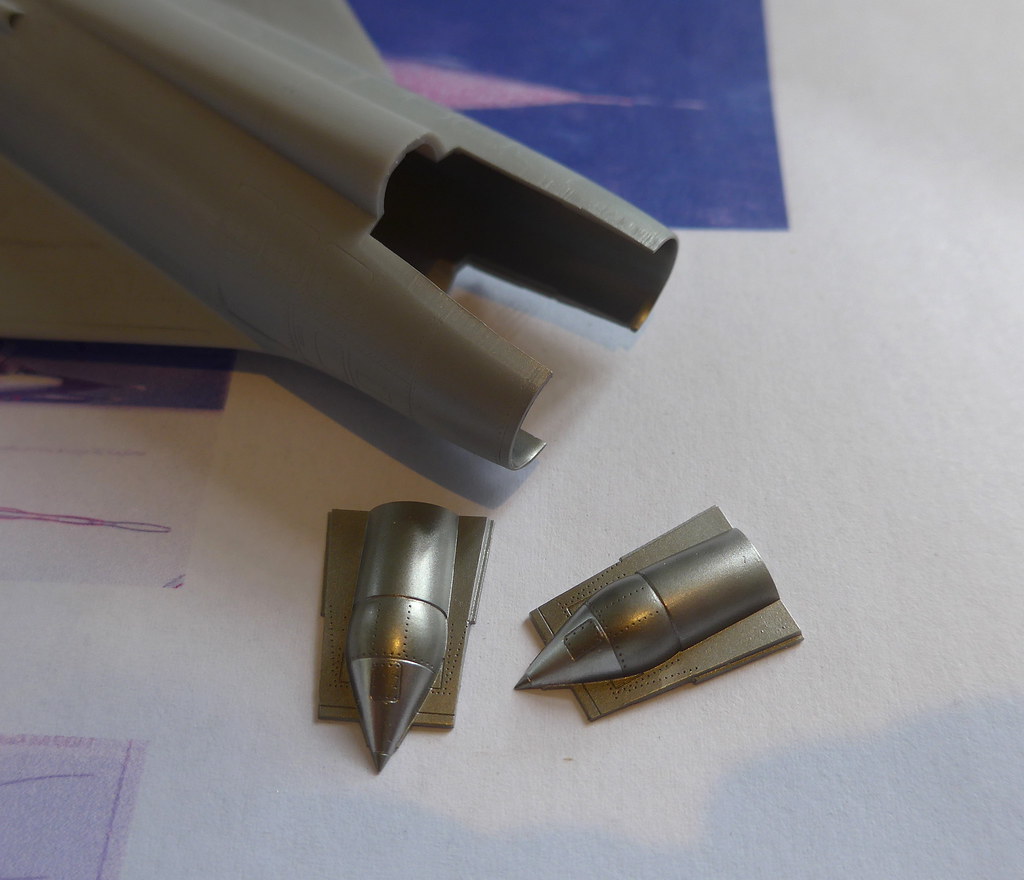
First up, trying to make the PJ IIIS nose fit the Modelsvit kit. I have all the Matterhorn Swiss Mirage decal sets (I really like these Swiss Mirages btw) and in the 1/32 set there are some very nice drawings of the specific Mirage IIIS nose shown below. It is longer than the IIIE variants for the special TARAN radar and is probably the biggest difference in terms of modelling we need to consider.

I scanned and scaled these drawings to the Modelsvit 1/72 kit and compared to see what I had to do. These photos have some camera distortion so must be taken which a pinch of salt how they line up.
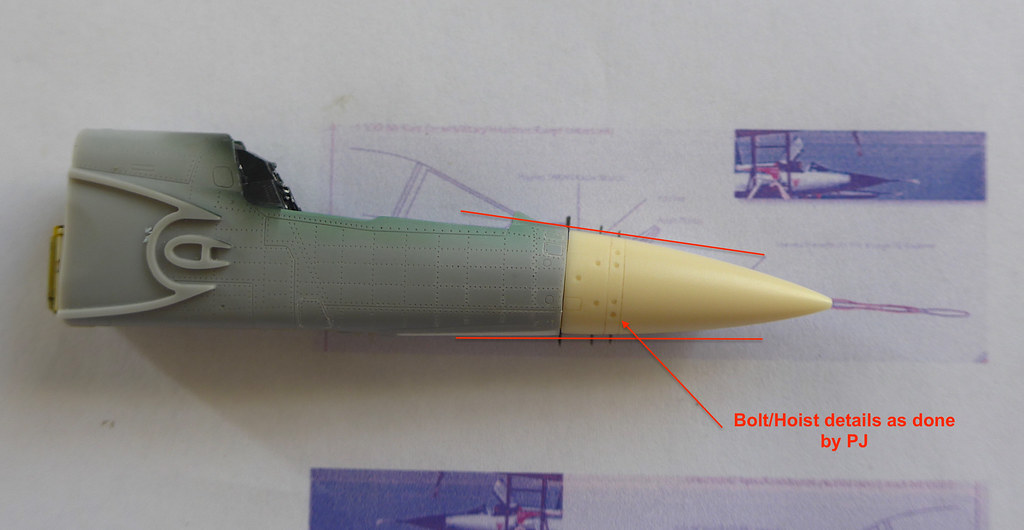
As you can see there is a noticeable profile difference between the kit and the PJ nose, I guess the PJ kit series have a slimmer nose profile than Modelsvit. The real Mirage IIIS has a a nice curvature in the transition between the fuselage, across the nose until the pitot tube. Because of the step shown above and the scribing needed inevitably after sanding I didn't want to use filler here, I'm sure a noticeable 'kink' in profile would have been the result so instead I added a plastic spacer ring to help the transition in profile. Also the nose seemed a little tad short in comparison to the drawings so it helped add a little length.
The radar cone bolt holes, used for folding the cone in the tight Swiss Mountain hangars and the hoist holes were filled with sprue as these were all in the the wrong place now, as well as the panel lines being filled with Zap a gap. I made the fuselage rivets deeper around this area so they would survive the sanding.
After blending and contouring (it took a while, about 4-5 primer check layers) I then re-scribed the panel lines again slightly further rear and drilled all the necessary holes using the Matterhorn drawings and close up images of the details. Some of the scribing needed was beyond my templates so small templates from plasticard were made, they worked quite well tbh but a bit delicate.

This is what I'm going for below, (Image very kindly allowed for use by Robert Schneidier of MC-ONE). From this great thread over on LSP: https://forum.largescaleplanes.com/index.php?/topic/73589-mirage-iiis-swiss-air-force/page/4/
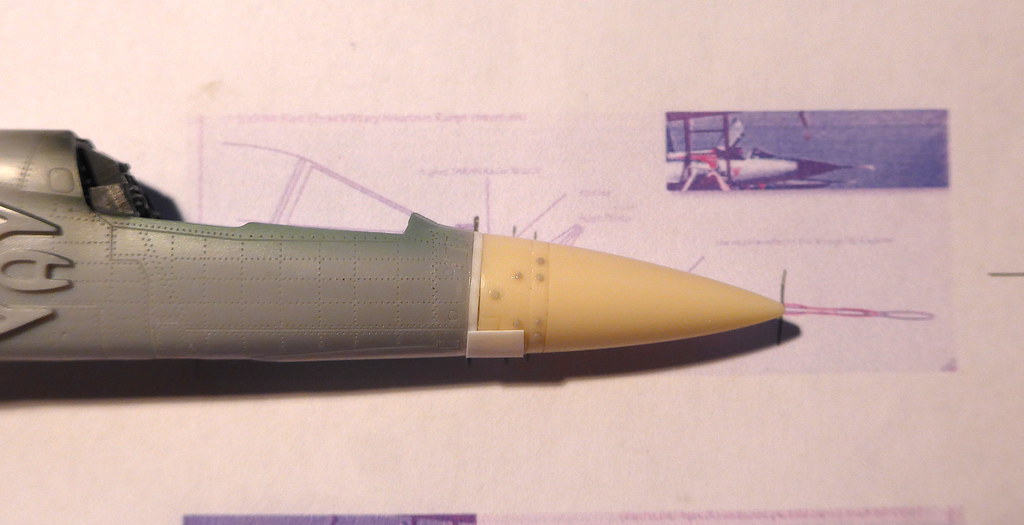
The final nose profile I settled on below,

It is a little too pinched IMO, but this is because I used a Master pitot here which is little thinner than reality. It does give better strength and detail and it is also a little longer matching the drawings better. Also having the Aero48 resin nose for the Kinetic kit at hand helped in getting the right shape.

As the Modelsvit kit is an IIIE OOB with the doppler radar under the forward fuselage, all the details around the very forward underside had to be scratched. After scribing the correct panels, the thin cover over where the doppler radar should go was scaled from dimensions from the Kinetic 1/48 kit and added via plasticard. Foil would have been a good bet here in terms of thickness but the last thing you want with an Alclad paint job is paint flaking off foil and all the headaches that would could come about fixing that.
This was then blended in and further small details added in this area,
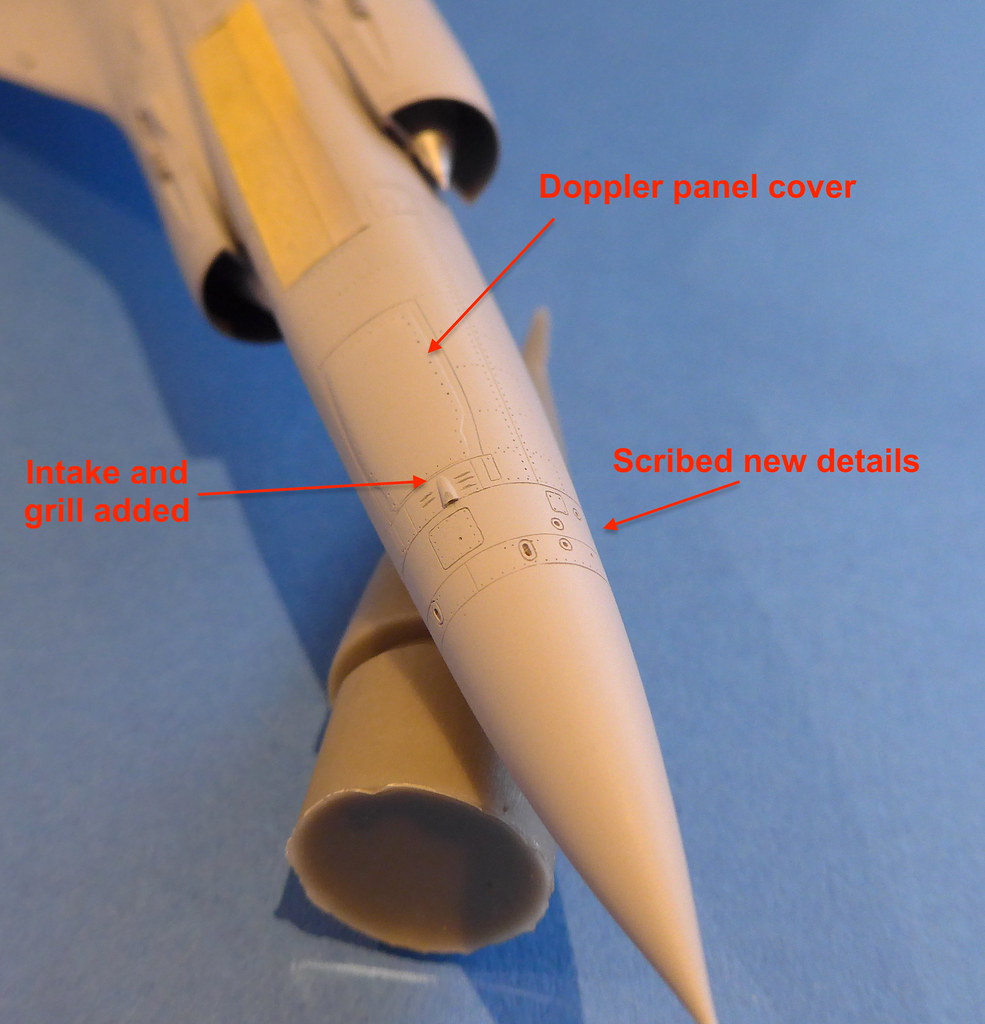
The intakes of the kit have a longitudinal seam line due to the breakdown (and some tooling faults on top) that was a bit annoying to sort out but I got there in the end. The intake shock cones received a few different Alclad shades and then a semi-matt clear layer, even only masking a few panels like this made me realise how much of a masking marathon this NMF will be!
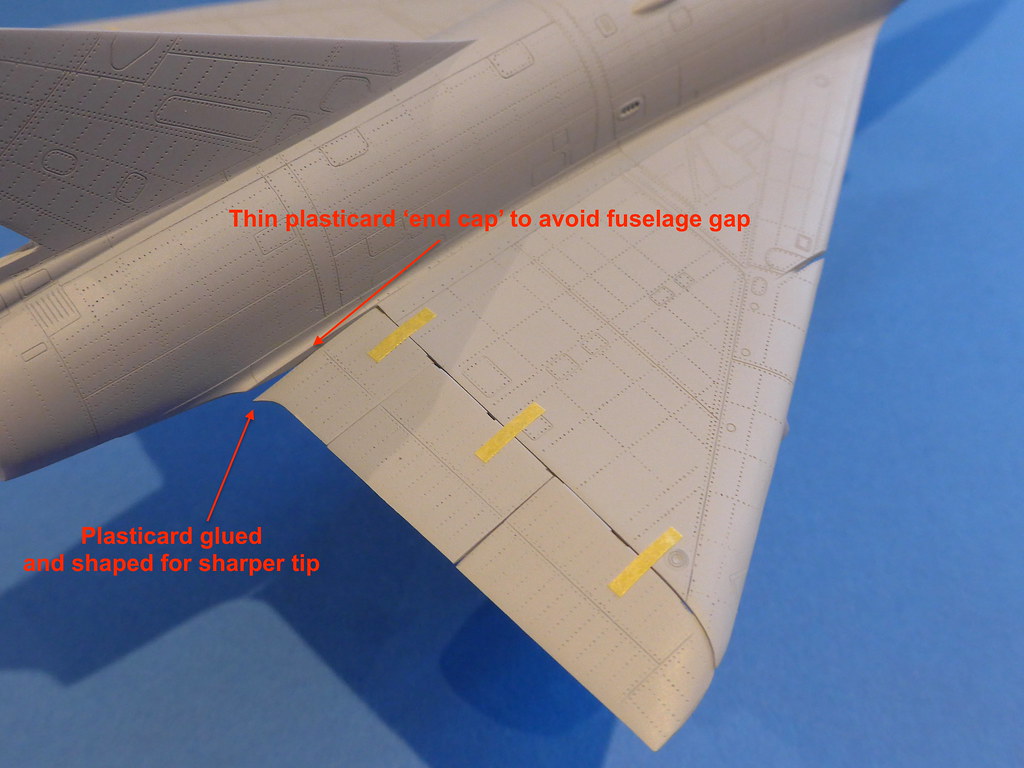
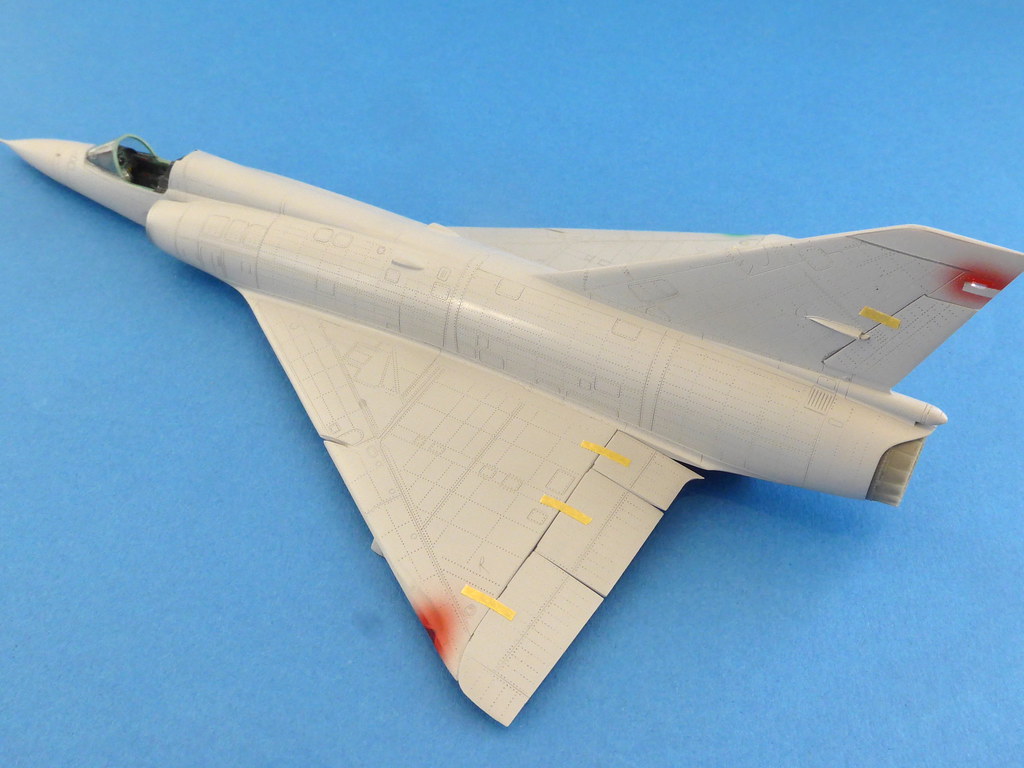
The ailerons and flaps of the IIIS seemed to be slightly dropped most of the time so I set about modifying this. The kit has no provision for dropped surfaces so you need to do plenty of cutting.
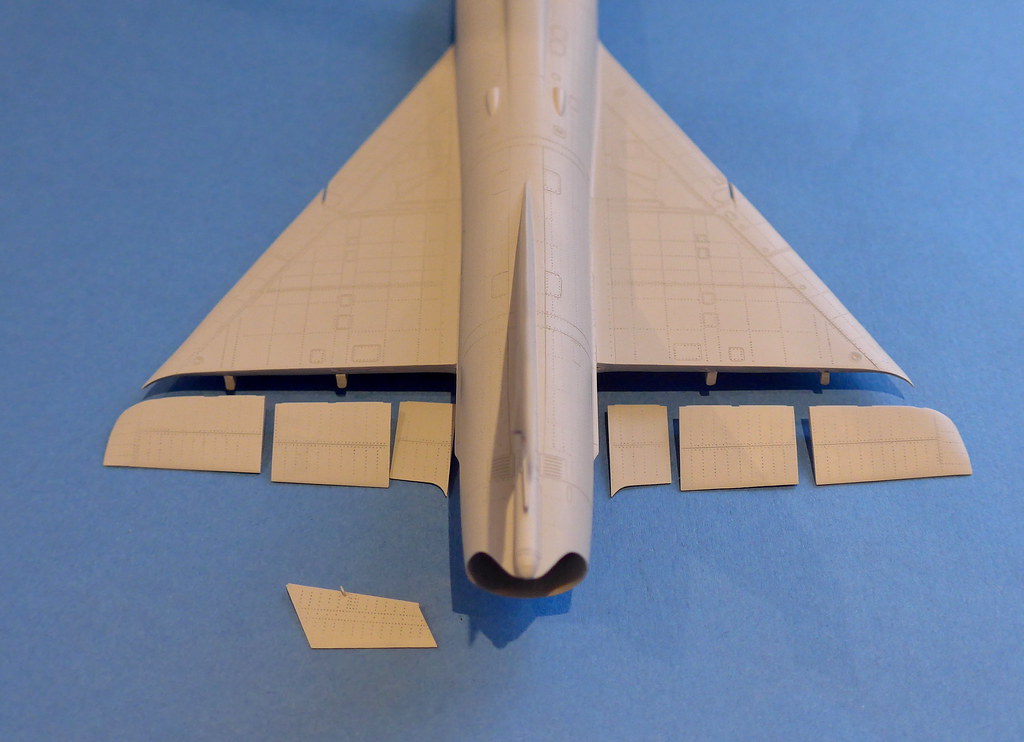
Before this I forgot I added some rivet lines that were missing for some reason on the top panels of the surfaces, to be consistent more than anything. I thinned the trailing edges a little too for scale.

I added a thin strip of plasticard to the front of the dropped surfaces to make up for the 'extra surface' needed when the drop, this was then sanded very carefully so that the surfaces could be butt joined at the correct slightly depressed angle. Trying to do a proper representation of dropped control surfaces here using semi-circular rod was beyond my abilities in this scale as scribing a receptive V-notch into the wing would be very difficult, careful enough sanding I think has given a similar impression. The actuators underneath the wing were cut where appropriate and slightly sanded to the correct angle to facilitate the drop.
Finally some little hinge slots were cut into the hinge line that are quite noticeable on the real jet, see this image: http://master194.com/photo_avion/mirage3-suisse/pages/fuselage-details08_jpg.htm

The result. They are roughly lined up here and I'll glue them at the end because the inner flap is very delicate.
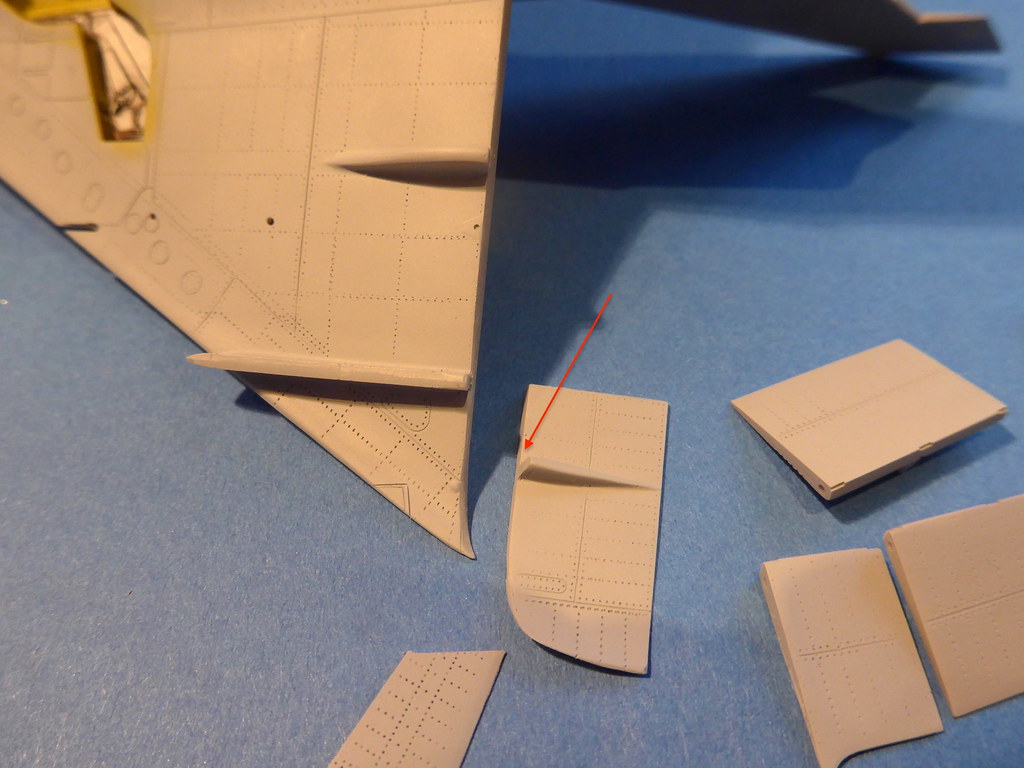
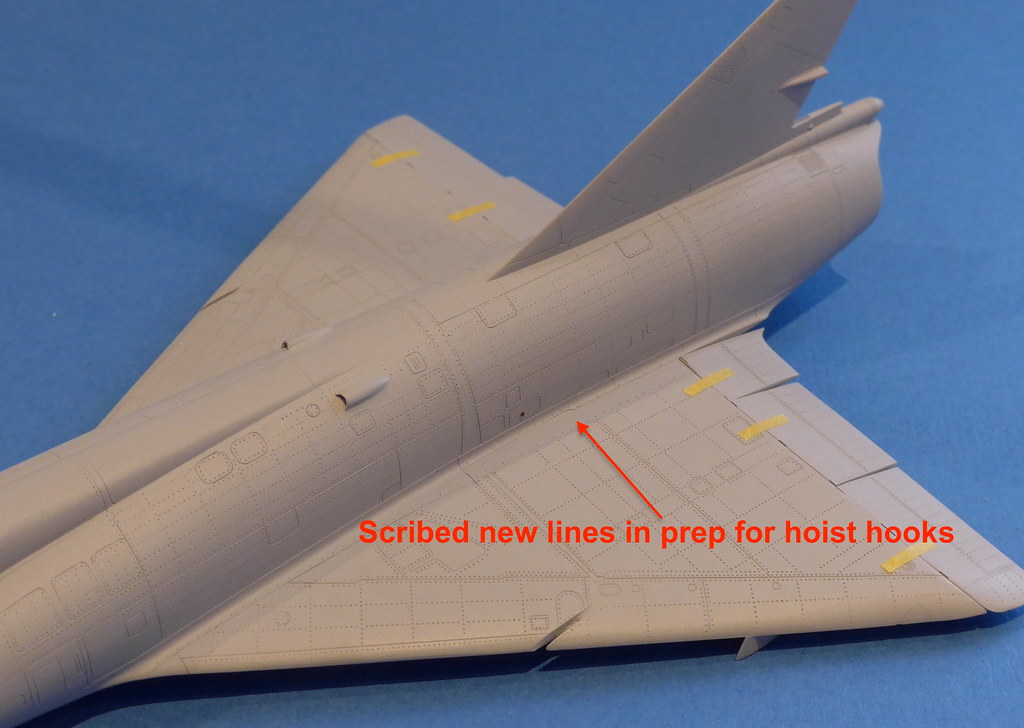
The Mirage IIIS and IIIRS had four hoist hooks located at the wing root for manoeuvring inside the mountain hangars and the panels around the wing root had to be scribed slightly different here, I haven't added them yet however to avoid damage.
I did a little work on the fuel tanks, namely filling in the lines as they were a bit clunky compared to the rest of the kit, re-scribing these finer and sharpening the tips, they are super pointy!

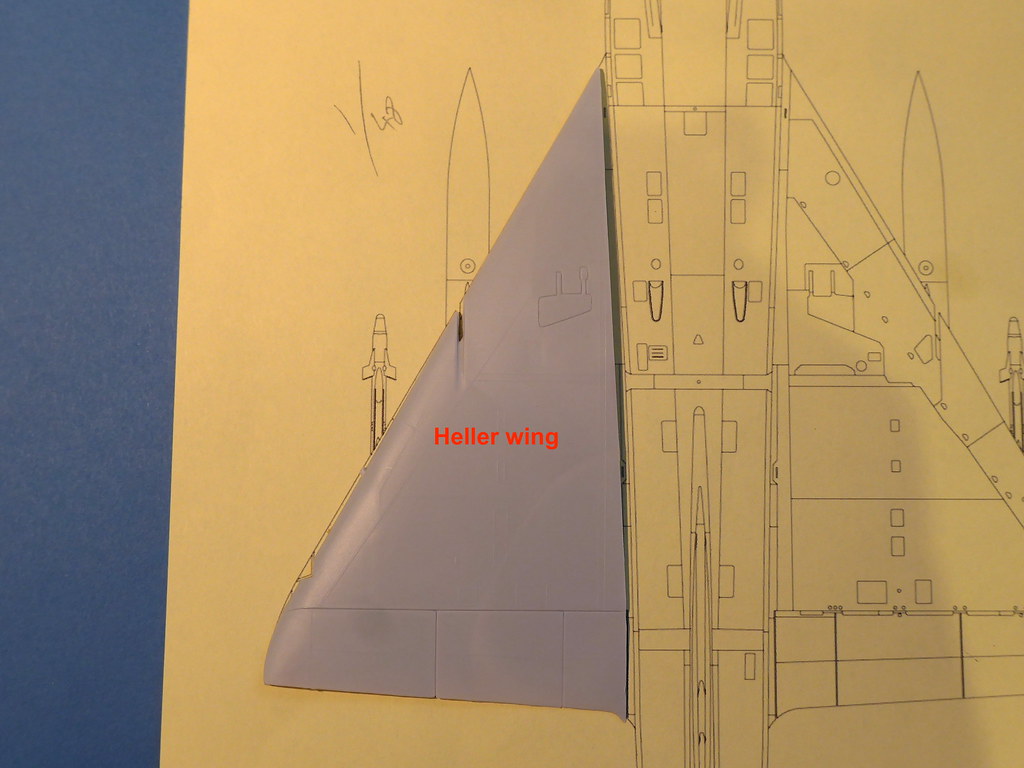
After joining the forward fuselage to rear fuselage/wing assembly something seemed a little 'off' with the shape. I compared the kit to some reputably accurate drawings and I think found the wing sweep is not quite sharp enough, making the wing join at the forward root a little too far back thus making the intake area a little too extended,

Maybe it was the drawings? I then scaled the drawings and compared to the Heller and Kinetic 1/48 wings. The Heller wing was almost a perfect match with a sharper sweep than Modelsvit.
The Kinetic wing has the same sweep as Heller but a smaller span and inner flap width,
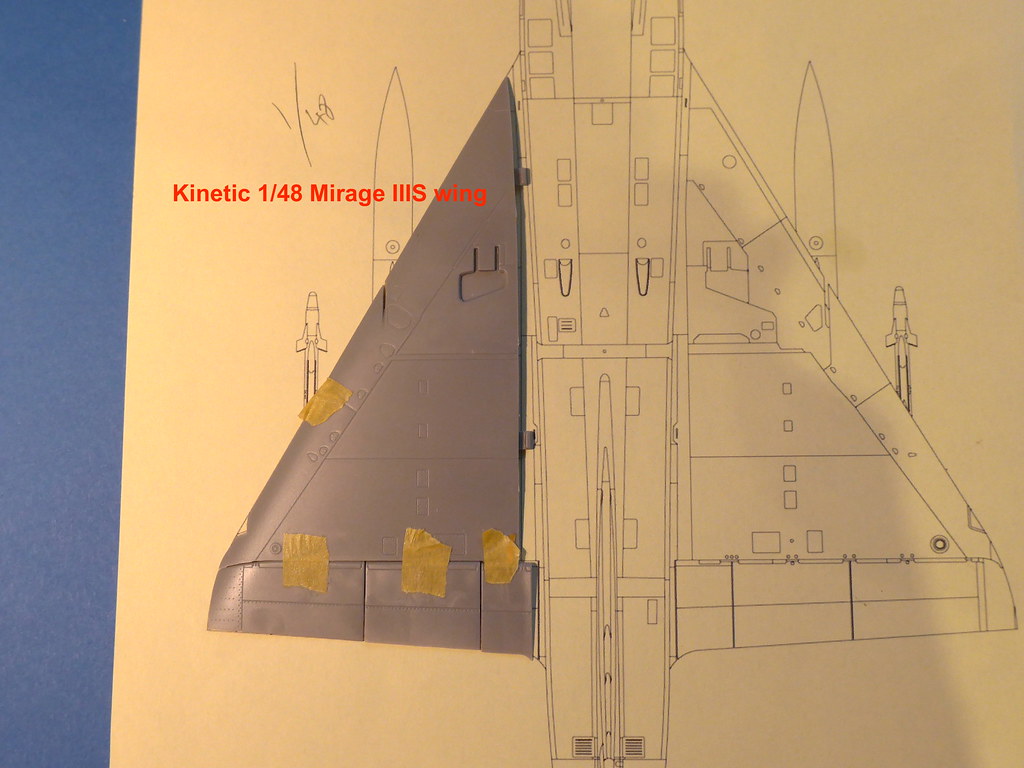

Given the other two kits match up and just looking by eye there is something. We are not talking major shape errors here but little discrepancies for sure, the Modelsvit wing problem isn't so obvious with casual looking but imho it isn't quite right. I think the Heller 1/48 Mirage IIIC/B kit, whilst old, it still the best representation of the subtle curvature of the Mirage III in 1/48 with the best 'coke bottle' area ruling of the fuselage and wing camber.
The upper surfaces of the Mirage IIIS wings had slightly different panel construction compared to the Mirage IIIE but I will not modify it in this scale, as I said before on this kit when you start sanding anywhere replacing the surrounding rivets and details is very difficult and I do not want to make lots more work for myself tbh!
Off topic for this thread but I did the basic cuts for a kit-bash from the best parts of the Heller kit (fuselage and wings) and the best/necessary parts of the Kinetic (ATAR-C exhaust, fin, forward fuselage, ventral tank etc...). This will be another Mirage IIIS using the Aero48 upgrades and Matterhorn decals but for another day, the parts fitted really well!
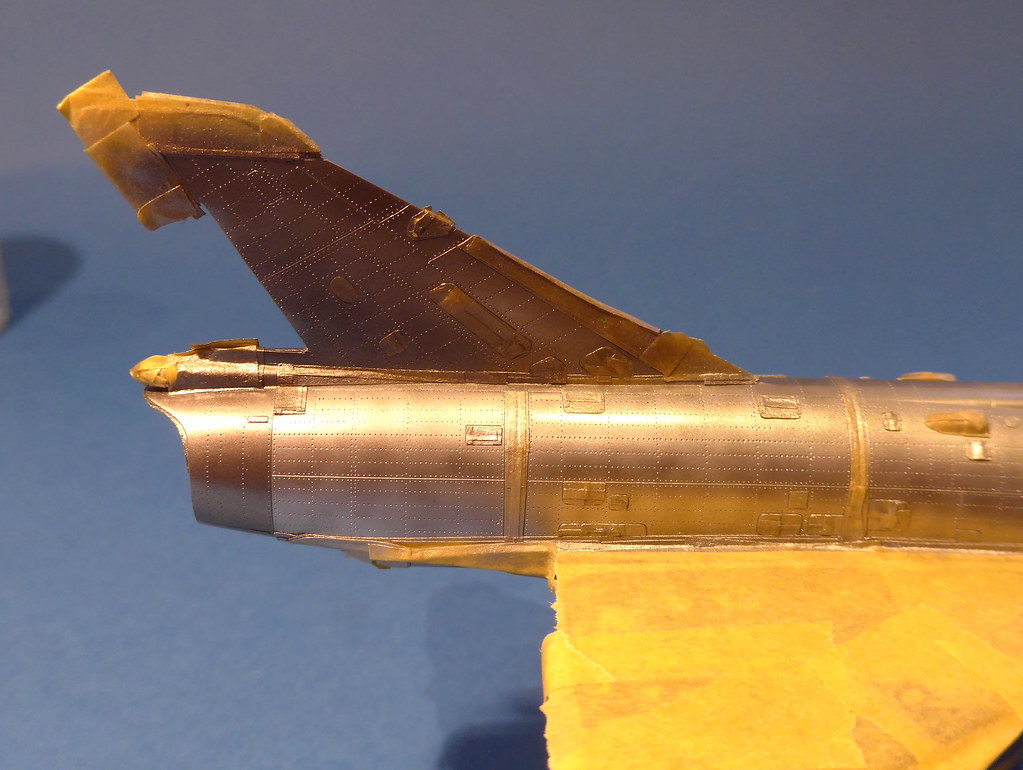
Back to model making I cut off the rudder, thinned the trailing edge, sanded the visible slots above and below and added a bit of actuator detail,
A general shot,
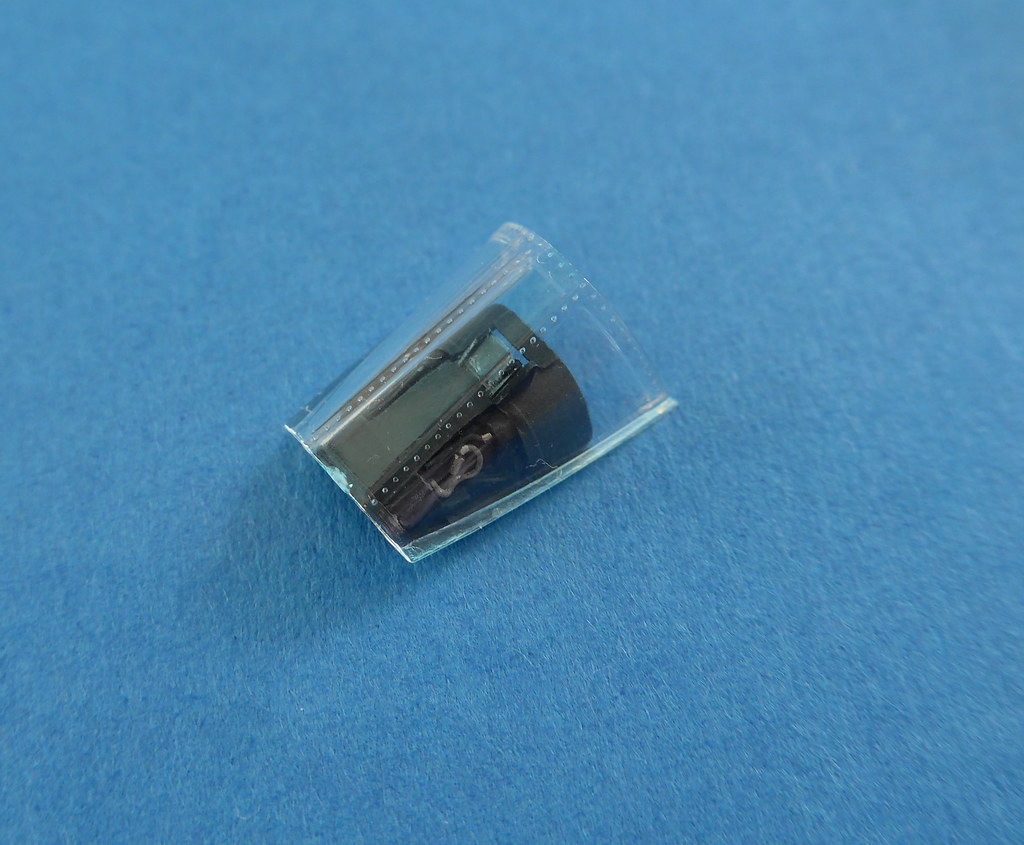
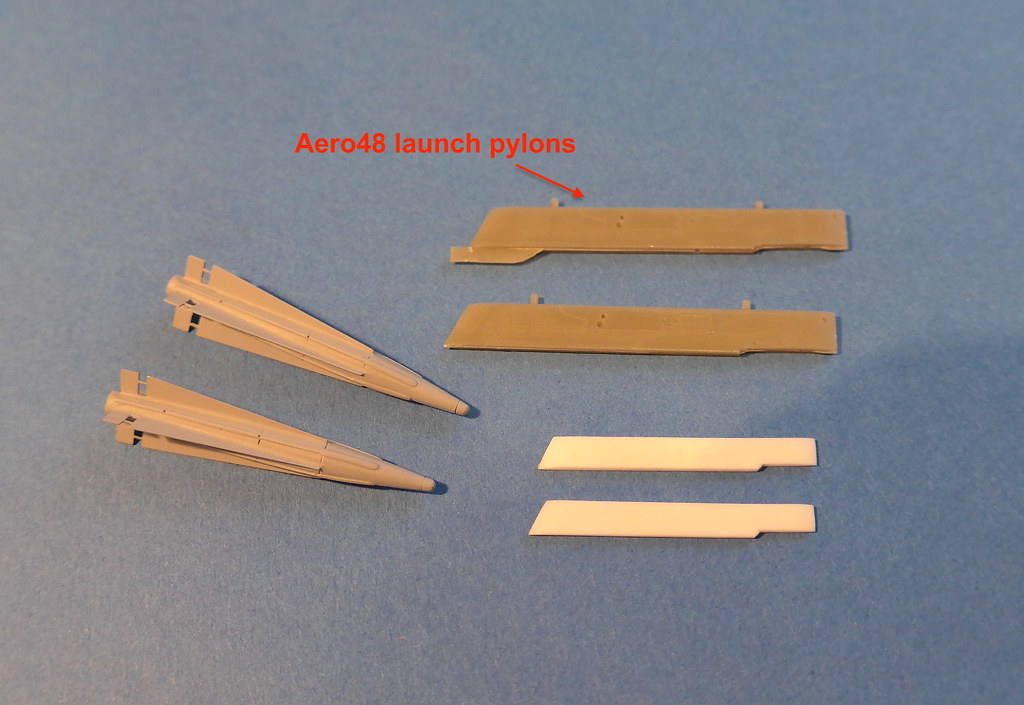
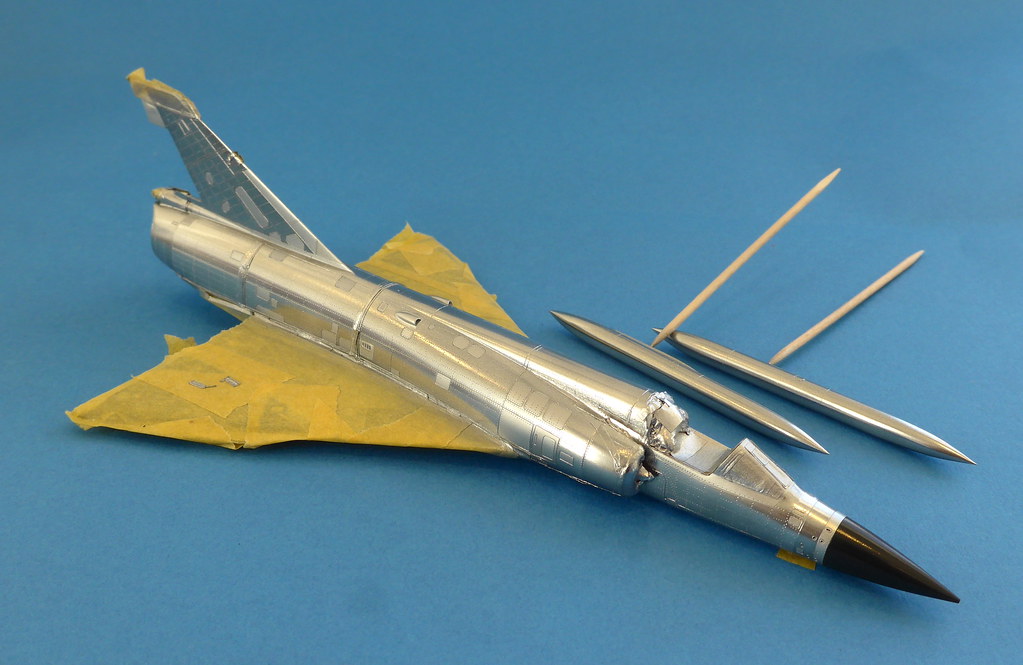
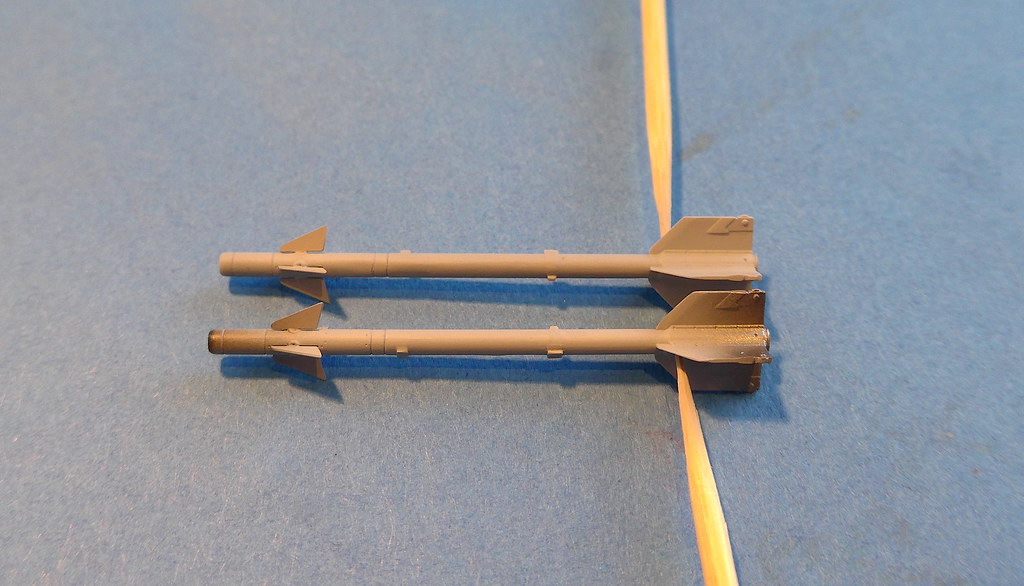
I've been working on the Maestro HM-55 missiles on and off for a while. They are not overly accurate but will have to do, the fins did not fit so well either and required 3 filling and sanding/priming attempts, this was very tricky sanding the cyano glue around very soft resin and thin etch tbh in this scale but mostly there now. They need some details adding like the launch lugs and how they adapt to the launch pylons. Speaking of which I used the Aero48 1/48 scale resin ones to take dimensions and make some 1/72 plasticard versions. They are just basic shapes at the moment and need panel details added.
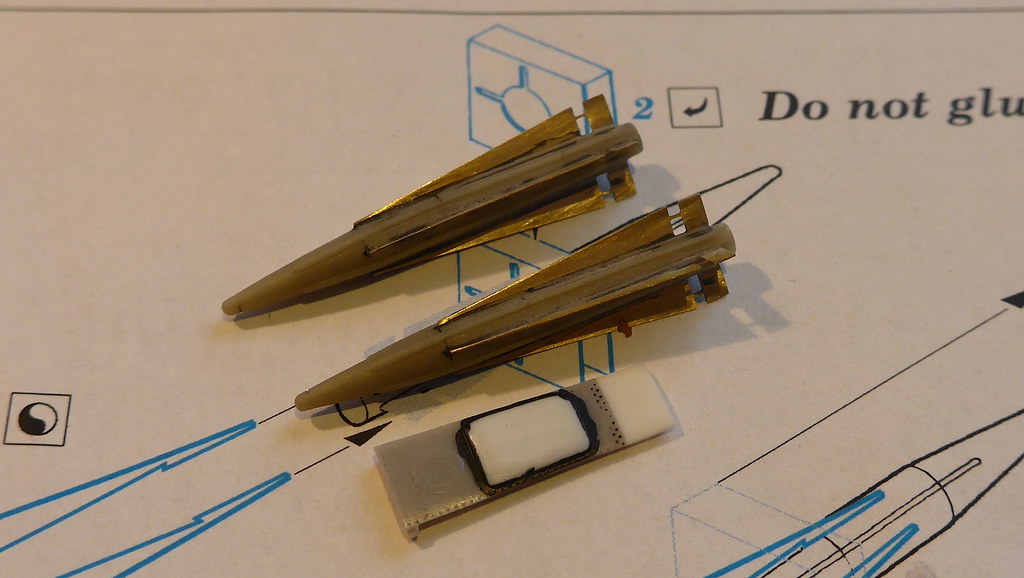
They will go on like so,

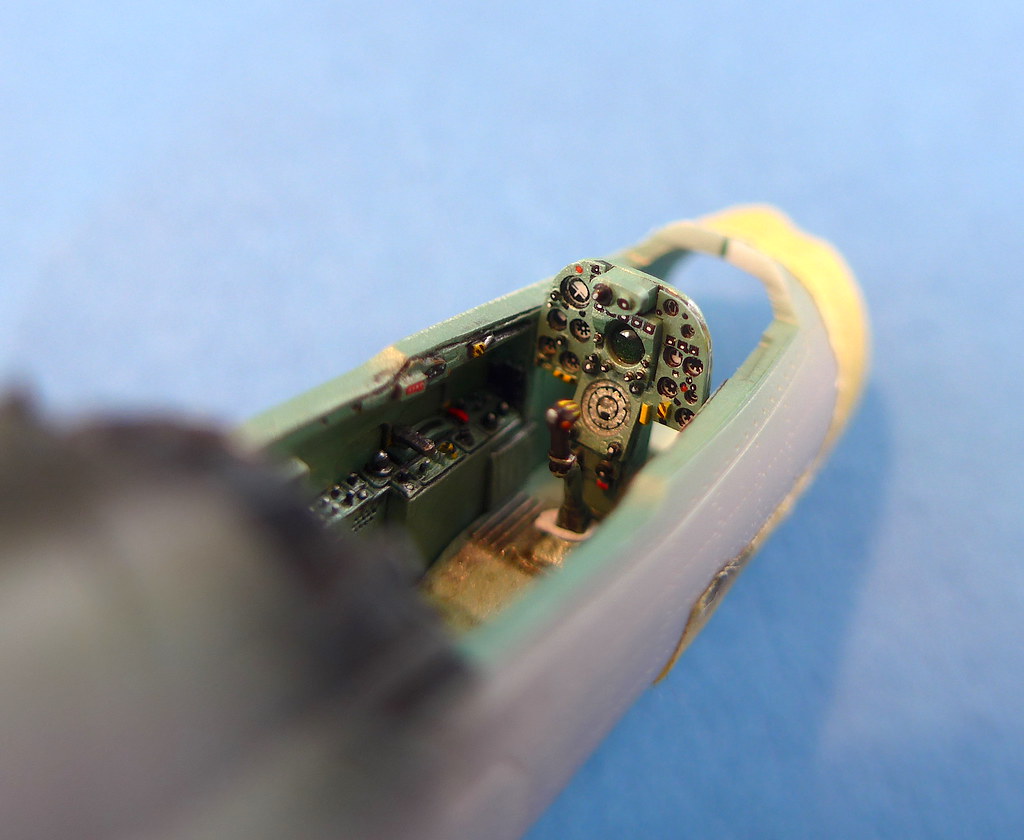
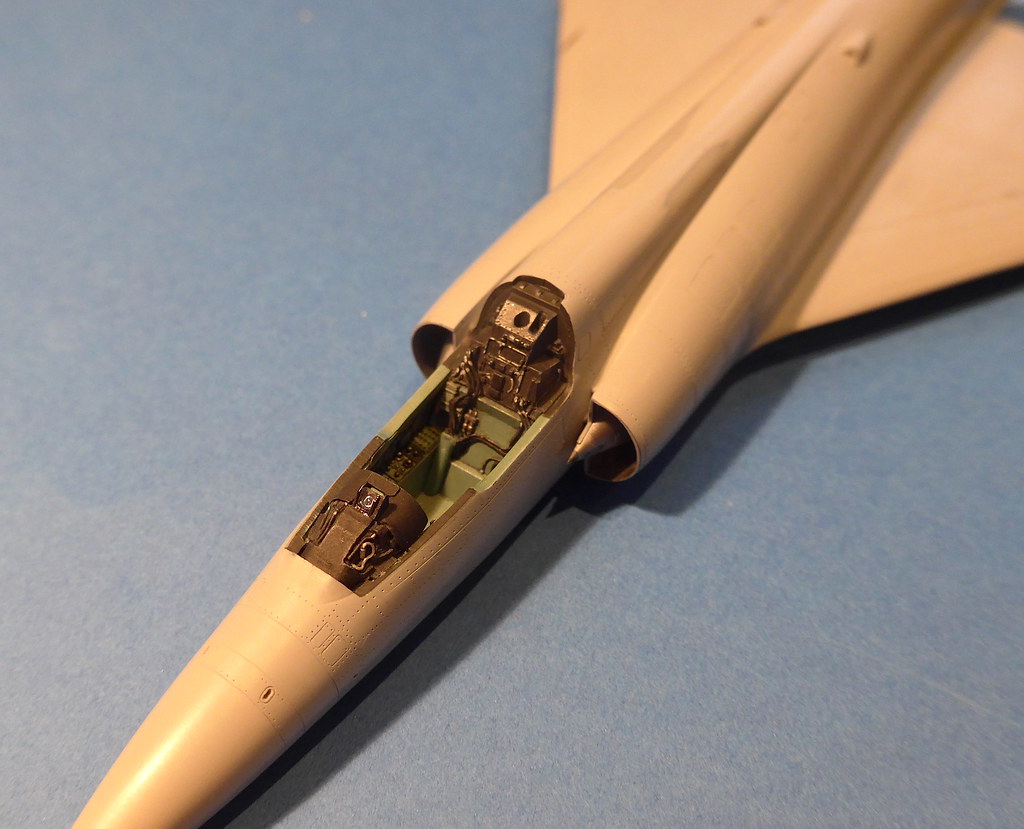
The cockpit IP and cover glued in, looks nice and snug in there.

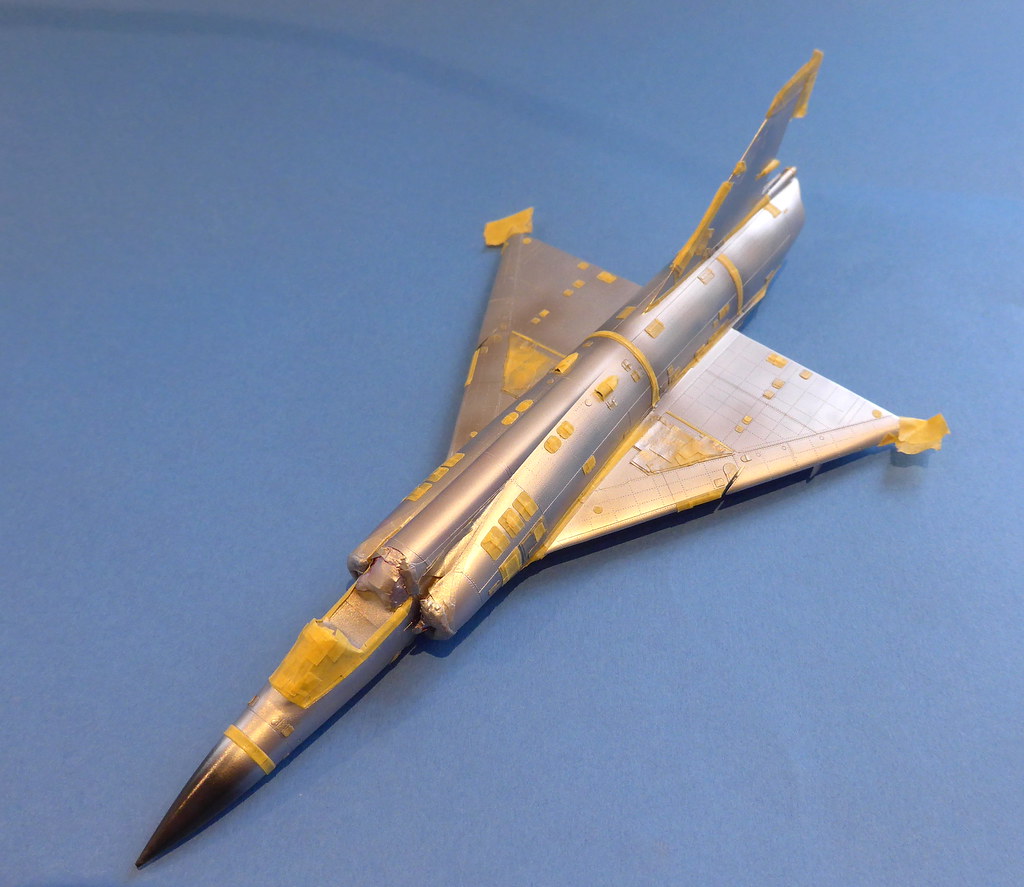
I've polished up the Mr.Surfacer primer, washed the model and it is now ready for the final front canopy part to be added and blended in, then I think I can get on with applying some paint. Masking this should be a ball!
The Modelsvit canopy fitted pretty well but I wasn't sure if it would look the part under a NMF and went ahead blending it in. The downside is there is next to no wiggle room in sanding the fames so I lost a little framing near the front, I'm hopping though to apply a few more layers of Mr.Surfacer primer near the front to build up a bit of frame, I'm not sure it will work we will see.
After sanding and polishing I brushed on a layer of Klear to help bring it back. I added the two little disc antennae mounts forward of the canopy which Modesvit has supplied some tiny etch ariels to go on.
There should be some more little details for the cockpit frame like the compass to go here but after the painting,
The various lights have been sprayed with Tamiya red/green clear so now I think ready for paint.
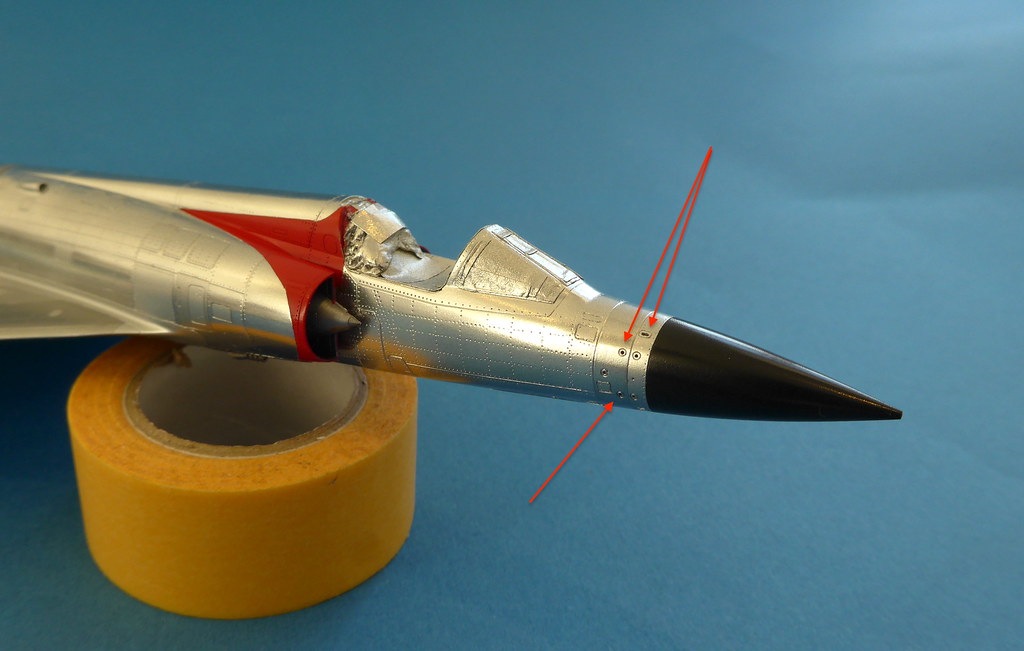
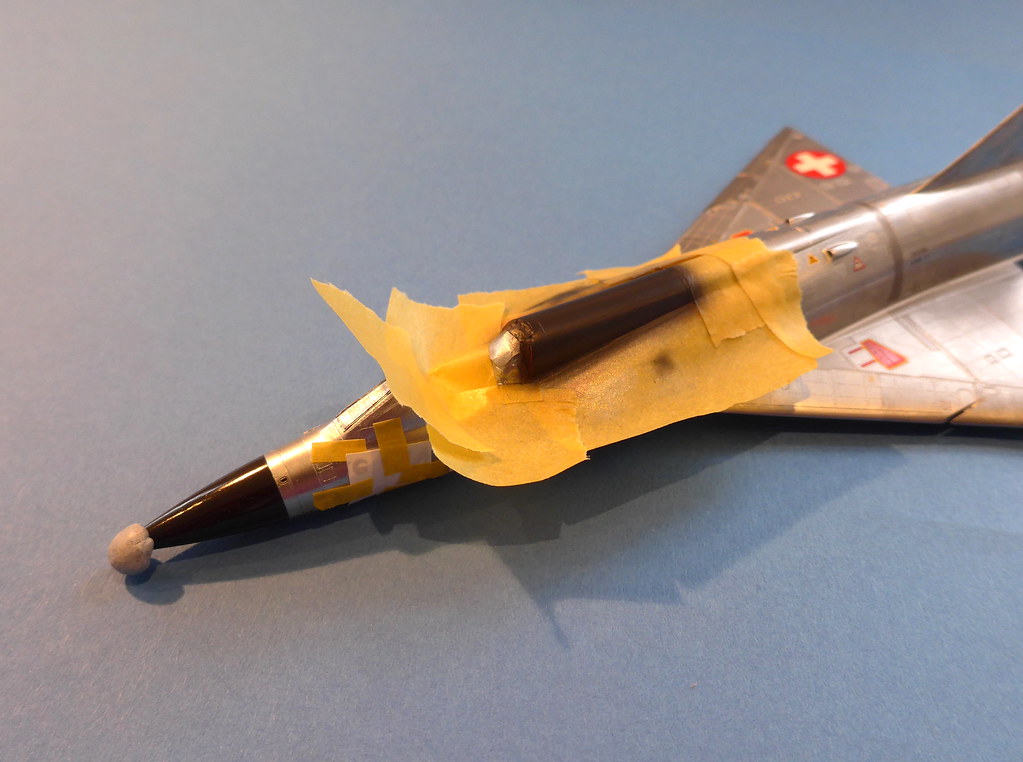
I usually break off my Master pitot probe at least once during a build and well no exceptions here
I'd inevitably do it again with all the masking needs for the paint job so instead I decided to cut off the tip of the Modelsvit IIIE nose to rebuild the tip and use the kit pitot ( the diameter is more true to the real thing after all) that I will simply glue on at the end.
I ended up combining the Master tip and kit pitot (still needs a bit of blending) to get the best of both worlds.

I've been looking forward to the painting as I've not really had a proper bash at a NMF before using Alclads. Looking at photos of the early Mirage IIIS deliveries the fuselage area and vertical fin seem to be relatively shiney, check out the reflection of the wing in the vertical fin in the photo below (Linked from this mc-one thread: https://forum.largescaleplanes.com/index.php?/topic/73589-mirage-iiis-swiss-air-force/page/5/)
The only Alclad paints that can really do this imho are the 'High shine' ones, my favourite for this is 'Highly Polished Aluminium.' This paint however is quite fragile (I've done quite a bit of testing) and masking over it seems touch and go, because of this I will paint these bits last and do all the other various painting first in order to avoid masking it.
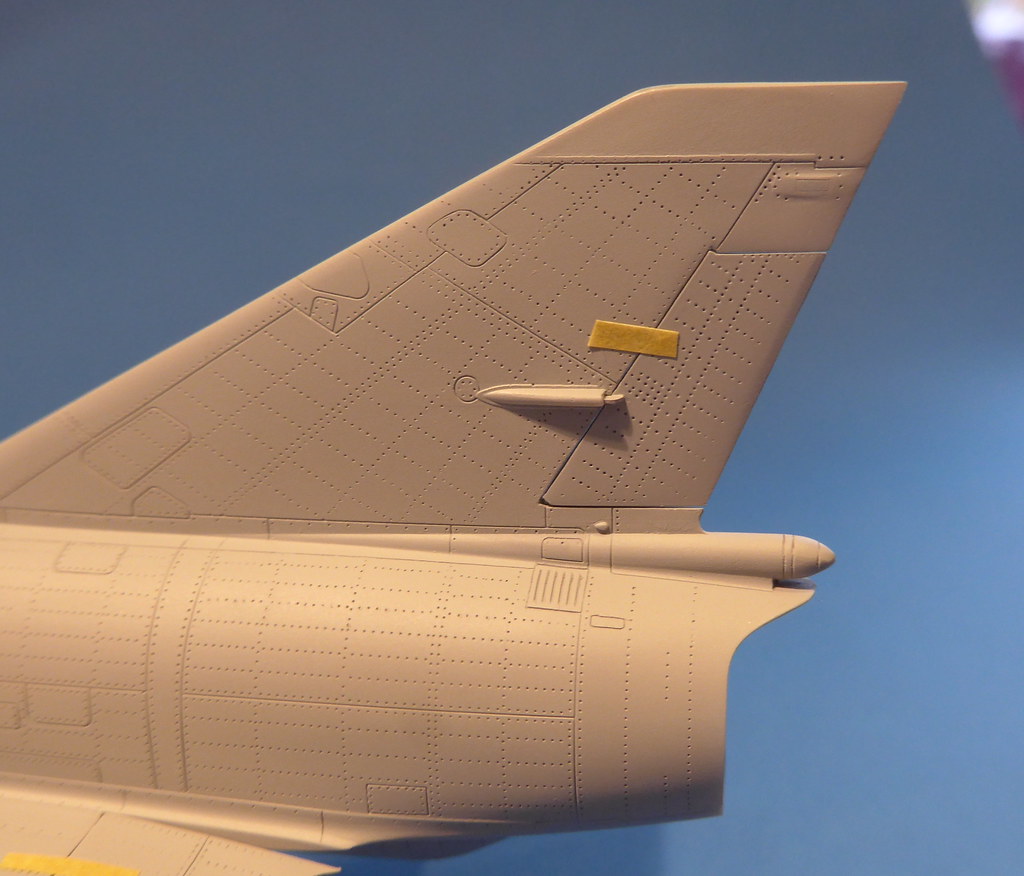
This started with the fin antennae,
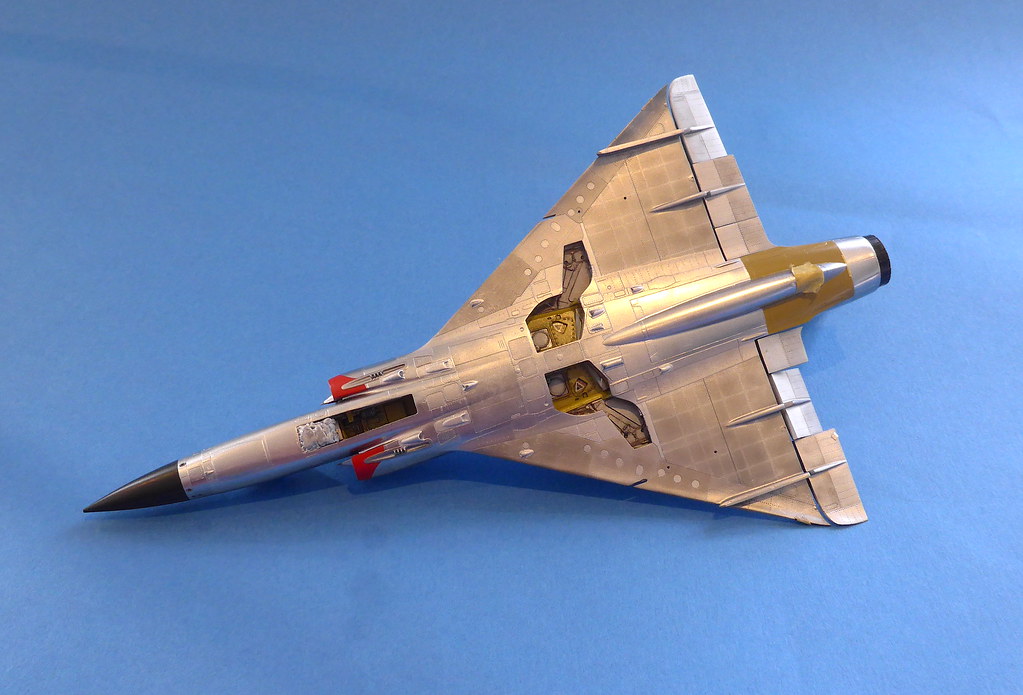
The Mirage IIIS could use the SEPR rocket for interception and this required the surrounding panel to receive protective paint, looking at the pictures I went with a yellow/green/tan shade. I haven't modelled the rocket engine here but it would be quite nice to add that in a larger scale build.

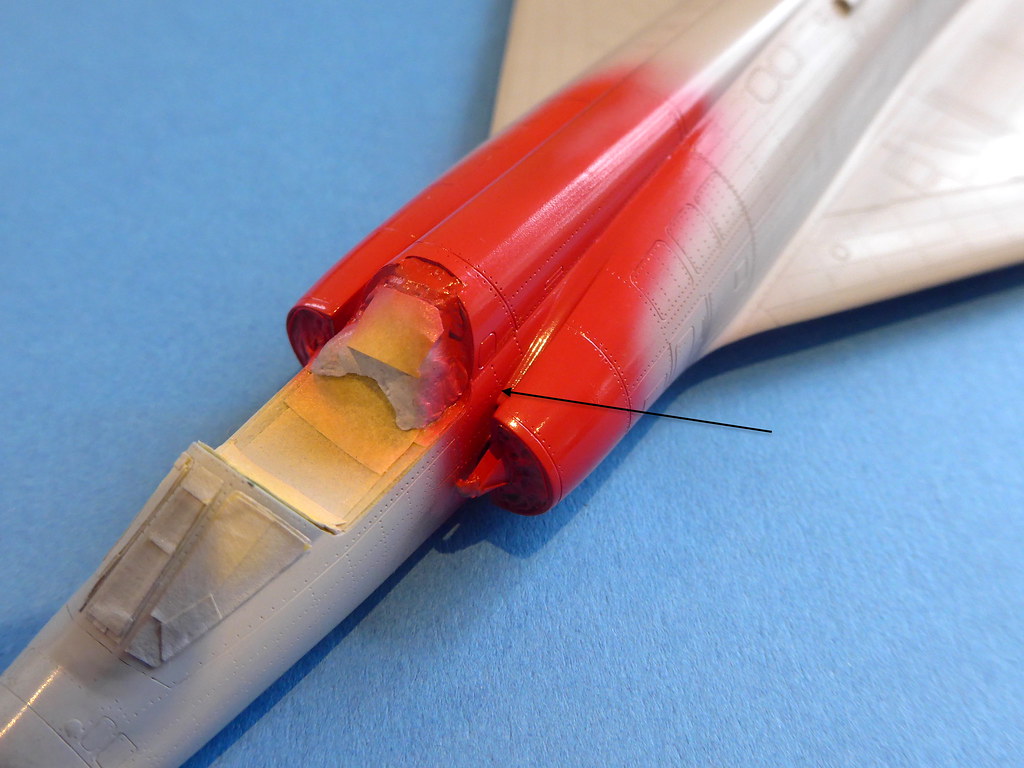
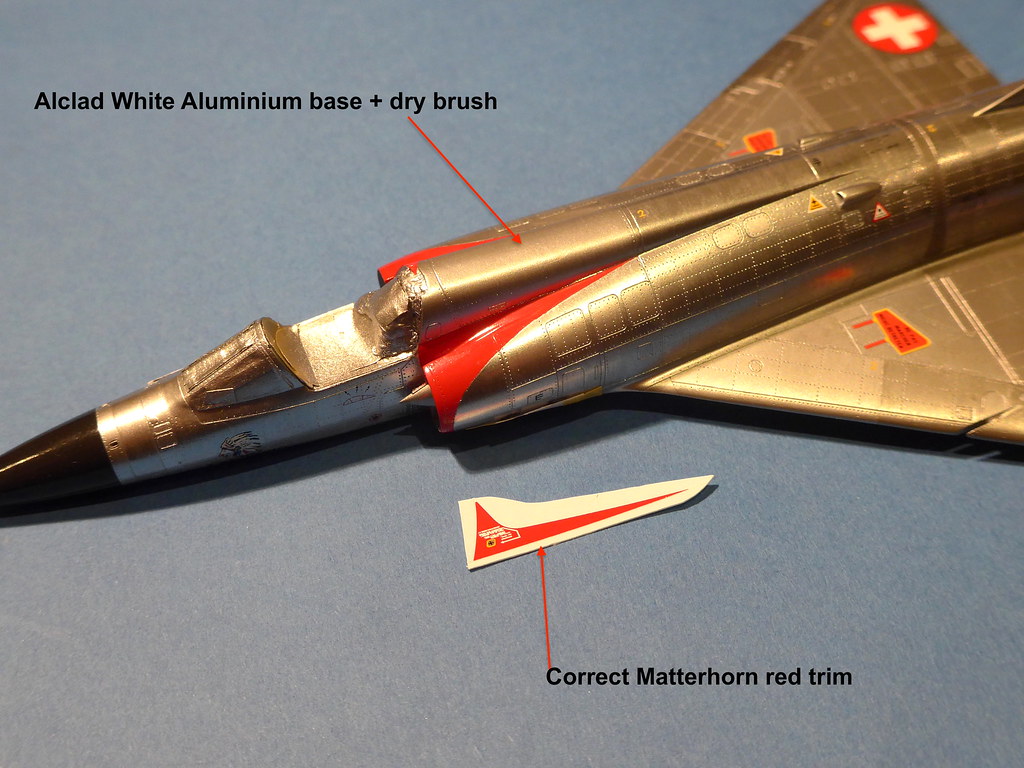
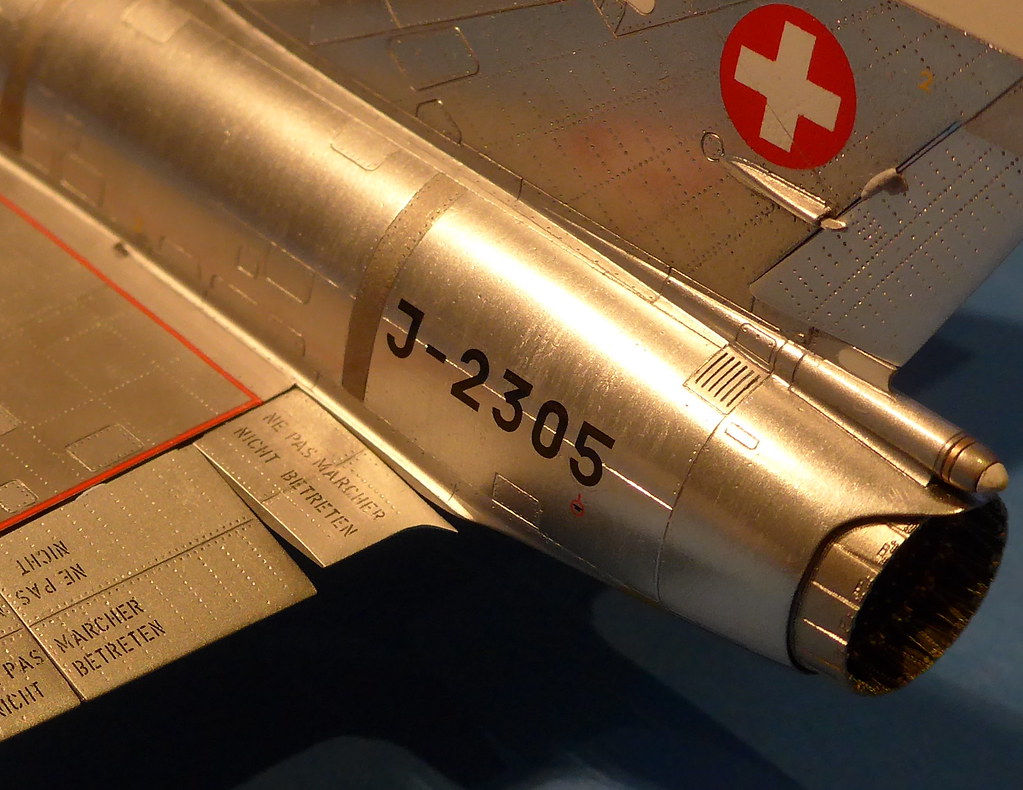
The differences between the Mirage IIIS with other variants continues even with the painting of the red intake trim, it extends and fills into the intake splitter plate area (see this pic https://www.airfighters.com/photo/230277/M/Switzerland-Air-Force/Dassault-Mirage-IIIS/J-2305/). The Matterhorn decals provide this red trim but I don't have much confidence in my decal trimming abilities in this scale tbh so I opted to paint it instead.
The red colour compared to the rest of the Matterhorn decals, I hope it will be close enough.
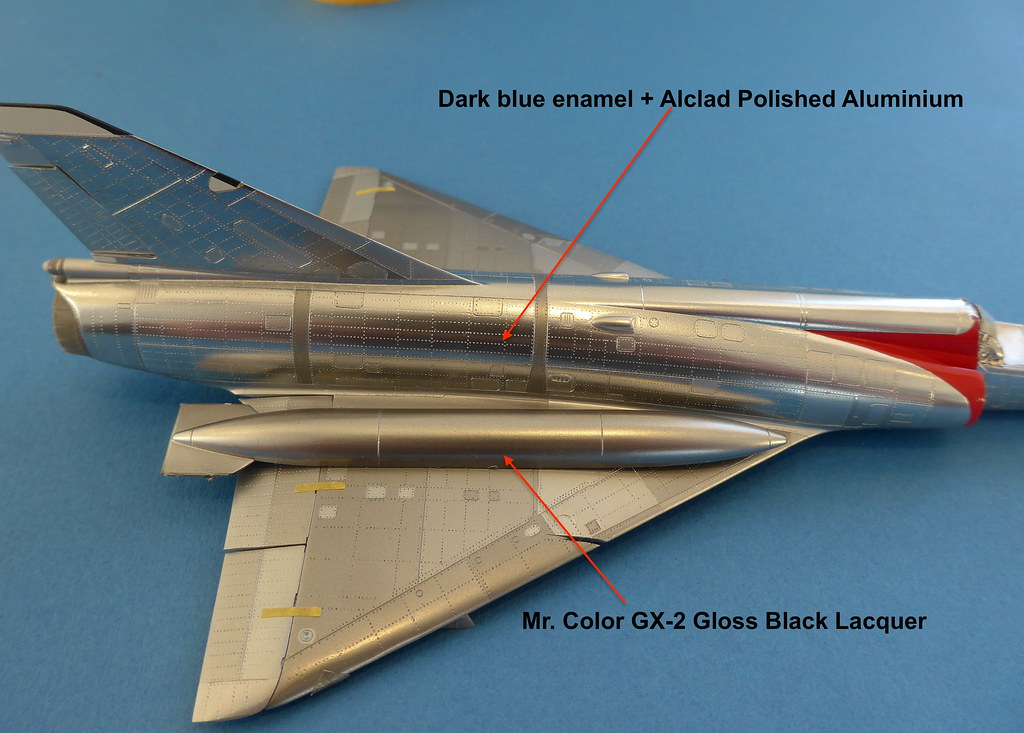
After these areas were masked up (with difficulty on the red trim!) I decided to start painting with the basic more durable Alclads, so everything metallic bar the shiney areas. Before this I sprayed some gloss dark blue over various panels as a base for the Alclad Aluminium.
After a base layer of Aluminium various other Alclad shades were used on the different panels using quite a few pics as a guide, no jet seems to be absolutely identical but similar. The masking required has not been a small amount tbh but doing little bits here and there slowly buildings up the differing panel finish. I've finished all the small panels now so just the wings to do with normal Alclad before the 'High Shine' Alclad.
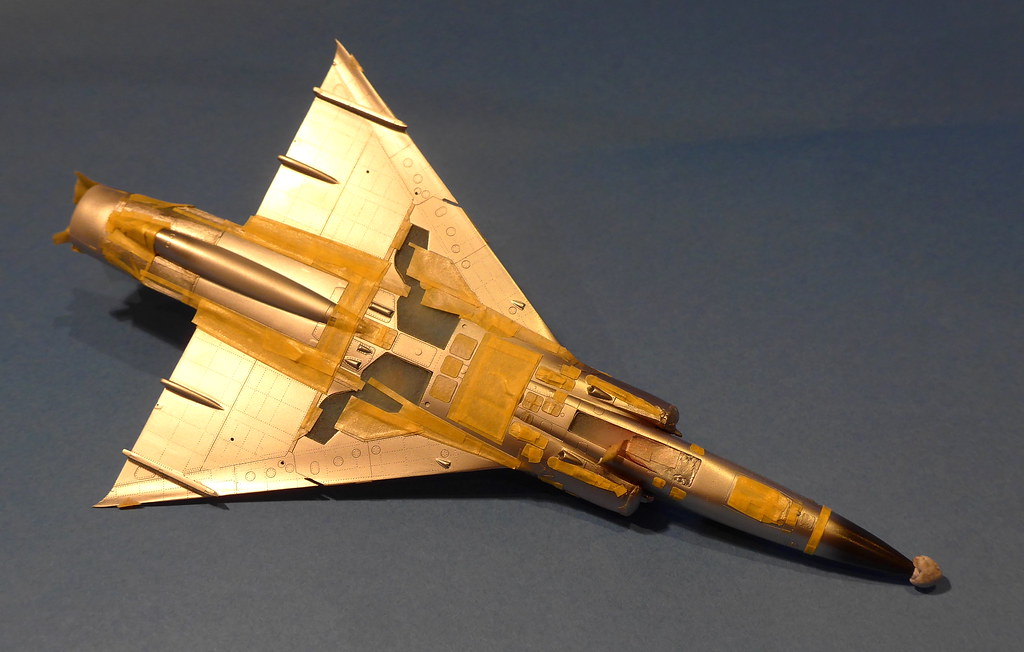
I'm finding it a bit difficult to get the correct shades right, these Alclad paints change hue quite a lot depending on the lighting and angles you look at the model and some seem to be very dependant on the base colour underneath. For example the small panel below is aluminium and the surround 'dark aluminium' but the contrast doesn't seem to be enough here, more work needed!

After I've finished the wings I can do the more polished fuselage surfaces, I think I need some more masking tape!
The wings are almost done I think, they are symmetrical in shades but are tricky to photo, especially in sub par lighting. I will do a few more panel shades asymmetrically as per the real Mirage IIIS. I'm not sure how many shades are on the thing now but it looks close enough to the pics. I'm learning with this so I'm not sure if the patchwork might look overdone later, I've tried to make the contrasts noticeable enough but subtle also to look natural, like the image linked in the prior post. I could always shoot a thinned 'blend layer' if needs be later on.

You can see the fuselage and vertical fin are much more reflective than the wings, annoyingly for us modellers whilst being shiney it also shows wear and scuffs. It isn't a mirror but it is shiner than what you get with standard metallic Alclads, sort of an awkward in between. The Alclad Polished Aluminium (PA) is not lacquer based like the non high shine Alclads, but Alcohol based, semi-transparent and should be applied over an enamel primer. The base primer has a huge impact on the final hue of the PA as you can at some acute angles 'see through' the PA to the underlying base primer due to the transparency of the paint. With this in mind I experimented with using reflective silvers as a base to then apply the more metallic and reflective PA over the top, so you only see metallic paint from whatever angle you view the model. Doing this, you won't get a super reflective mirror surface like an enamel gloss black base but it gives you a chance to pre-shade and vary the silver tones under the PA to make it appear more weathered, whilst also not seeing the gloss black base at certain angles when viewing the model. I did some testing and it looked pretty darn good but I was conscious the Mr.Color paints I used were not enamel as instructed by Alclad. I was ok with this as after testing with Humbrol gloss black I thought it was too shiney, an amazing finish if you want a mirror but too reflective for this Mirage.
So I sprayed a base coat of Mr.Color 8 and 159 silver, then masked off and sprayed some darker more chrome-ish panels a darker base colour. After this I then used various mixtures of super thin gloss black and silver to vary the tones of the surface just like a did in my tests which worked out well to vary the appearance of the Alclad PA going on top.

In my prior tests I then sprayed Alclad PA over this silver mottle to get quite a nice varied and shiney polished finish. However this time for some flipping reason on the model itself I decided to spray over a few wet layers of GX-122 UV gloss to really make the surface shine before the Alclad PA, assuming it would be ok because they were all Mr. Color Lacquers so no problemo. I was wrong!
I applied two very light layers of Alclad PA over this and then stopped and thought something wasn't right, the model had next to no metallic hue like I knew Alclad PA should have, instead it was like a super bright silver,

Damn it, the GX gloss really didn't get on with the Alclad PA. No crazing or bad reactions, very smooth and shiney in fact but most of the metallic lustre Alclad PA has just wasn't there, it had killed the 'metalness' which completely defeats the point of using Alclad. So lesson one learnt, you can over lay Alclad PA over Mr.Color silvers no problem, but not the GX gloss series. I then thought maybe I could just spray over the Alclad with Mr.Color silver again and repeat the process but without the GX gloss, however as the Alclad PA is delicate and alcohol based I wasn't so confident in putting strong Mr.Color Lacquers over the top of it, I seriously didn't want to strip this model given all the time and masking I'd put into it incase things went tits up.
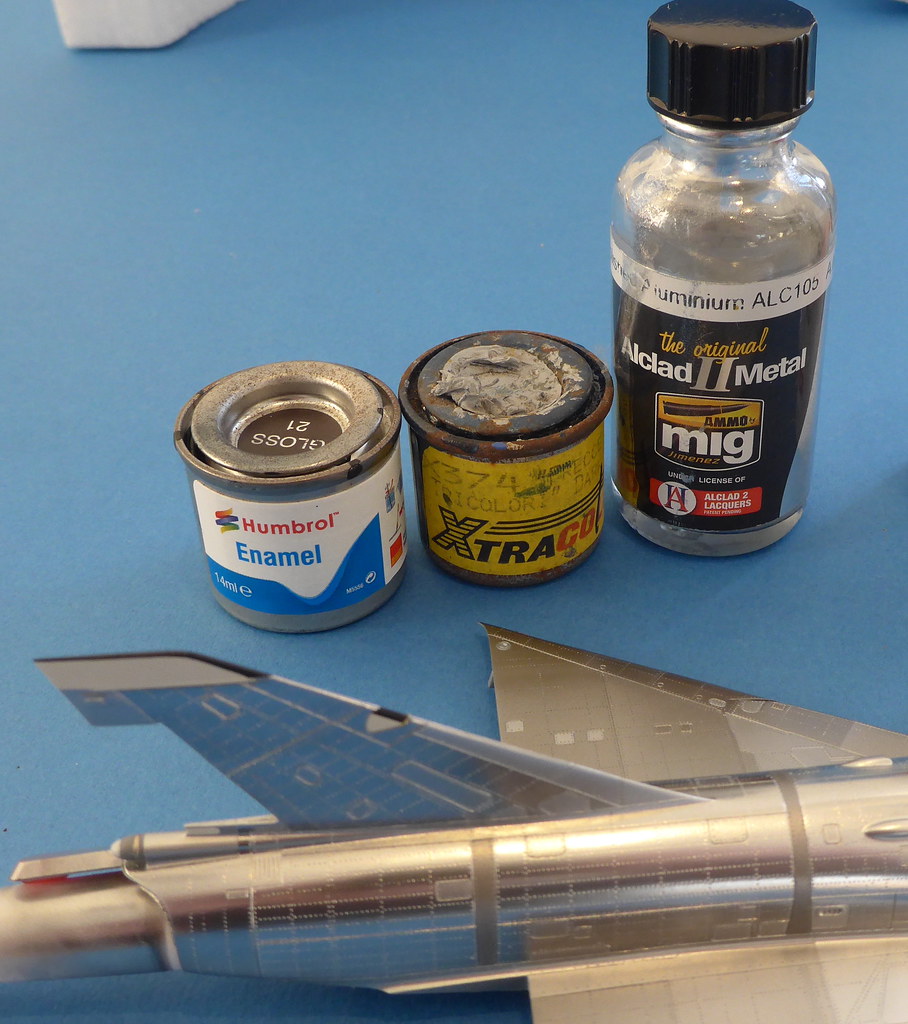
So I just began winging it. A dark gloss enamel is what the instructions say you should do, so I then kept it simple and followed with a very very thin few layers of a very dark gloss blue, specifically Xtracolor Frecce blue with Humbrol gloss black mixed in. I had again done some testing of dark blue bases under the Alclad PA before and liked the result, it gives the Alclad PA a slight hue as if the reflective metal is under a blue sky, it is very easy to overdo it however so I went conservative and made a mix pretty close to black. With hindsight whilst typing this I should have made it a bit more blue as the hue is very discrete on my painted model. Lesson two, use a dark blue enamel base but not too dark!
Sorry for the crappy pic. I only applied two very thin layers just to put an enamel base for the Alclad PA, so the previous metal layers still came through somewhat, a dark metallic blue now! I had by now suspected Alclads instructions of an enamel base for the high shine paint isn't just for a dark shiney surface, but something chemically in the Alclad paint bonds and shines so much better with the enamel base, much much more than any of the umpteen acrylic or lacquer bases I had tested. I think the prior tests with Mr.Color 8 silver as a base only worked because that paint in itself was rather metallic already and reflected though the semi-transparent Alclad PA

After a few days drying I then masked off the darker base areas and applied two thin layers of Alclad PA, leaving about 20 mins between layers, very gradually building up the shine. As the paint is transparent and works on reflectivity of the underlying base, the more you put on the more standard and less high shine aluminium it becomes. However look at the difference in metallic lustre, it was huge! This proved it for me, it doesn't matter how shiney or dark your base is, if you don't use an enamel base you will not get the full metallic nature of this paint.
Darker masks off,

Then I applied another thin layer of Alclad PA. After this I then checked if the contrast between the small masked off fuselage panels (previously sprayed in non high shine Alclad Aluminium) was ok,

It was too stark so all the little masks came off,
Then two more layers of Alclad PA were sprayed over the fuselage to blend everything in a bit more, finally stopping at the shine I was happy with. It isn't a mirror as that would be too much for the subject, but it is quite reflective. All the masks were then removed to see what is what. It is a guessing game at this stage, I will clear the model so trying to preempt the final shine after the clear is guesswork for me atm.

The contrast between the darker panels wasn't quite as much as I'd hoped but overall I'm happy indeed!
The finish is difficult to photo depending on numerous factors. For example compare the above images to the more darker reflective fuselage below, in reality it looks quite different in differing lighting and angles.

I need to do a little more painting on the undersides, namely making those dark panels lighter and brush painting the air scoops and small circular panels a more matt aluminium but maybe after the clear to allow handling.
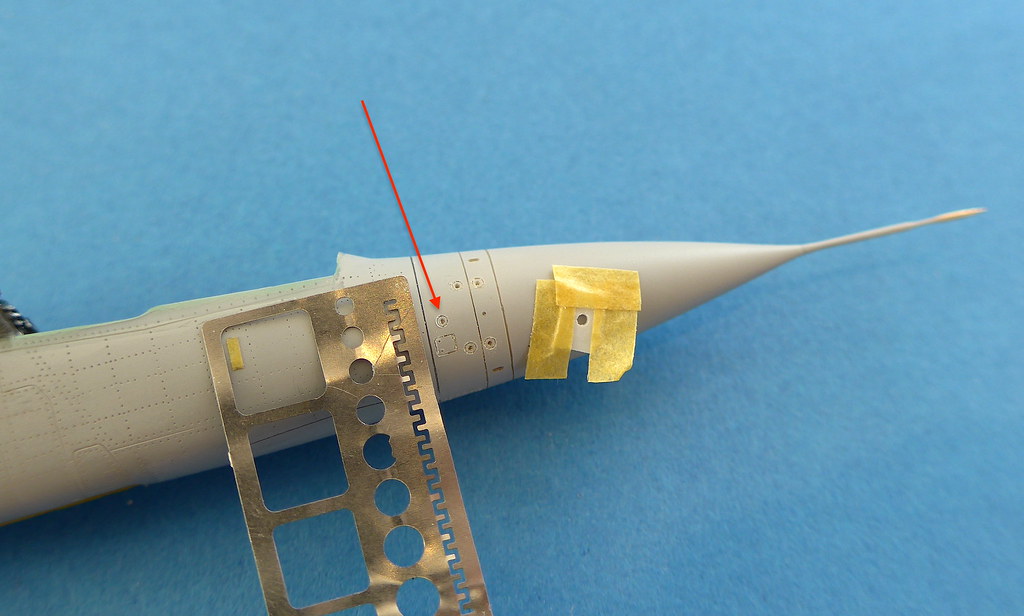
The folding nose needs a little detail painting on the bolt/hoist areas too, too small to mask and paint! I'm waiting until the Alclad PA cures for a few days first however.
The enamel gloss surface could have been better if I'd just gone for an enamel base at first, prior metallic layers and Mr.Color among others have slightly taken the edge off a super smooth surface but I'll chalk all this up to experience and at least now I know the order I'll use to paint NMF builds.
To further highlight my opinions on the difference between an enamel base vs other for this paint check the pic below. The fuel tank was primed with Mr. Color GX lacquer gloss black + levelling thinner then with neat levelling thinner misted over to make it as reflective as I could, it was just as shiney as Humbrol gloss black. I then spayed some very light layers of Alclad PA over, whilst shiney it is miles away from the metallic lustre on the Mirage model itself, I swear it is something chemical wise in the paint doing this. I know in the future if I use the Alclad high shine paint I will only use an enamel base, maybe someone reading here has different findings on using Lacquer bases, if so I'd be interested.
The saviour, a very used looking tin of X374!
I will let the Alclad PA cure for a bit. I'm unsure weather to clear coat it before and after the decals or just after. I've tested the Matterhorn decals and they are very thin, I don't even think a clear coat is needed for the decal film but to protect the paint it will need it. It is a very delicate paint and will inevitably loose some metallic properties with clear. I've tested the following ones below,
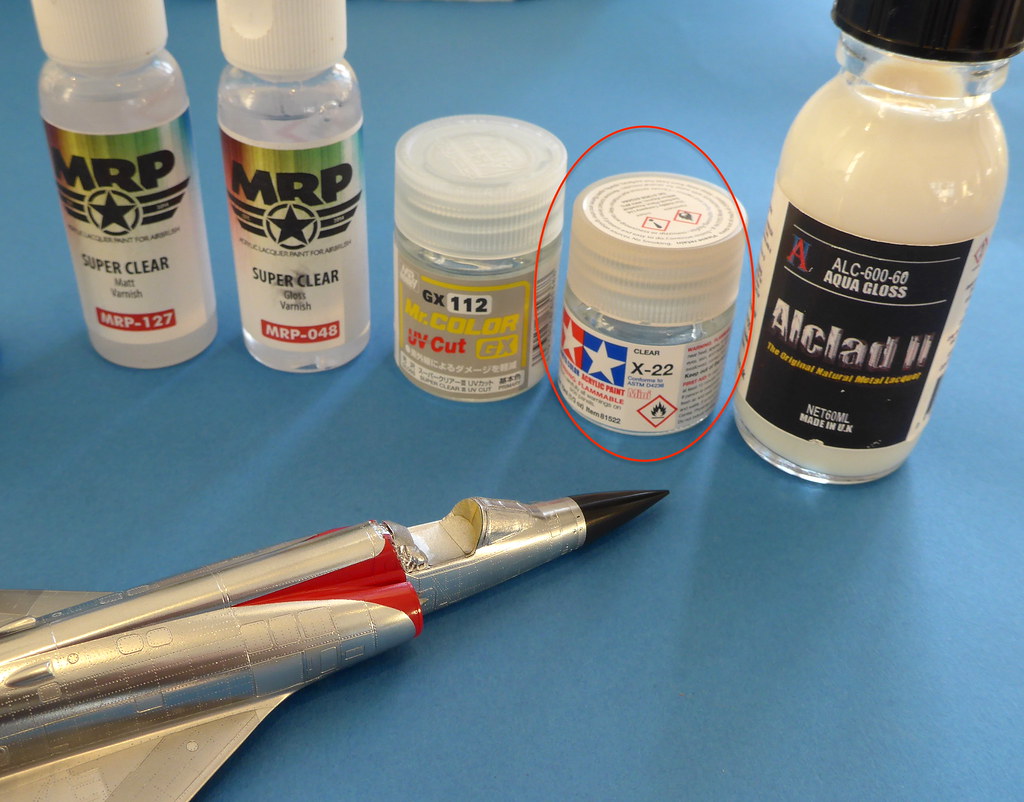
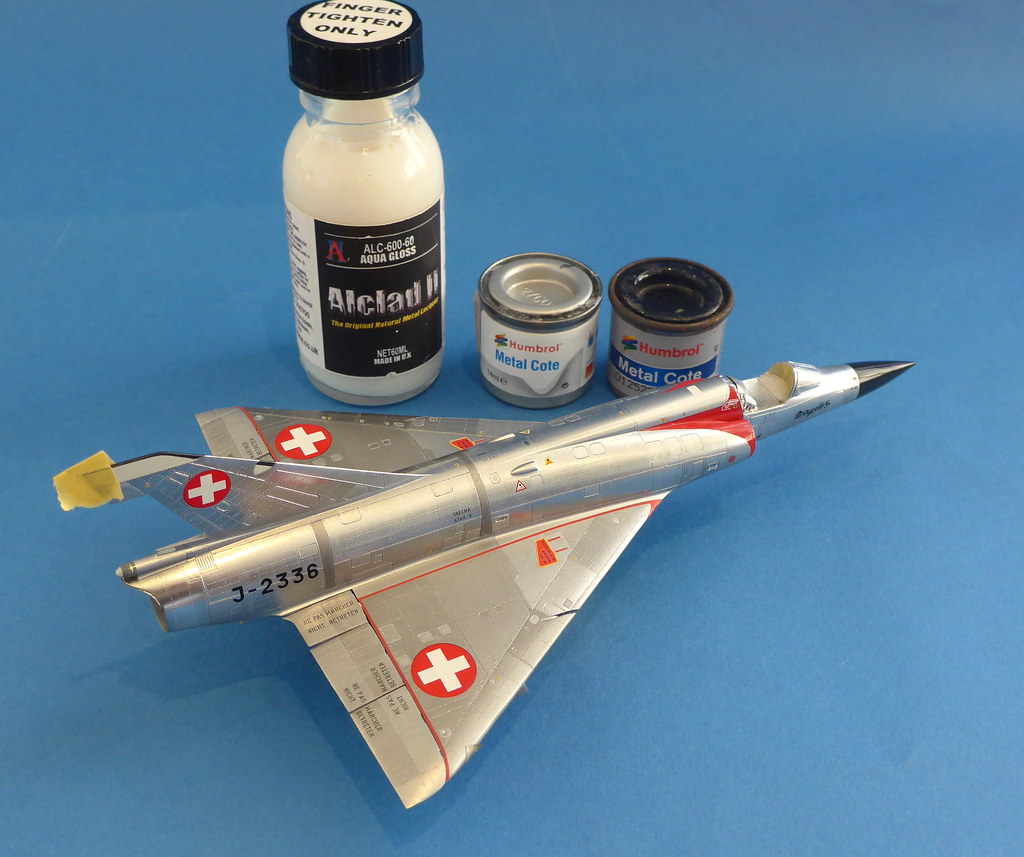
For me Tamyia X-22 + levelling thinner was the best by far, it really keeps most of the metallic nature of the paint and provides a great acrylic barrier for some oil washes. The GX is too aggressive, Aqua gloss was ok but not amazing imho, maybe I couldn't spray it right but I didn't waste anymore time testing after X-22 it was that good. The MRP varnishes are new to me, fantastic stuff! The MRP gloss doesn't dull the shine much either but it is so thin it is pointless to use it on order to hide decal film, it's just too thin, amazing stuff for glossing up various smaller sub assemblies though quickly. I plan using these to vary some of the panels to make the surface sheen non uniform again after the X-22 clear.
The final decision now is whether to dry brush the Alclad slightly with Humbrol Metalcotes to bring bit of texture to the panels, I have tested it a few times like my first go below,

I never 100 percent trust manufacturers instructions blindly, I always use images of the real subject to check things, nothing beats the original source! I'm no expert on Mirages nor Spanish jets but I would assume this panel is generally coloured like other operators of the base Mirage IIIE airframe that used the SEPR rocket, or when they used the SEPR. From my findings on the Mirage IIIS, the colour of this protective paint could vary from a lighter tan-yellow (with a hint of green) when new to a darker shade, mostly due to oil and dirt streaking from the underside panels and maybe rocket exhaust fumes if fired. Sometimes this panel wasn't even painted with this coating and the rocket was still ignited! The Matterhorn decal instructions for the IIIS state it as a 'translucent tan-green paint coating' over this panel for SEPR firings. I used this image for mine, but as my model will be of a very new aircraft I made it slightly lighter on my model,
I think the dark lighting and contrast in the above photo is making it look darker than reality. If you look at this article linked below on flying the Spanish Mirage IIIE, the first photo you can just see the colour of this paint on the Spanish Mirage IIIE, https://hushkit.net/2017/10/16/mirage-pilot-part-1-mirage-versus-phantom/ . To my eye, it is maybe a bit more yellow and tan as the coating looks quite fresh, this then would darken with flying hours and the associated weathering. If you are planning to model a weathered example, I would start with this yellow-tan colour then go from there with different paint shades and oil staining, it does always seem a very matt finish so it probably accumulated dirt quickly to produce a darker non uniform shade like your image. From the images I have seen this panel is not always painted however on the Spanish Mirage IIIE and the normal aluminium/silver paint colour is there, I guess the SEPR rocket was not planned for use anytime soon.
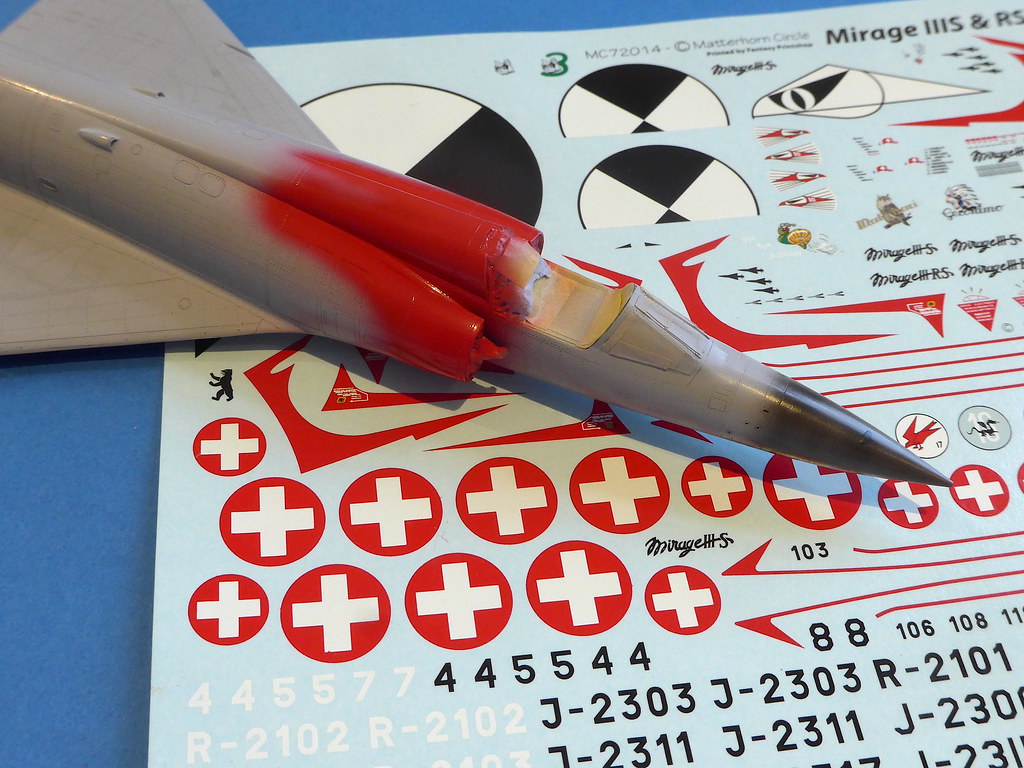
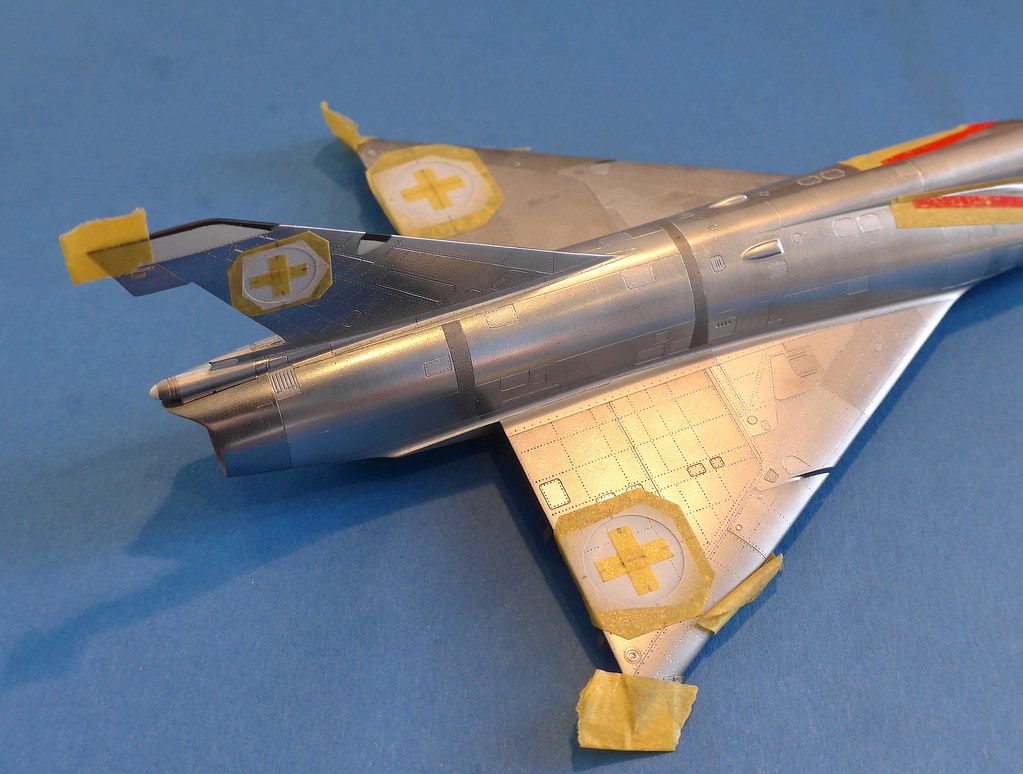
Well the decal stage arrived. The Matterhorn decals are rather comprehensive, you can decal two of any Mirage IIIS/RS throughout their operation history from very early NMF aircraft to the final canard equipped KAWEST85 updated camouflaged aircraft which is great. The few missing off my sheet below were used in tests to see how they would go over a NMF, they are super thin so everything looked good!

During the decal phase I realised I had masked off the red trim around the fuselage avionics panel incorrectly (the red trim covered the panel too much as threw off the look), it was a borderline 'is it worth it?' decision but I went ahead and corrected the red trim, first off by sanding the access panel to prep for Alclad,
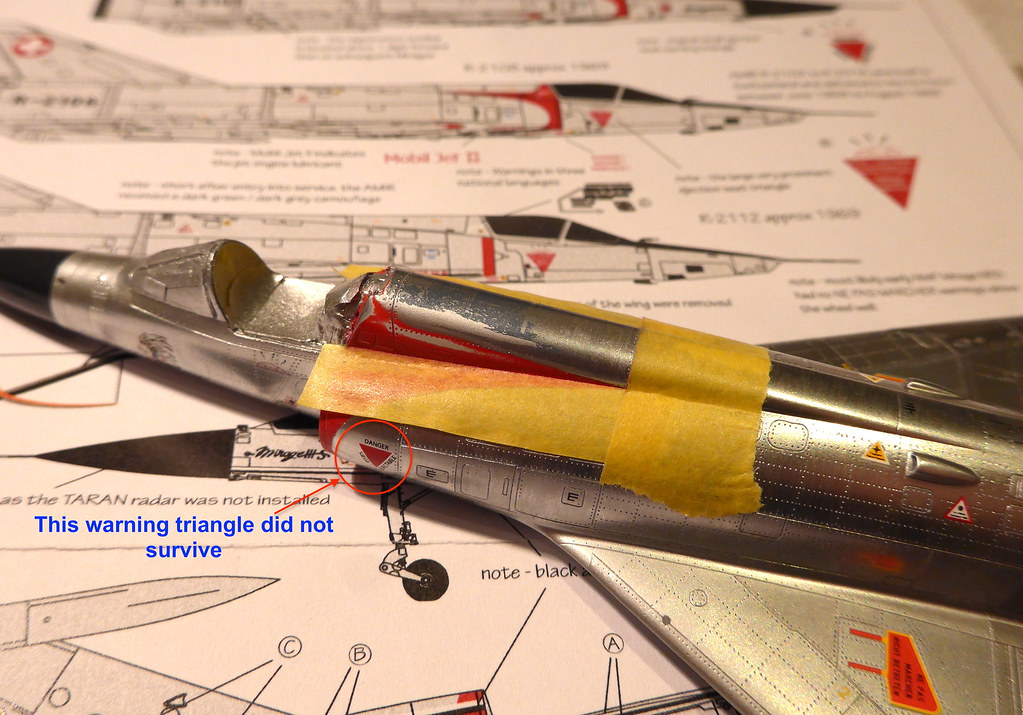
Black surfacer then polished up. After accidentally pulling off the intake warning triangles with Tamiya tape during the process I more approximately made little decal coverings (paper over the decal secured with tape) to prevent the same story with the main markings.
Going back a few steps, before I placed the decals, I applied a brushed layer of Alclad Aqua gloss over the main fuselage to protect the delicate Alclad Polished Aluminium, I find I get a much better finish with Aqua Gloss by brushing rather than spraying and this does a great job at allowing you to handle this paint with no rub off. Then to add a little wear to the metal finish I dry brushed slightly various panels and areas with Humbrol Metalcote polished aluminium and steel in various mixes, very subtle to break up the pristine finish like in the previous posts, unfortunately it is difficult to capture on the photos. After this another layer of Aqua Gloss was brushed on to protect this, so that is two layers on so far, this is important for later, then I went ahead with the decals.
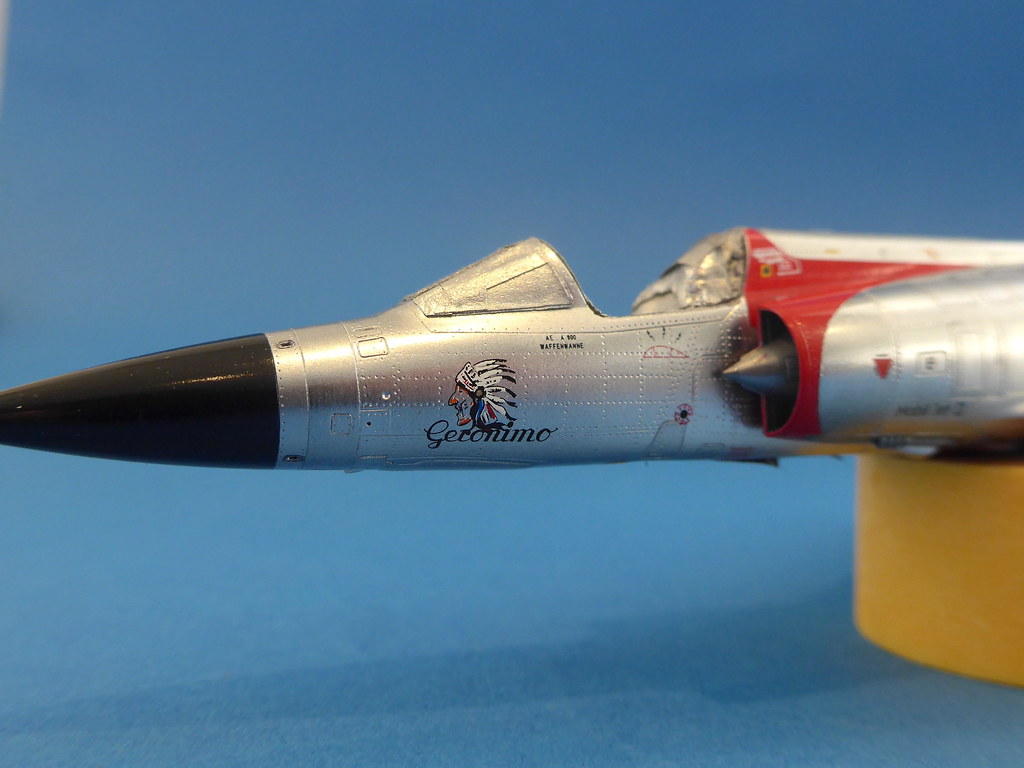
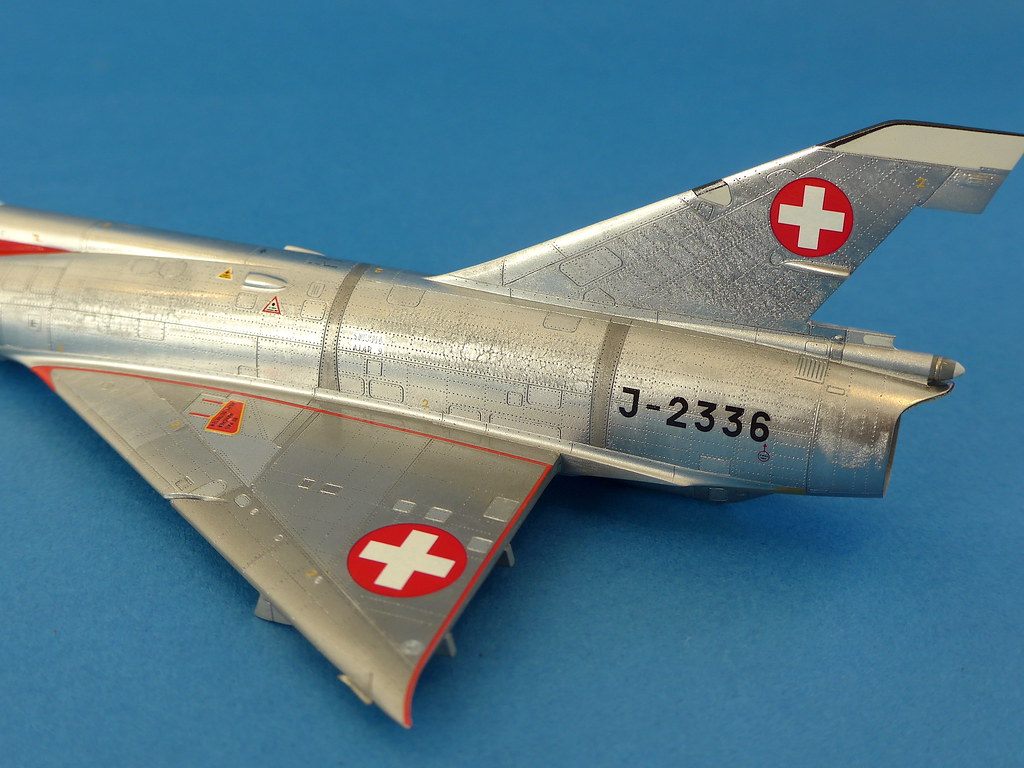
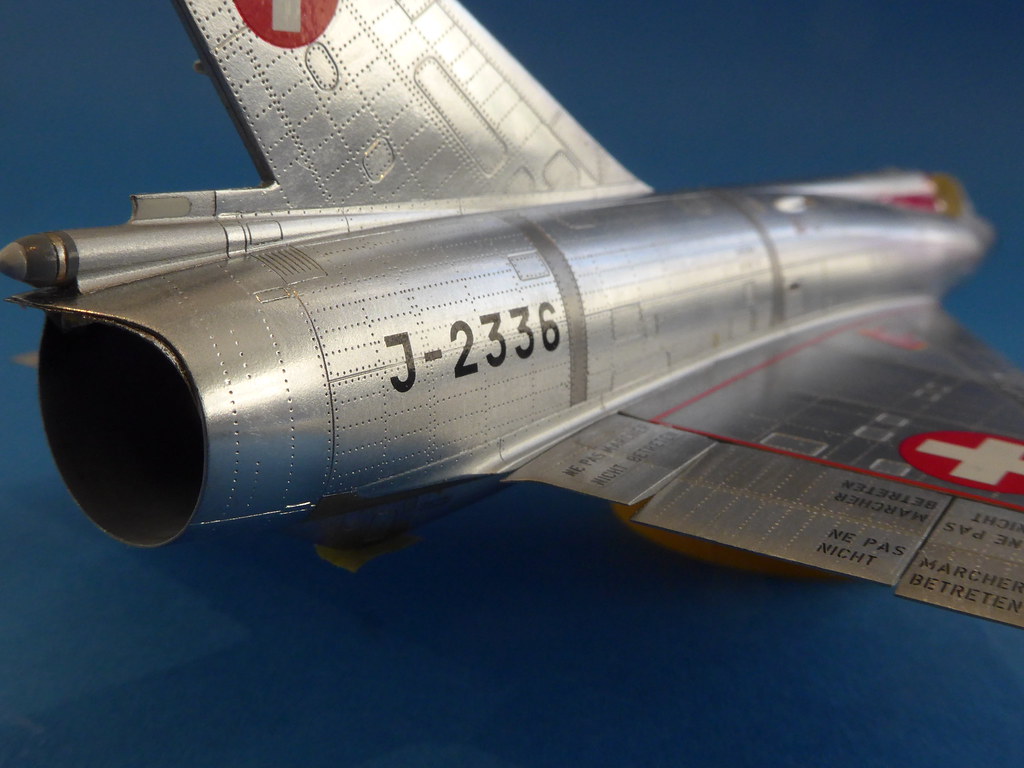
I choose the aircraft 'J-2336' Geronimo which was the last aircraft off the Swiss production line with some nice artwork, these freshly delivered jets had slightly different stencils (more French) in places, soon these were replaced with more Swiss trilingual German, French and Italian stencils so you need to check exactly what time your aircraft is the decal correctly.
I was worried about any decals over a NMF, the decal film is always supposed to be a problem. The Matterhorn decals were quite the opposite, the decal film is practically invisible and really didn't even need a clear layer over the top, very impressive. Check this close up of 'J-2336' number below, this is without a clear layer over the decal and no trimming of the film. I have no relation to Matterhorn-Circle and I'm certainly not here to advertise anything, but I think how good they were deserved to be highlighted.

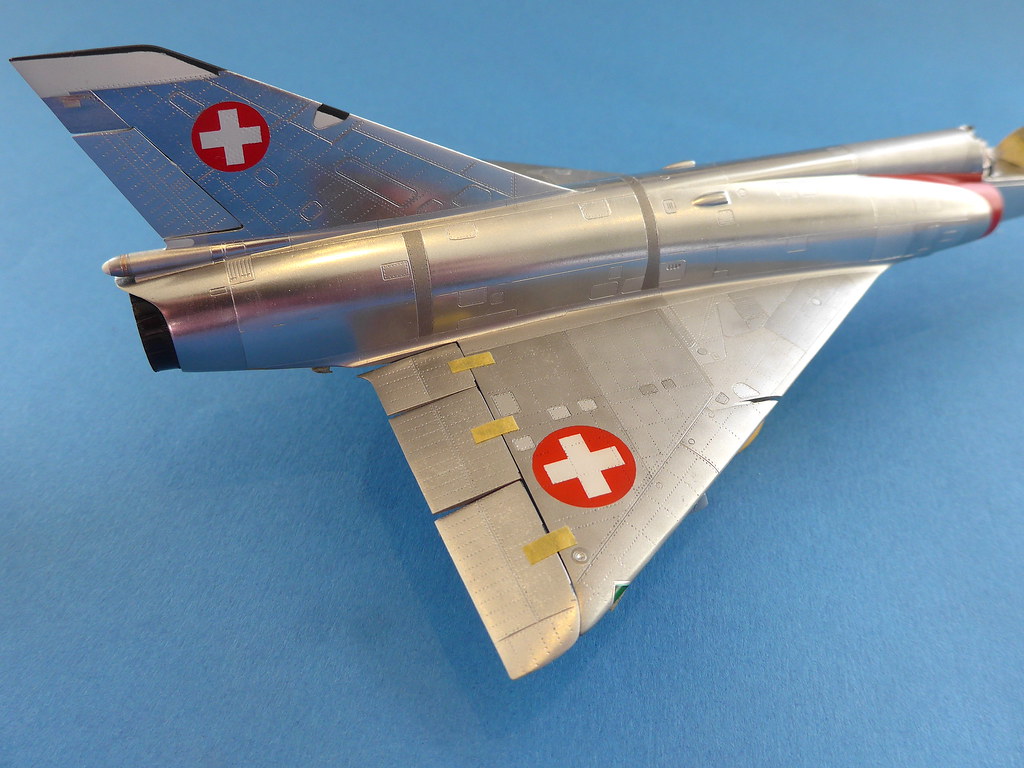
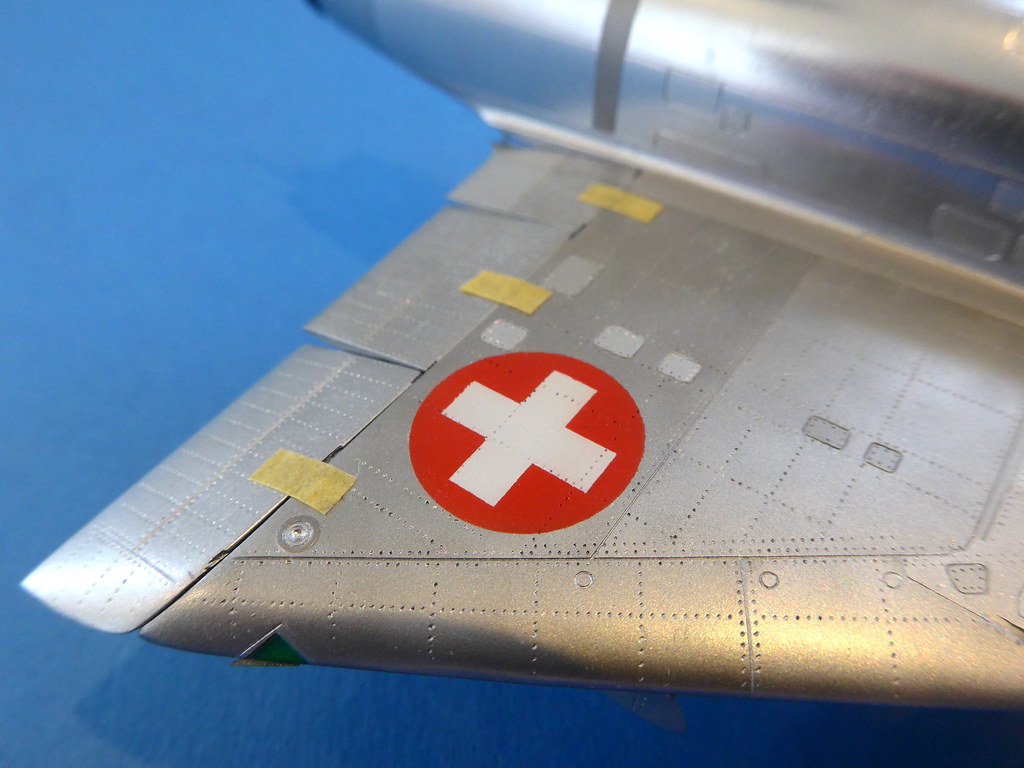
I choose to build J-2336 as it came off the production line. The airbrake decals and red wing walkways were from the Modelsvit kit sheet as they are sized very specifically to the kit's dimensions in these places, these went on very well indeed also, top decals all around fortunately! I didn't apply any decal softener to the crosses as, contrary to any other build I've done, I didn't want them to shrink into the rivets, highlighting the rivets through the white of the cross I think wouldn't look so scale going off images of the real aircraft.
The dry brushing of Humbrol Metalcote gave a slight variation to the super pristine Alclad in the prior posts and I was quite pleased how it helped bring a bit a realism (or at least non uniformity), it is difficult to photo but in the shot below you can get a sense of it,

Then, disaster. I decided to spray a fine clear varnish layer over the model to protect the decals, only a few light layers to avoid disrupting the Alclad shine too much using Tamiya X-22 clear and levelling thinner. I tested it prior and it worked just fine over Alclad, no reaction, no crazing just a super clear rock hard varnish that kept the NMF really well, better than Aqua gloss.

I'm guessing the levelling thinner penetrated the two brushed layers of Aqua gloss, then the Alclad Polished Aluminium, then the underlying Xtracolor gloss enamel and finally reactived the Mr.Color lacquer paint underneath all of this, which then reacted with the Xtracolor enamel on top of it and crazed everything. Pretty gutted tbh, tough way to learn this lesson on this model! I thought there was always a chance but I wrongly assumed enough barriers were between the X-22 and the earlier Mr. Color silvers. There is no reaction on the wings where no enamel paint was applied over Mr.Color, so thinking logically the Xtracolor enamel-Mr.Color interaction therefore has to be the reason for the fuselage crazing. I didn't do a test piece of Mr.Color---Xtracolor enamel---Alclad---Aqua gloss---X-22 as it wouldn't have been a quick test, another lesson there, if in any doubt whatsoever always test paint compatabliity no matter what!
I think I would be able to strip all the paint off, hopefully trying not to get any paint remover inside the cockpit, but because of the scale this will be a difficult job indeed. I just don't fancy doing this and then going through the tortuous paint process all again anytime soon, so I'm going to put the model aside for a bit until I'm prepared to fix this carefully probs in the new year, way too much work has been done modifying the base kit to quit on it totally.

well after a long delay I've almost got back to where I was a few months back.
Whilst removing the crazed paint with Mr.Color thinners (it doesn't harm plastic even clear parts but strips anything), I realised there wasn't any easy option to remove the residue from the intake area so I broke off the forward fuselage area to get at it better. Whilst seemingly back to the building stage I decided to address a few things.
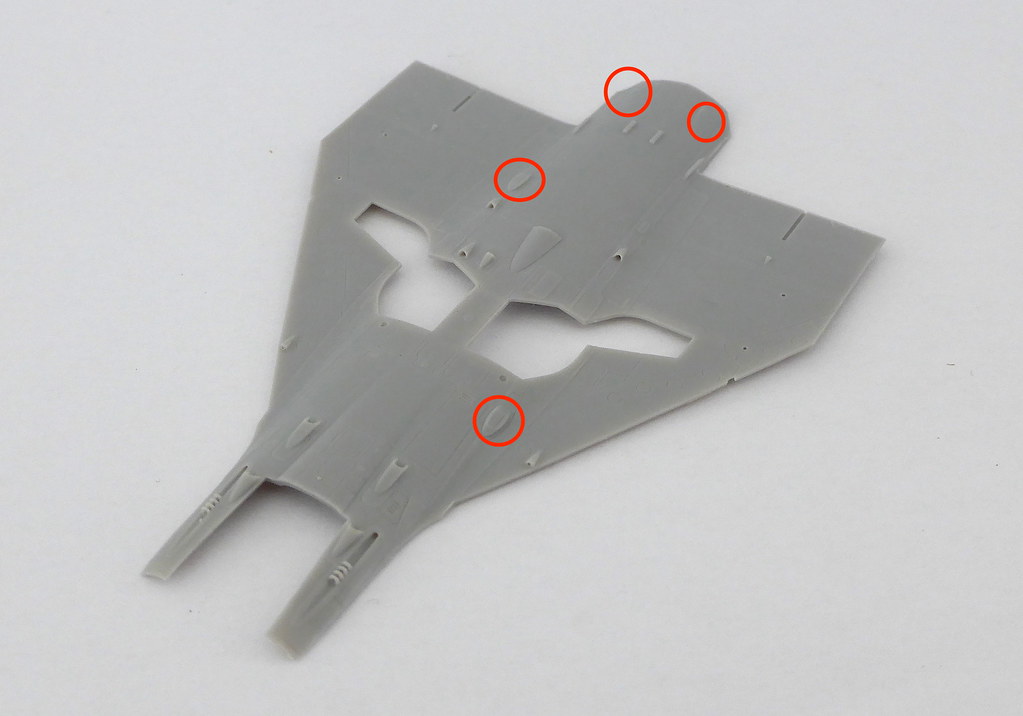
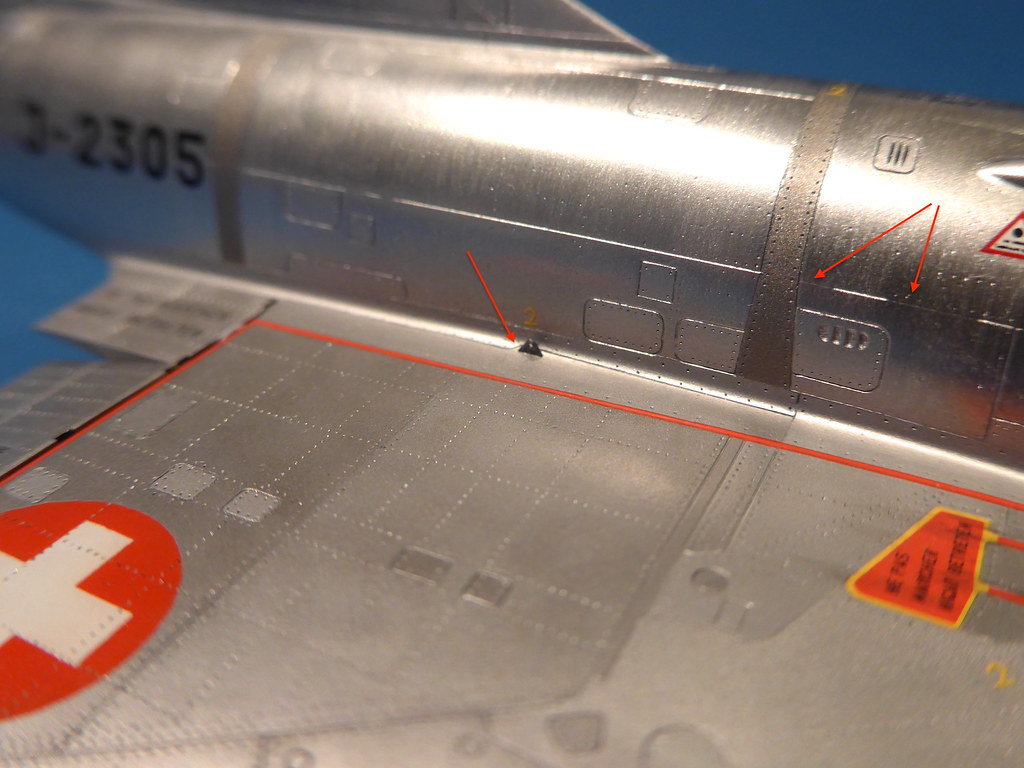
First thing, I filled and scribed new correct panels on the wing using IIIS drawings and close up images of the wing. Swiss Mirages featured a slightly different panel set up here due to extra strengthening measures introduced to the airframe compared to baseline variants.
Before and after below, spot the difference, not much but it makes the model seem that bit more a true Mirage IIIS in my mind.
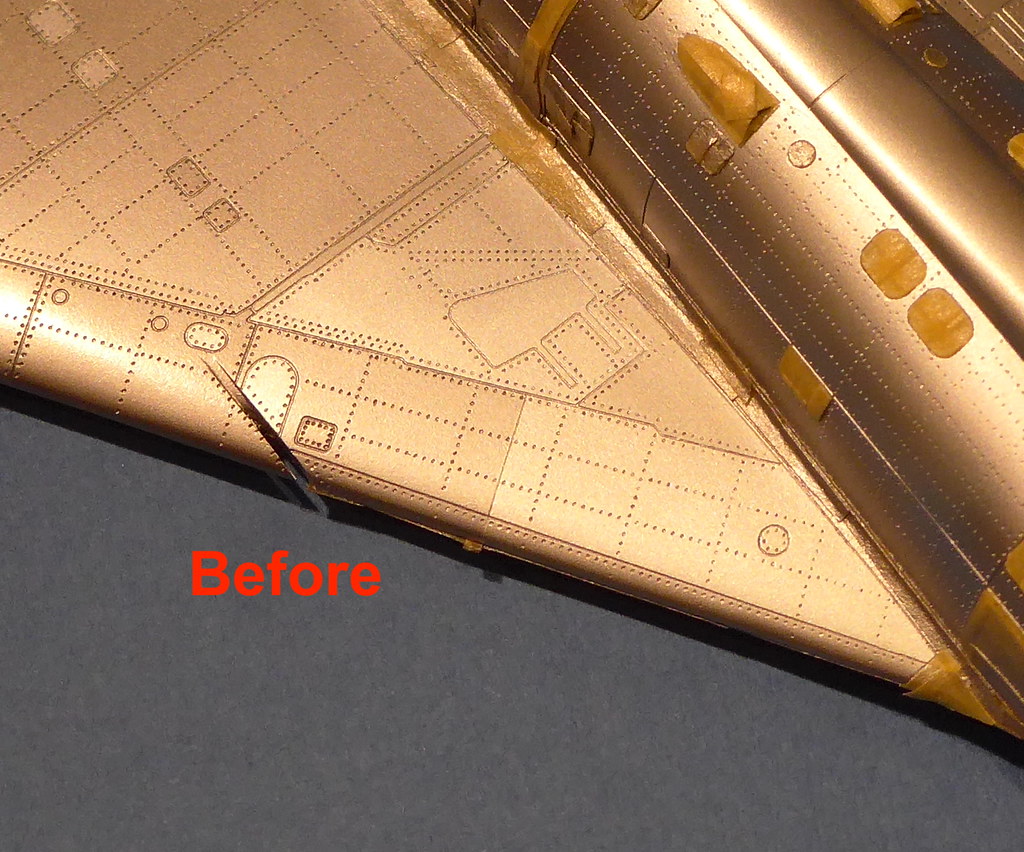
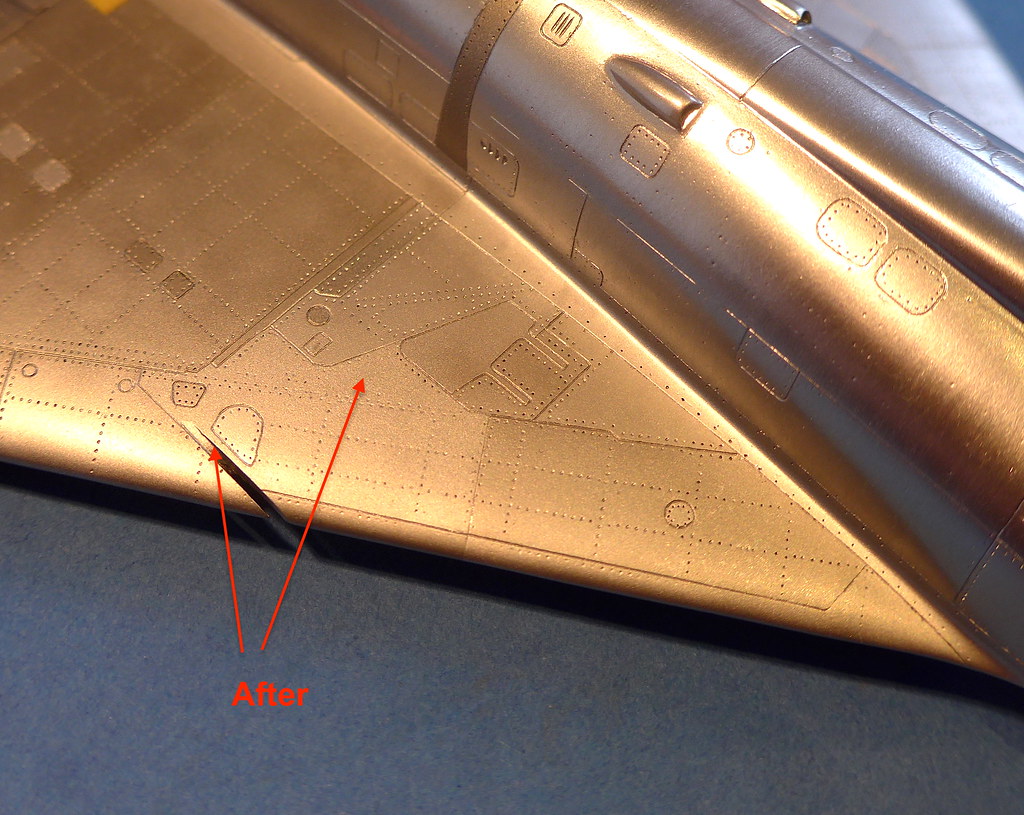
Also maybe noticeable, I have reduced the appearance of the rivets on the wings and vertical fin by some sanding. After looking at many photos I decided to fill the rivets on the fuselage as despite them being readily apparent on the wings and fin, the fuselage hardly showed any visible rivet traces, especially if we consider the scale. I used Zap-A-Gap superglue and even with this I kept finding rivets here and there that refused to be filled. It became a game of 'whack a mole' in a way as I spotted some and filled them, after the sanding a few more appeared in other places so I called it a day after most had been sorted, my excuse is that on the real airframe some of the rivet lines are visible here and there in a sporadic way so I'm cool with not getting every one.
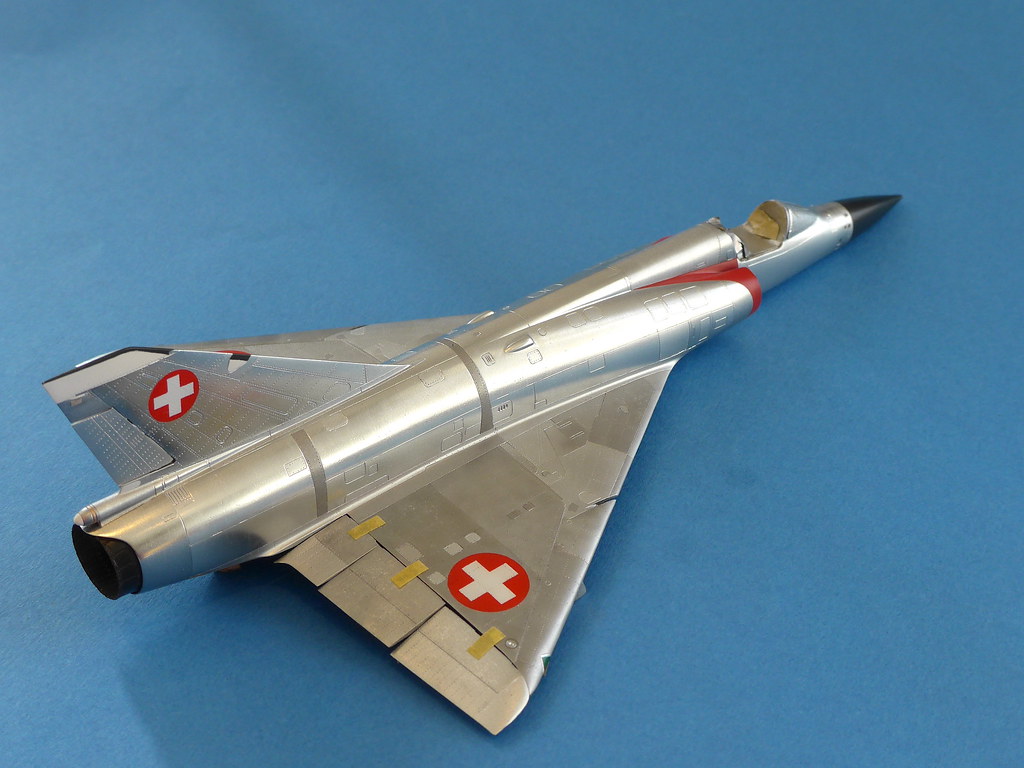
I then repainted the model roughly the same way as before with some changes in the order, fortunately I saved all the little masks I made for the tiny access panels across the airframe, this saved hours of masking second time around! The finish is my attempt to replicate an almost factory fresh Mirage IIIS soon after delivery, so this called for some quite reflective areas such as the main fuselage and vertical stabiliser. The exact finish I was trying to achieve can best be seen in this linked video below from the website 'notrehistoire.ch' (which has some great videos on the Swiss Airforce), showing detailed construction of the Mirages in Switzerland. Go to the time '35.55' in the video and you can see the different finishes of the various areas of the airframe of what think is a brand new or near new airframe.
https://notrehistoire.ch/entries/49a8VOvPWnv time, 35.55.
My photos here really aren't capturing reality but you get the gist, I'll take RFI photos outdoors where the finish really comes alive. Trying to replicate a foil finish with paint I'm finding is an impossible task for my abilities, I'm not good enough to do it so for my 1/32 Mirage IIIS I think I will try foiling first which should give the look I'm truly after.
I used Alclad Airframe aluminium for the darker reflective areas such as the fin, intakes and rear exhaust shroud and a 50-50 mix of Airframe and Polished for the brighter fuselage areas. The forward fuselage around the cockpit simply used Alclad normal aluminium with polished aluminium over the top to replicate a modest shine. The nose rings around the folding nose cone were painted with airframe and white+polished aluminium to give the various contrasts here. I did mottle the Alclads on the wings to the vary the finish but again this is largely lost on the photos which is rather annoying!
I've sprayed the red intake trim at the end this time to prevent any paint lip build up, because of the super smooth fuselage surfaces any paint lip is magnified and impossible to really work on properly without damaging the surrounding Alclad, the decals do cater for this but cutting them and adapting their fit I think would be harder to do than just paint it. However, I left the red trim around the avionics hatch behind the cockpit and will use decals here as painting the correct shape of red trim here was really tricky to do correctly and symmetrically first time, best left to the decals which fit well here.
I noticed in a few images a strange patchwork pattern along the rivet lines on the underside wing panels so below is my attempt to replicate it. The exhaust is just in primer atm. There are plenty of shades and mixes of Aclad all around the airframe but the photos aren't doing them much justice.
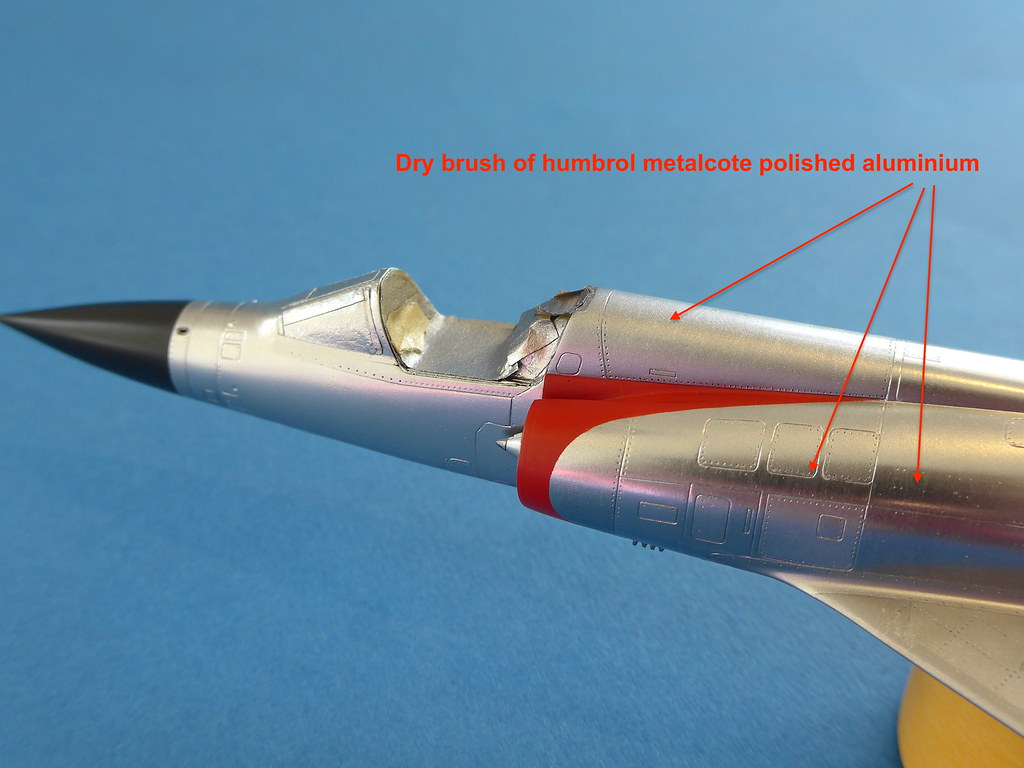
After painting Alclad's aiframe and polished aluminium you get a super reflective finish which I find not so realistic, it looks like you have dipped your model in chrome so I slightly weathered it up with thin mottling of normal non high shine alclads (thinned with levelling thinner btw which helps a lot) and then dry brushed very very slightly with Humbral Metalcote polished aluminium which gives a slight bit of 'texture' and grain or character to the finish, enough to take it from a mirror finish but to still be shiney.
This last dry brushing is largely lost on the photos but hopefully I can capture it better later on.
It is hard to see. I did a little bit a blotching on the wings too.

I decided to spray the main crosses on the upper fuselage (to speed things up I'll simply use decals on the lower wings). First time I've done this and I totally underestimated how long it takes to get everything lined up correctly, kudos to those who do this often! Btw in the below pic the fuselage looks a bit duller compared to the other photos, this is because I over did the dry brushing so after a layer of Alclad Aqua gloss as a barrier I re-sprayed the Aiframe and Polished aluminium to bring back the shinier finish, then repeated with a much more subtle dry brushing.
I used Tamiya matt paints with levelling thinner to reduce any chance of a lip forming around the mask, overcoated with MRP super clear and a final very high grade micromesh gave a result I'm really chuffed with, not perfect but from normal distance I'm happy.
This is ready to start adding the decals now.
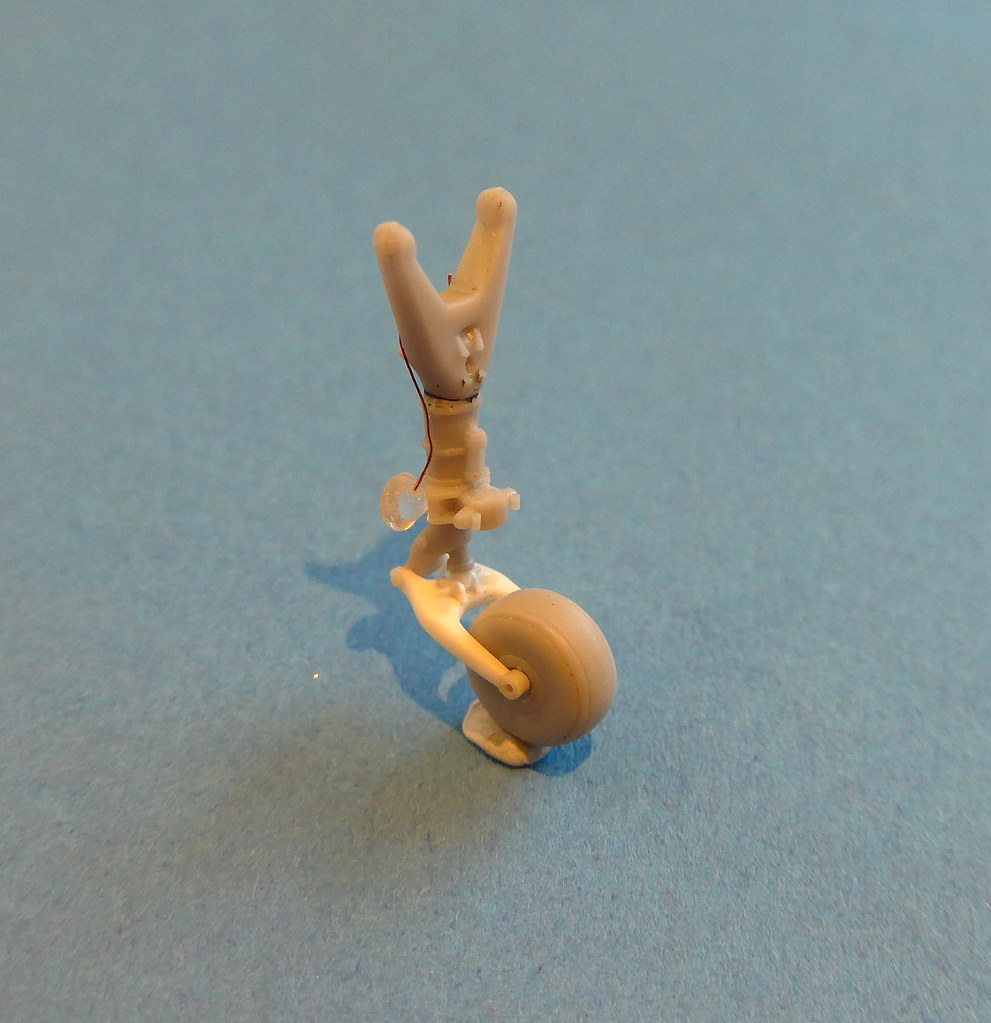
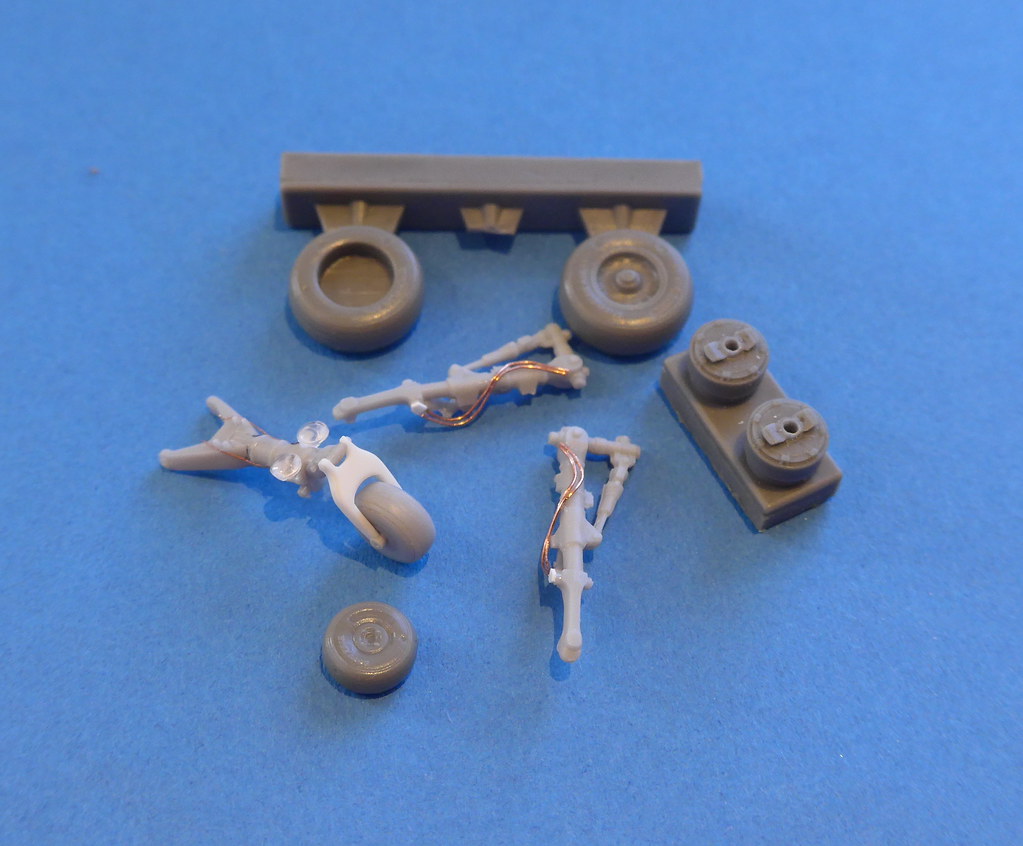
I've also been working on some of the smaller details. First up the modified front gear leg and extended nose wheel fork. The Swiss had strengthened gear but also an extended, positionable nose wheel fork used to adjust the height of the aircraft (raising the front therefore dropping the rear) to allow the vertical fin to duck under the entrances of the mountain hangars. On the left is the Modelsvit part (I have two kits) and the right shows my modified version using 1:1 dimensions to make sure everything is ok, here is a pic of the real thing for comparison: http://master194.com/photo_avion/mirage3-suisse/pages/train-avant01_jpg.htm
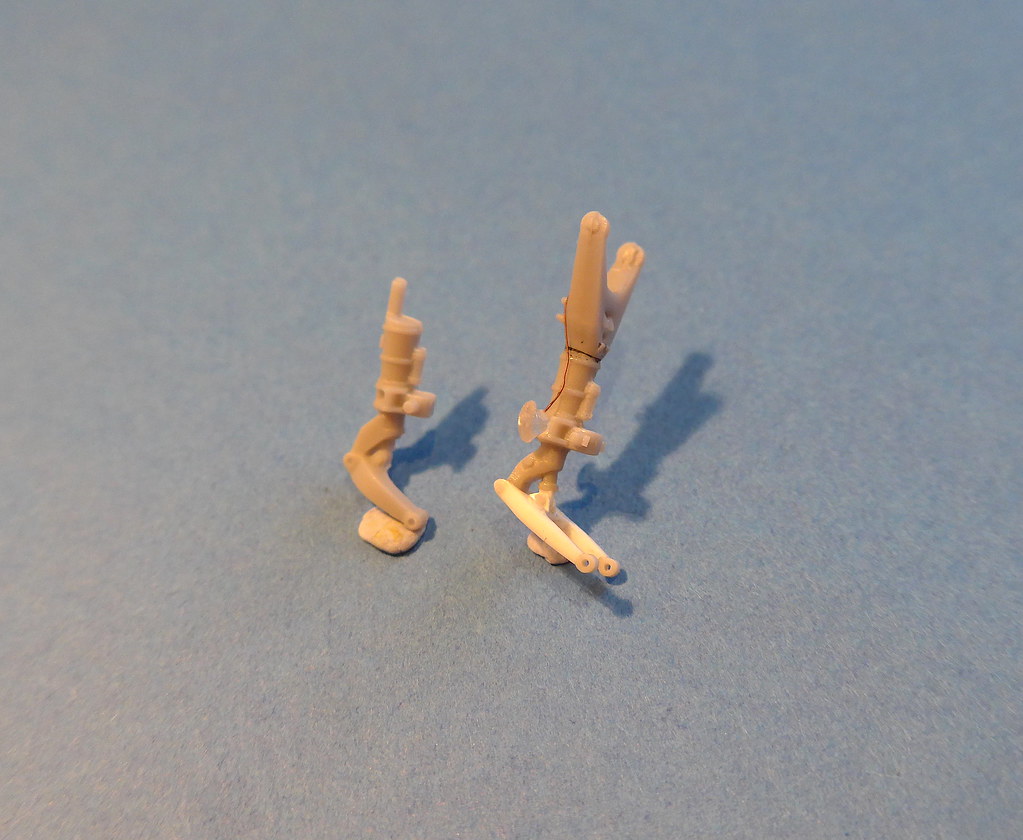
I'll be using the kit's nose wheel with a thin steel rod as the axel or strength, I know it looks small but this took ages to replicate and adjust! I've scribed some tread into the wheel since this photo which is the problem with the Modelsvit wheels, they don't have any and in this scale is a hard thing to add.
I'm using the Reskit main wheels because of the tread issue and added some basic brake lines to the main legs. I found the main legs to be pretty horrible tbh, there was tooling misalignment between the parts (one half had shifted) so cleaning them up was difficult in this scale, they aren't perfect but will do.
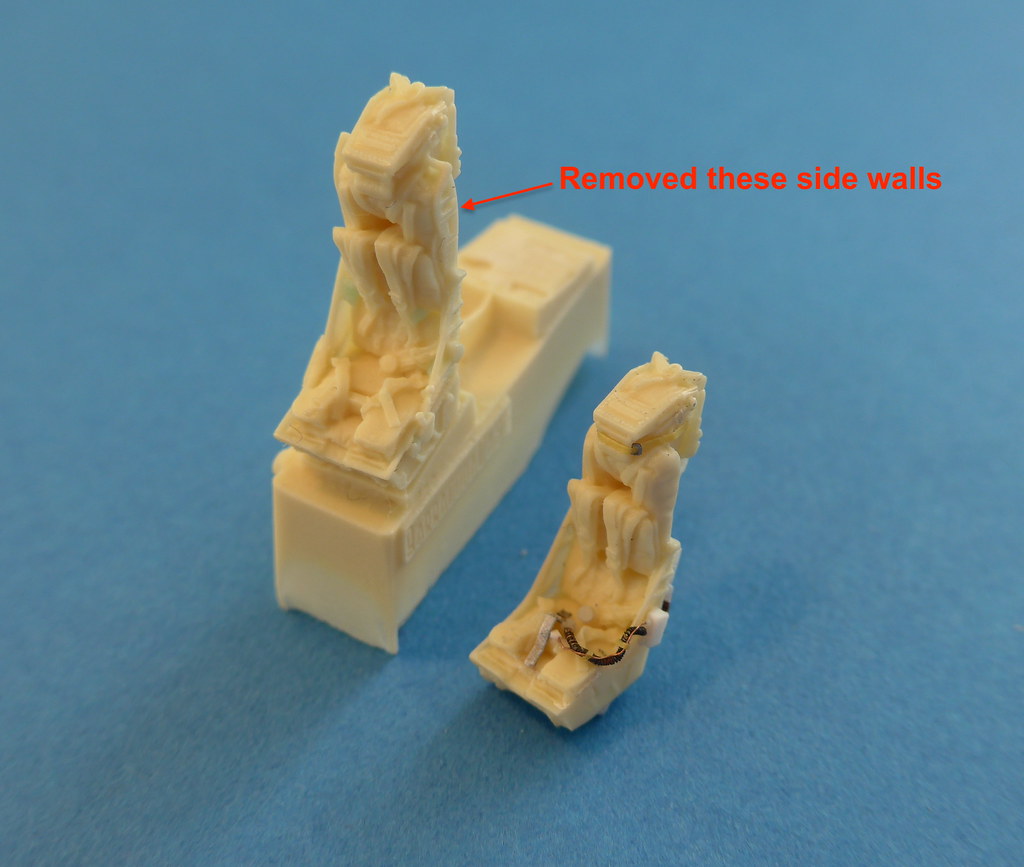
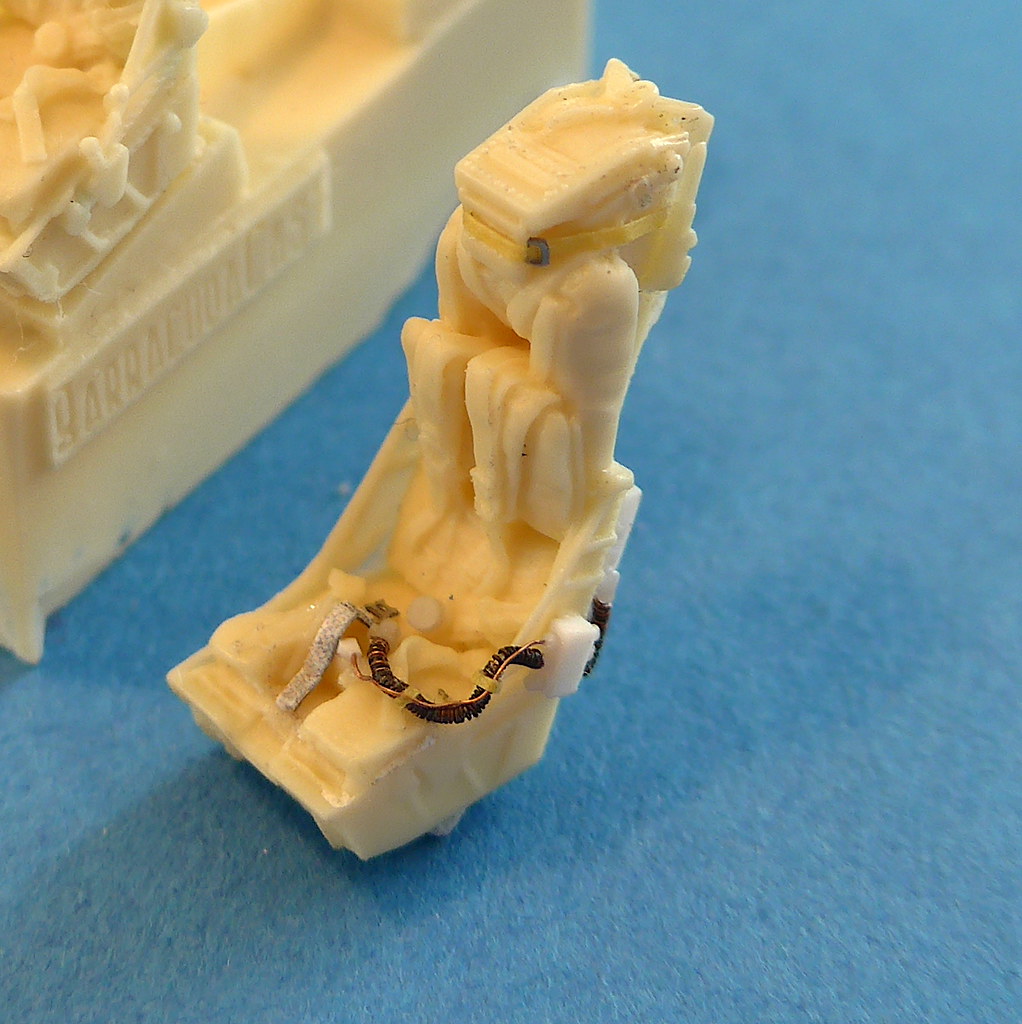
The Barracuda resin ejection seats I realised aren't quite correct for the Mirage, they are for the EE Lightning and have the side walls. So I carefully sanded these off and then rounded off the cushion and added a few fold creases to better represent the Mirage IIIS seat. Also a few extra parts like the oxygen supply were added using a good online walk around of the seat. The base sides needed some sanding to fit into the Modelsvit cockpit but this will all be hidden when in place, the pull handles will be added at the end.
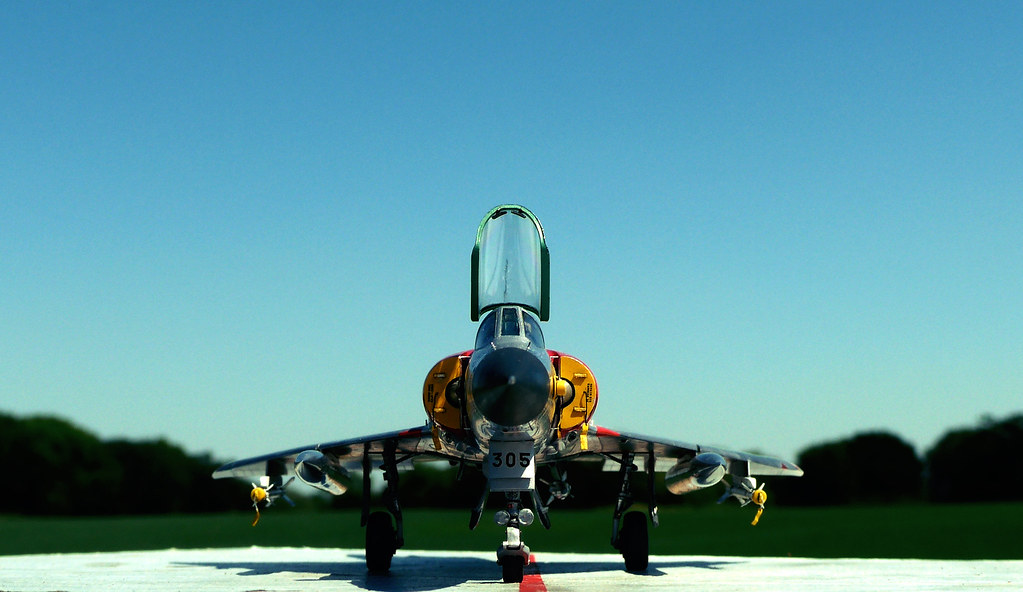
I've been working on the armament too. I got some Eduard Brassin Aim-9Bs as they really nail the sidewinders in this scale imho but I noticed something a bit strange during painting. One of the four missiles provided was noticeably shorter than the other three, and the other three had these strange raised panels on the outer surface. Looking at some photos of Aim-9Bs, these seem to be fictional so I made up another Aim-9B of the same length and sanded off all the raised panels, now both equal and ready for painting. Strange! The seeker heads will be made up with Gauzy glass agent.
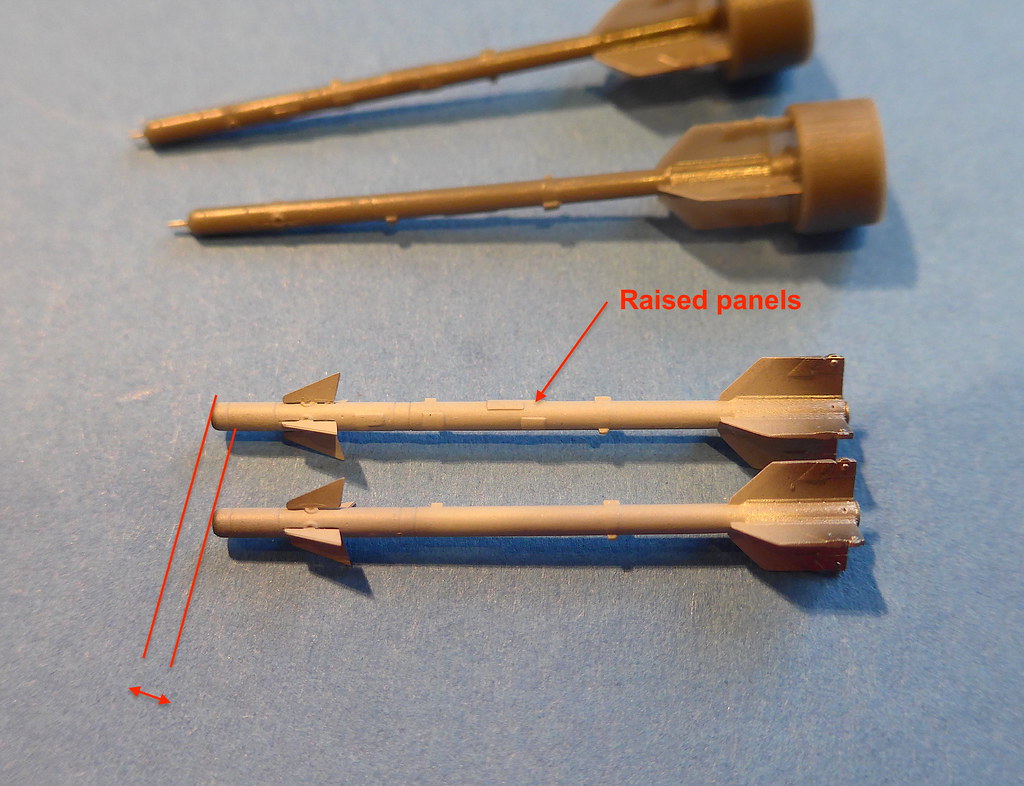
Sorted,
So I began adding the first few decals yesterday and thought the model looked too pristine. I started to have second thoughts about building a super new finish in this scale, it was looking maybe a bit too toy like and needed more realism for my liking so I decided to make the dry brushing and wear a bit more obvious on the central fuselage and fin. I'll do more weathering later but not excessively as even examples of the IIIS in service for a few years were almost always relatively pristine.
The below image shows more what I'm trying to do, I think it has some sort of filter exaggerating the tarnishing of the surface but it is more what I want to replicate,
(used under clearance from poster of MC-ONE)
I carefully dry brushed some more Humbrol Metalcote polished aluminium on the surface to exaggerate the wear compared to the previous post,
also on the tanks
My phone's camera seems to capture the dry brush finish better than my camera (but makes everything seem more chromatic), in reality it is somewhere between the two cameras,

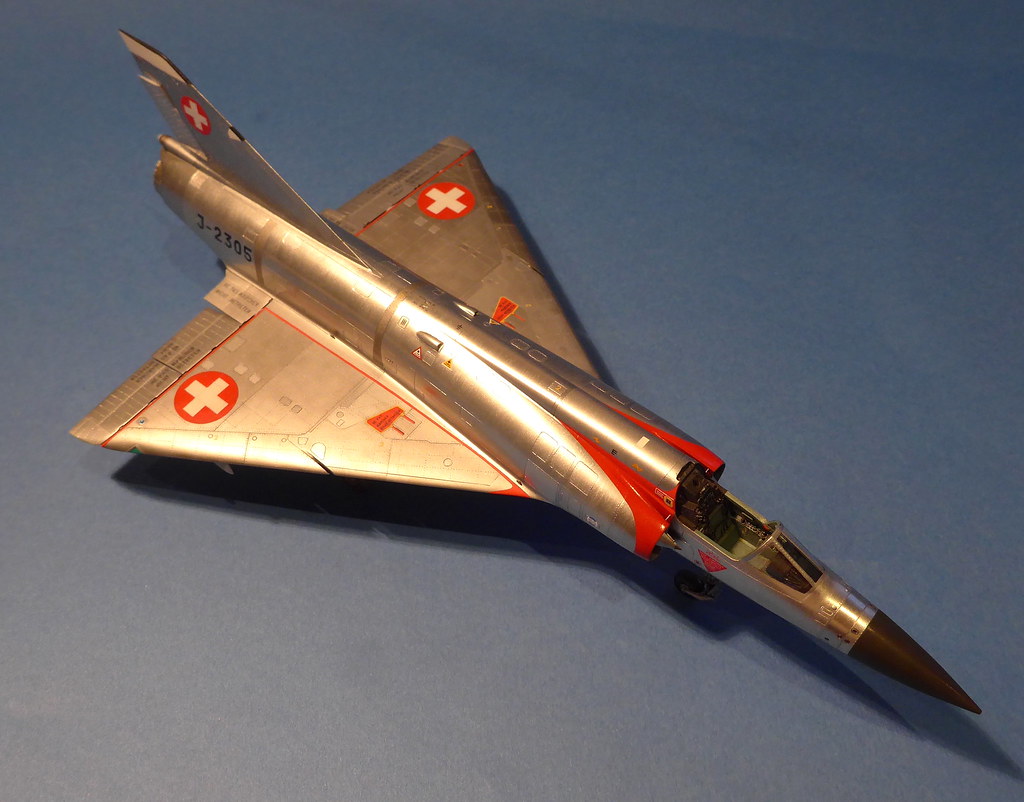
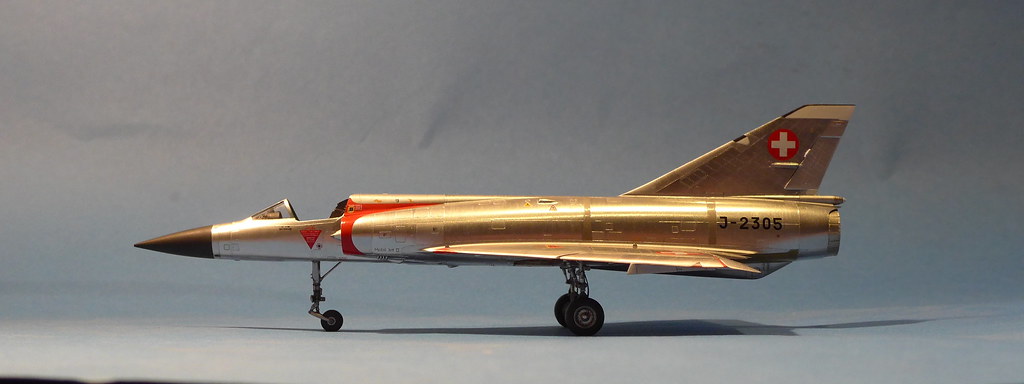
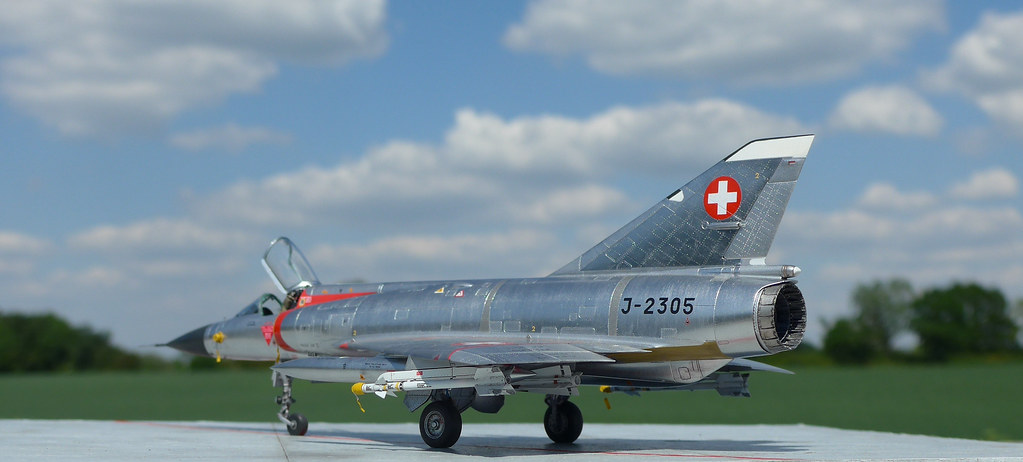
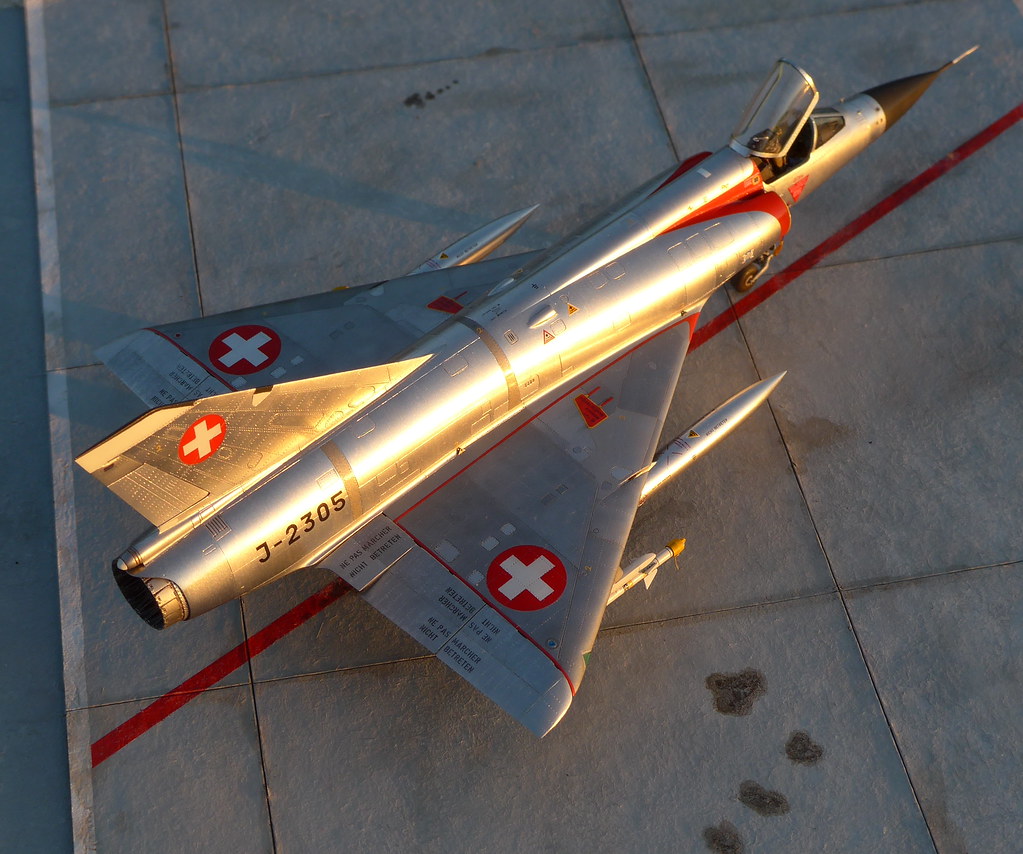
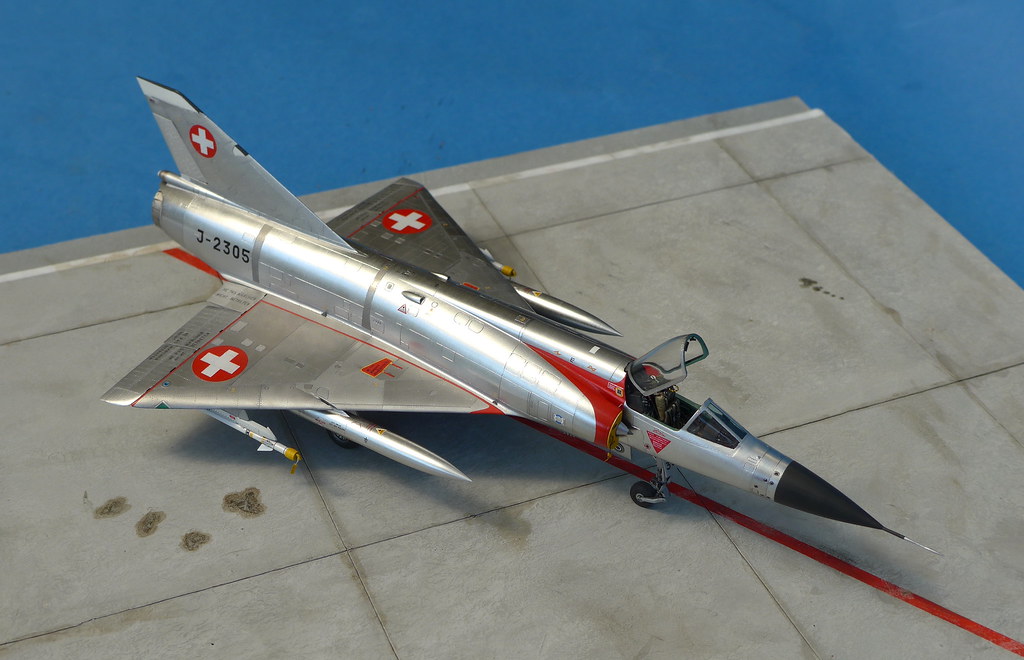
The decals are on (always seem a breeze compared to DACO's F-104 stencils now), I chose 'J-2305' as it was the aircraft in the video linked in the first post of this thread fully armed up. I will save the last Mirage IIIS of the production line, 'Geronimo' , for my 1/32 Mirage IIIS where the artwork should look more impressive in the larger scale, whenever I get around to it. I also applied a light oil wash and a water colour wash over the more delicate Alclads (polished/airframe aluminium-enamels thinners just strip this stuff regardless of clear coat). These early Swiss NMF Mirages were kept in pristine condition, especially newish ones in the 60's like my model so other than some streaking here and there and light grime I've not done much weathering.
The Matterhorn decals really do a great job because the decal film is almost invisible over the NMF which I guess is always one of the pitfalls in these models, really chuffed with them.
However, I have learnt another lesson in the world of NMF. On my first go at painting this model, I applied a clear coat of Aqua Gloss before placing the decals and the resultant decal film was invisible. Below is a photo of the prior paint/decal job without any Klear over the top of the decal, just underneath.
Instead, this time I thought I wouldn't bother putting a clear layer underneath the decals and directly decal onto the Alclad to preserve more metal appearance which has backfired a tiny little bit. Below is a pic of the decal directly over the Alclad, then an Aqua gloss clear layer over the top. It is still nearly invisible and I've taken a photo at a non-flattering angle to highlight/capture it but the contrast in metal appearance between the naked Alclad underneath the decal and the Aqua gloss has shown up a little bit compared to how I went about it first time over. I guess the slight difference in reflectivity between the Alclad-decal-clear and Alclad-clear around the decal has caused this. So next time I'll apply a clear coat before and after the decals to have a uniform reflection and the film should be back to being 100% invisible again. Don't get me wrong it's still pretty much invisible but another interesting potential pitfall in the NMF world I hadn't thought about, I think the Matterhorn decal's thinness have probably helped here, thicker or ones with less transparent film really could have backfired with the contrast difference.
After the decals and then the Aqua Gloss overall varnish to seal everything (which did take away a little bit of metallic feel but surprisingly not overly so) I then used MRP clear matt varnish (thinned with Gunze levelling thinner some more) to mottle over the wing panels and control surfaces as these on the Mirage IIIS were really quite a dull and flat aluminium in contrast to the fuselage. I got the MRP matt varnish specifically for this because it is so thin and clear it didn't change the metallic appearance of the Alclad at all, just making it flatter so it worked well. I still need to touch up a few of the little scoops on the underside.

In order to get some of the smaller details on easier, I decided to finish the landing gear. I wish now I'd replaced the front lights with some clear lenses as they aren't great. When I added the details I just wanted to finish the project so kind of passed over them. The decals for the wheels come from the Matterhorn sheets. The gear parts as stated earlier were bit of a mess to clean up properly as there was some misalignment in them but I guess this is a short run kit after all so things like this aren't unusual.
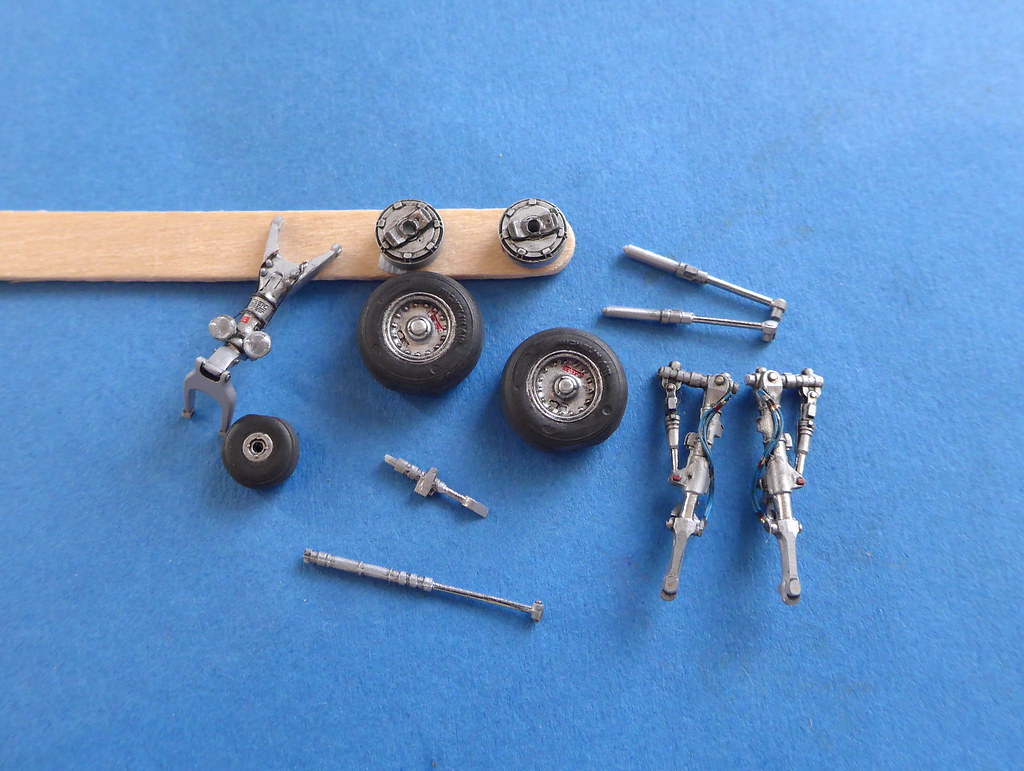
Getting the correct 'sit' was a tad difficult as using aftermarket wheels (with slightly different size to the kit) and the mods I had done to the nose leg made sure some adjustment was necessary. I *think* it is right enough now, the nose wheel fork could be adjusted and I've seen photos of it in all sorts of positions and therefore nose up attitudes of the Mirage so I just settled on one photo and set everything to that with a moderate pitch up.


The small intake strengthening struts added (bleeding difficult!!)
And another Swiss Mirage mod, the small triangular hoist hooks used for lifting and positioning the Mirages inside the mountain hangars. The red arrows on the right show another less than stella job I did in rescribing some of the spill over main panels after filling the rivets. I did the rescribing over a black primer and now remembered why I don't use black primers, seeing the work done/corrections was difficult for my eyes compared to light greys so I scribed too lightly (I thought better than too heavy at the time) and the result, a few places of inconsistent panels, I'll see if I can do something about it but correcting things and Alclad I've found don't go together so well. Also in this close up you can see the rivets on the wings are a different metal colour, I used Humbrol metalcote polished aluminium as a wash on these (the normal type Alclads underneath are bullet proof to any wash other than lacquers) and carefully applied it after studying some close up photos showing the brighter rivets, hardly noticeable in my other photos but quite nice in real life and something I'd do on other NMF models.
A more focused close up of the forward hook, I think I used Humbrol metalcote steel for these.
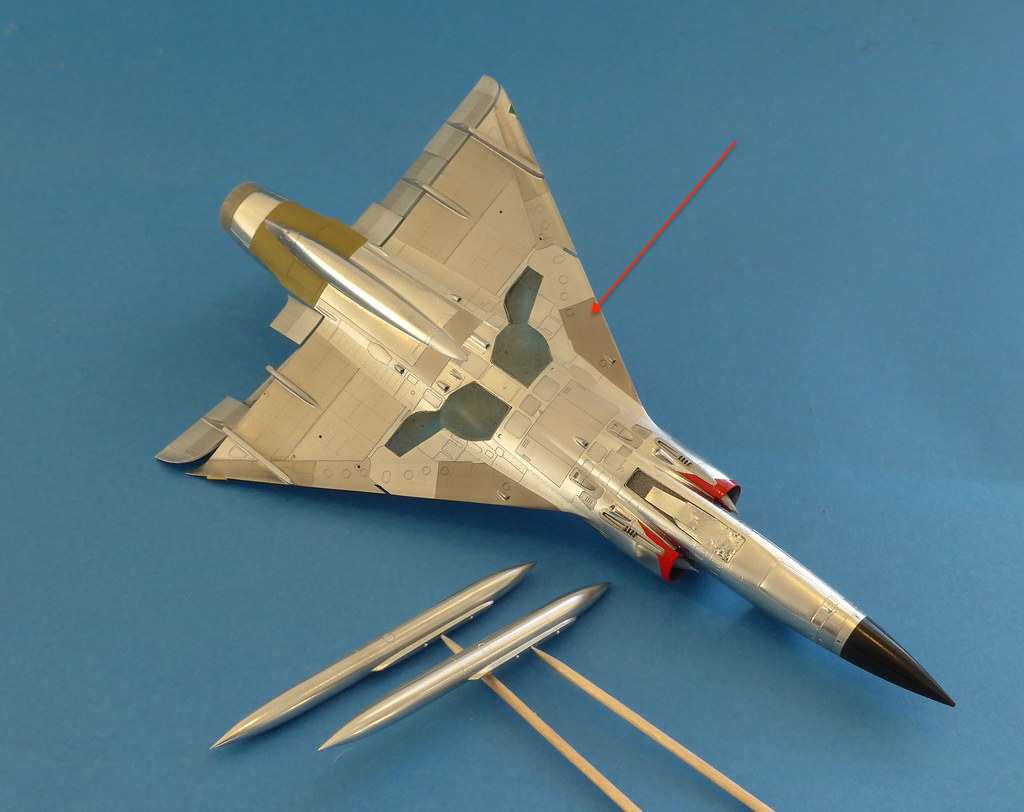
On the whole I agree the kit captures the subtle lines well in general but there is something that once I noticed, I haven't been able to unsee, but it isn't overly massive. I don't think the wing shape is spot on (compared to say the Heller Mirage IIIC/B), close, but the leading edge wing root begins too far back of the intake, resulting in the wing not having enough sweep and the fuselage/intakes/nose (everything forward of the leading edge) maybe looking a little too long because of this.
Pictures say a thousand words so,
Compare the picture of the model to this pretty much side on image from 'airfighters' : https://www.airfighters.com/photo/71537/M/Switzerland-Air-Force/Dassault-Mirage-IIIS/J-2331/
The blue line to me is where the leading edge root should start and the model is definitely further rear. The wing span seems correct so the knock on effect being a delta is a reduced sweep to meet the span. I did compare the wing to some reputably accurate drawings that match the Heller/Kinetic 1/48 Mirage wing's sweep pretty perfectly so I'm pretty sure Modelsvit got this bit slightly wrong. Hard to get a good photo of it but the general idea,
and the Heller and Kinetic 1/48 wings to the same plans scaled,
I just hope they correct it on their further releases, not a deal breaker for me for sure but I do see it, the problem is highlighted a bit with the wing tanks as they then seem to slightly protrude too far out from the wing. If they scale up their Mirage III series to 1/48 it should blow Kinetic (and Heller hopefully) out of the water!
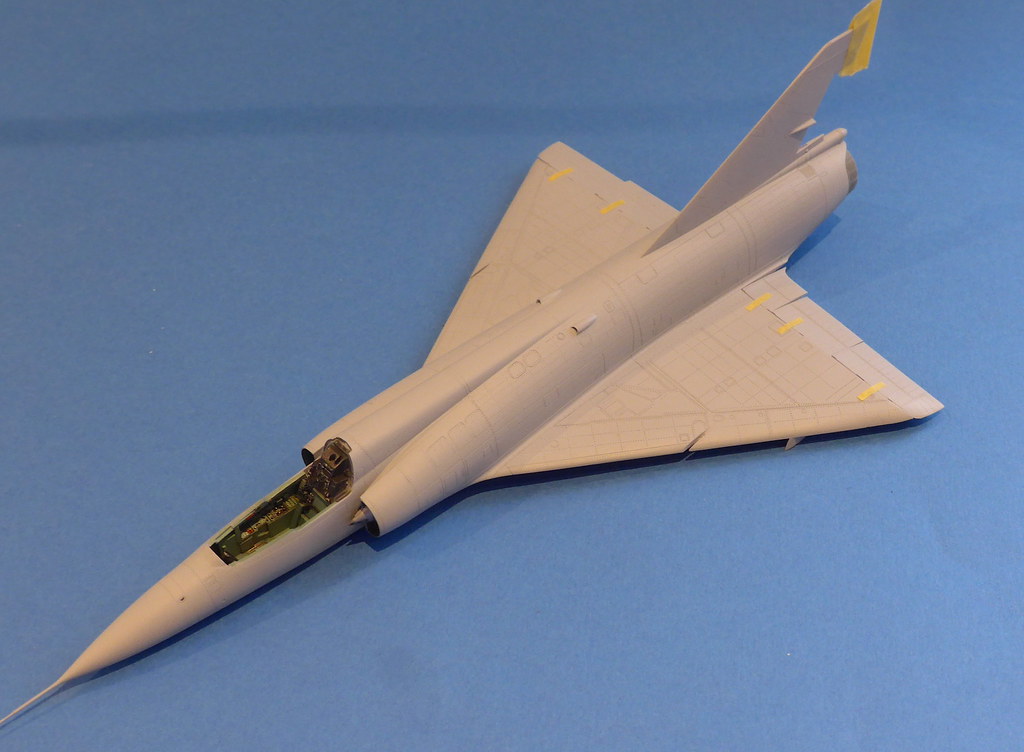
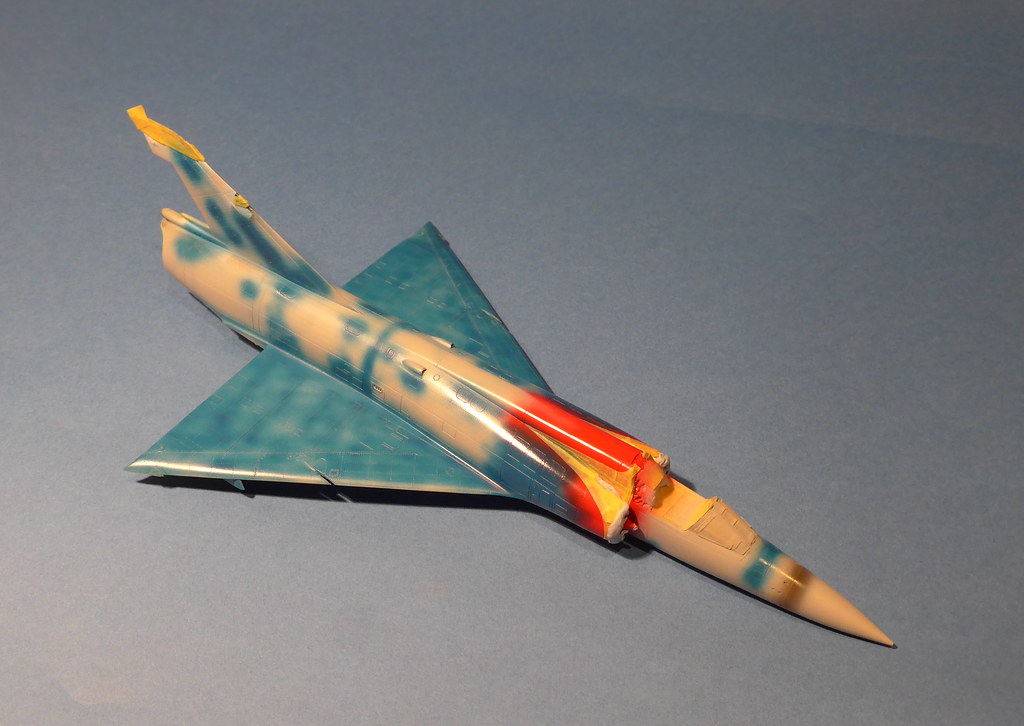
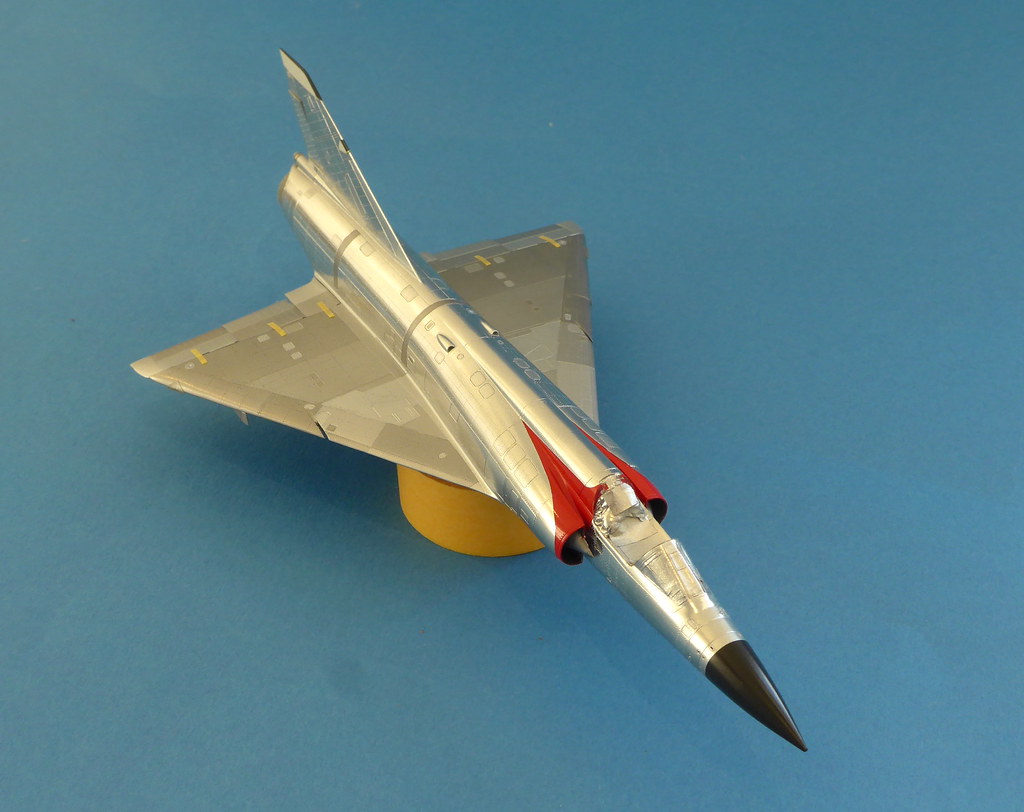
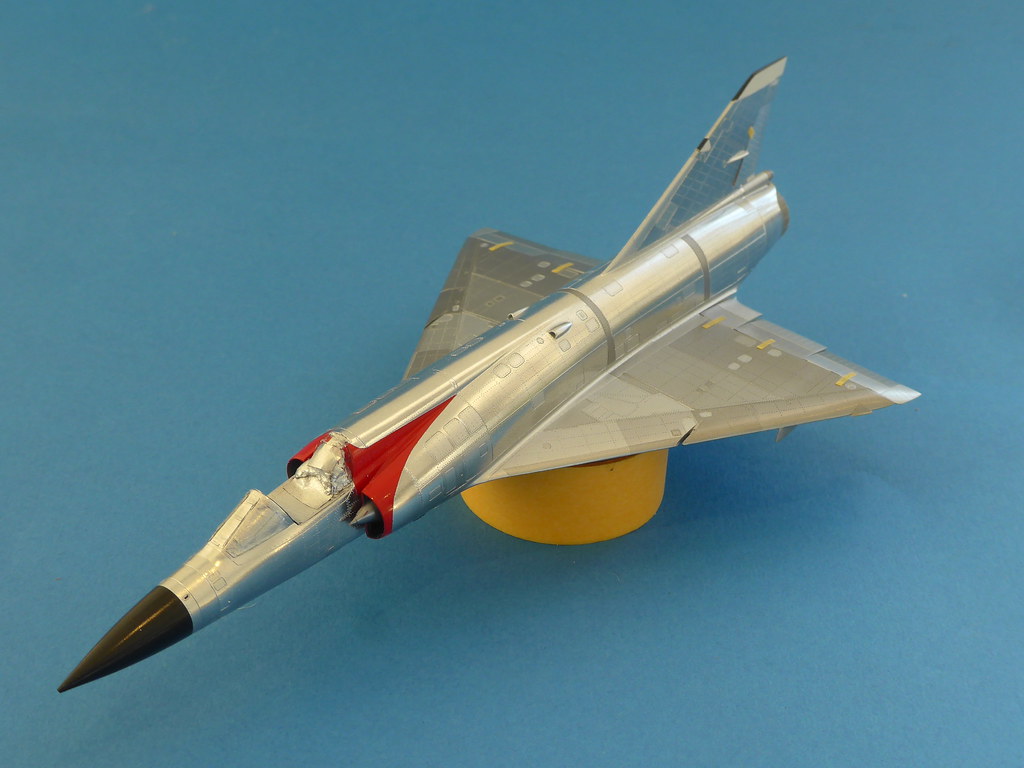
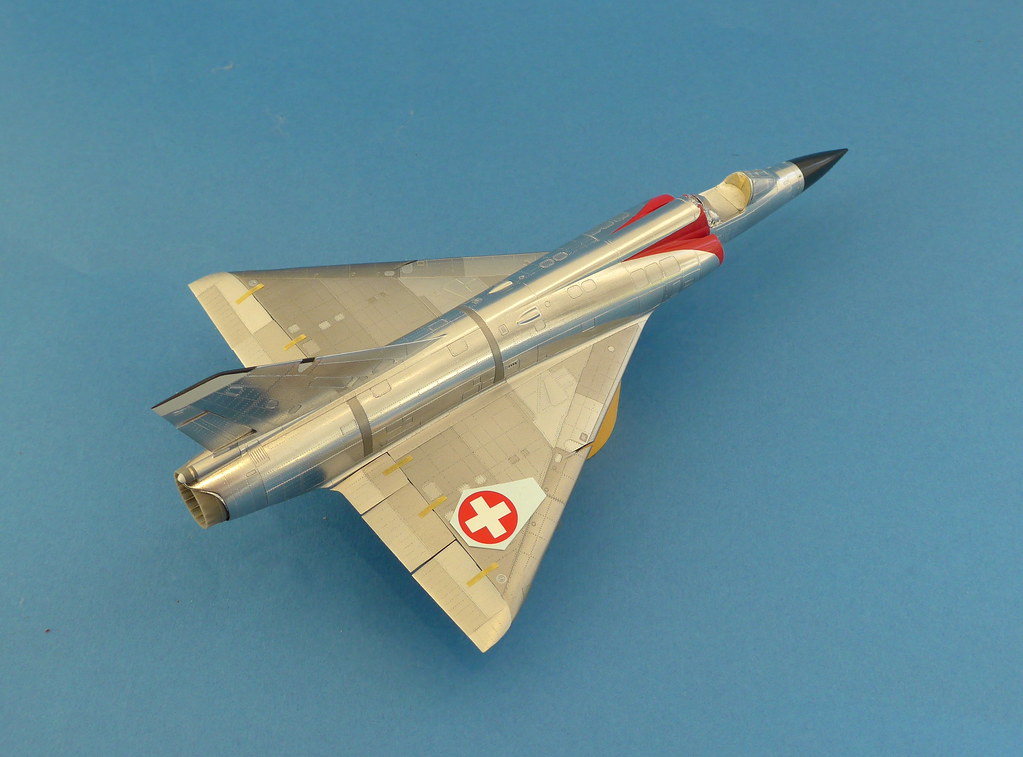
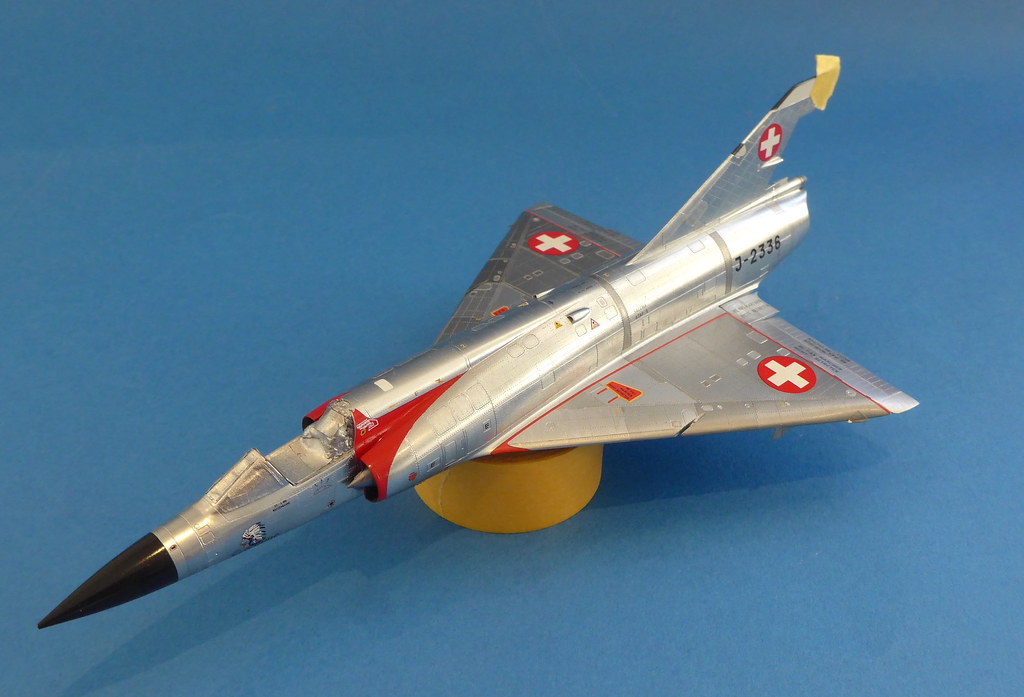
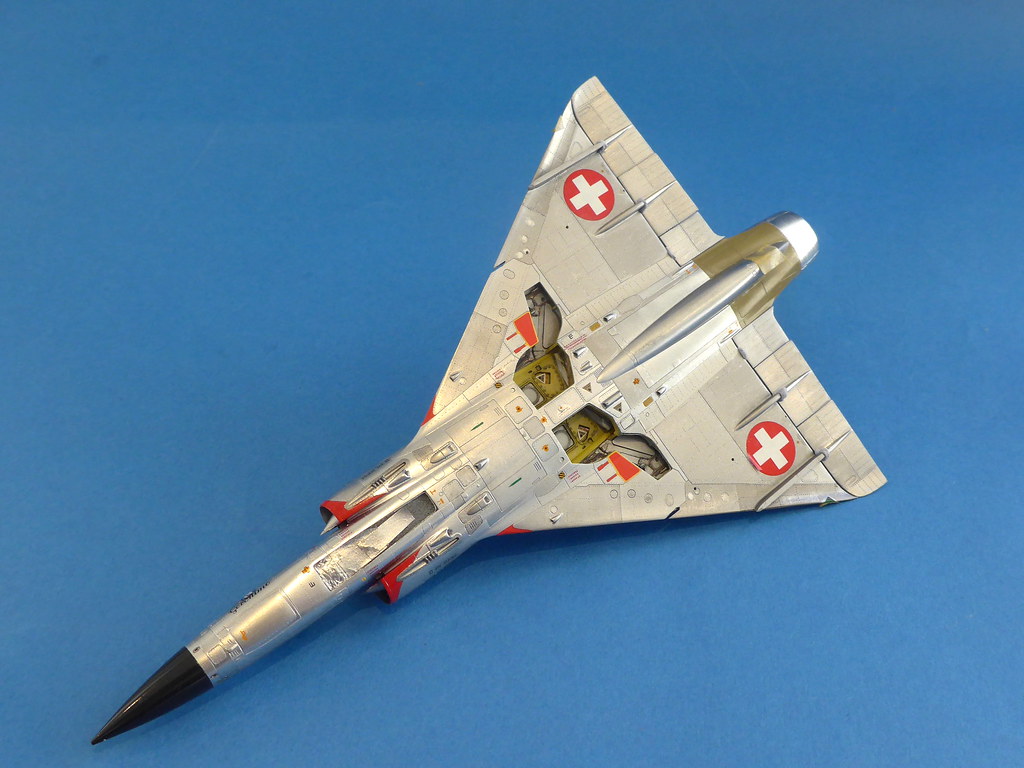
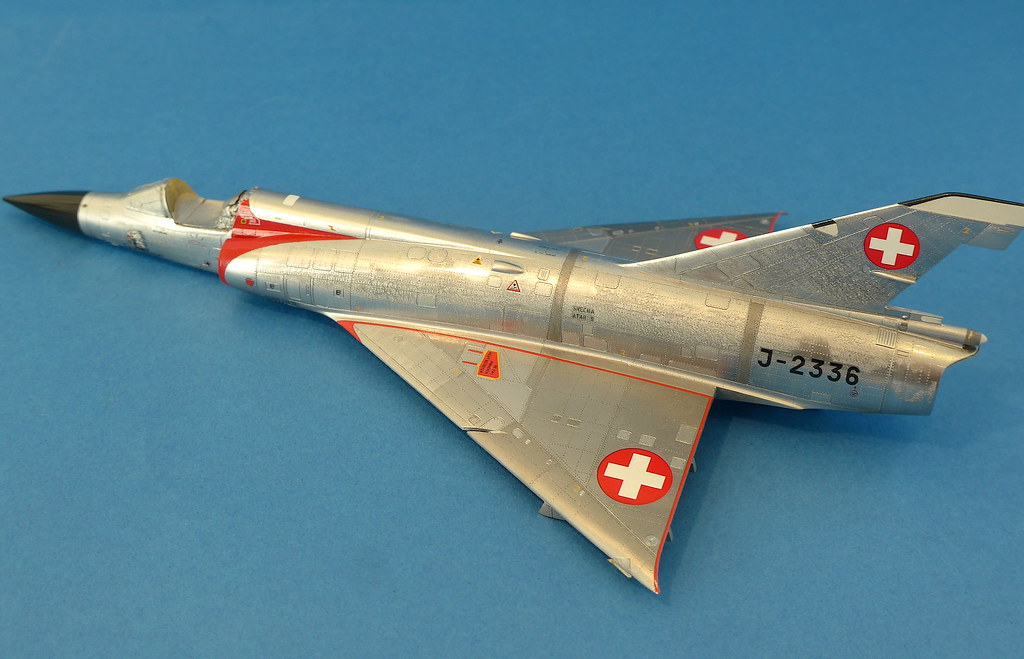
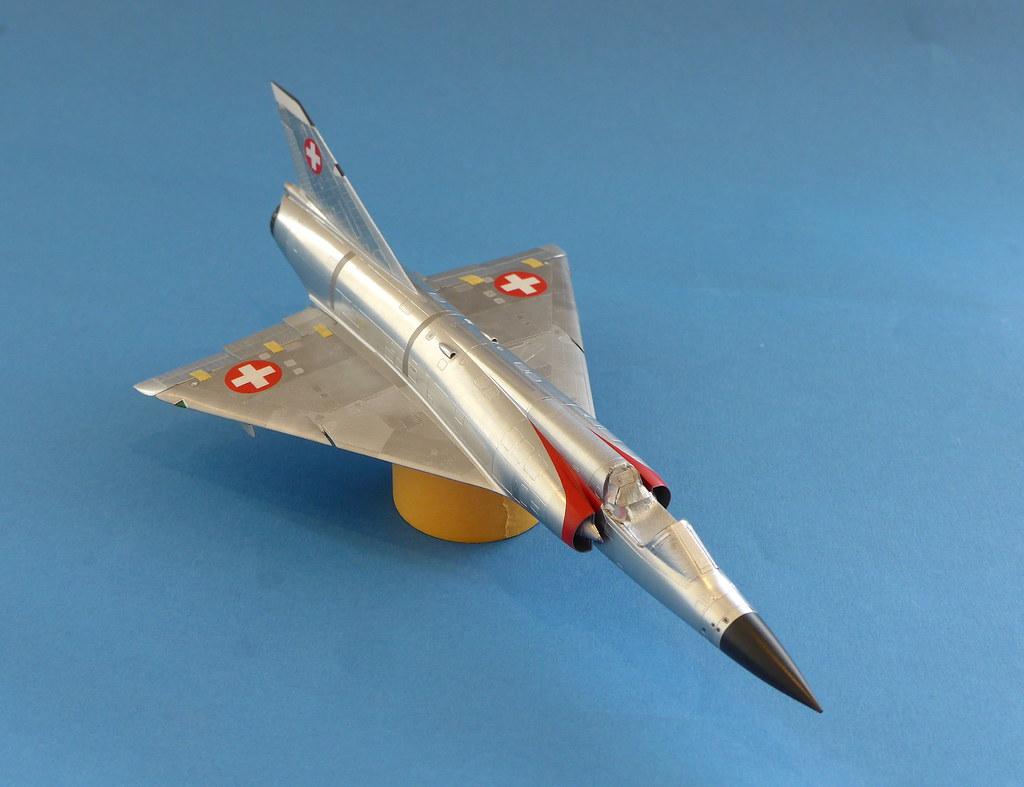
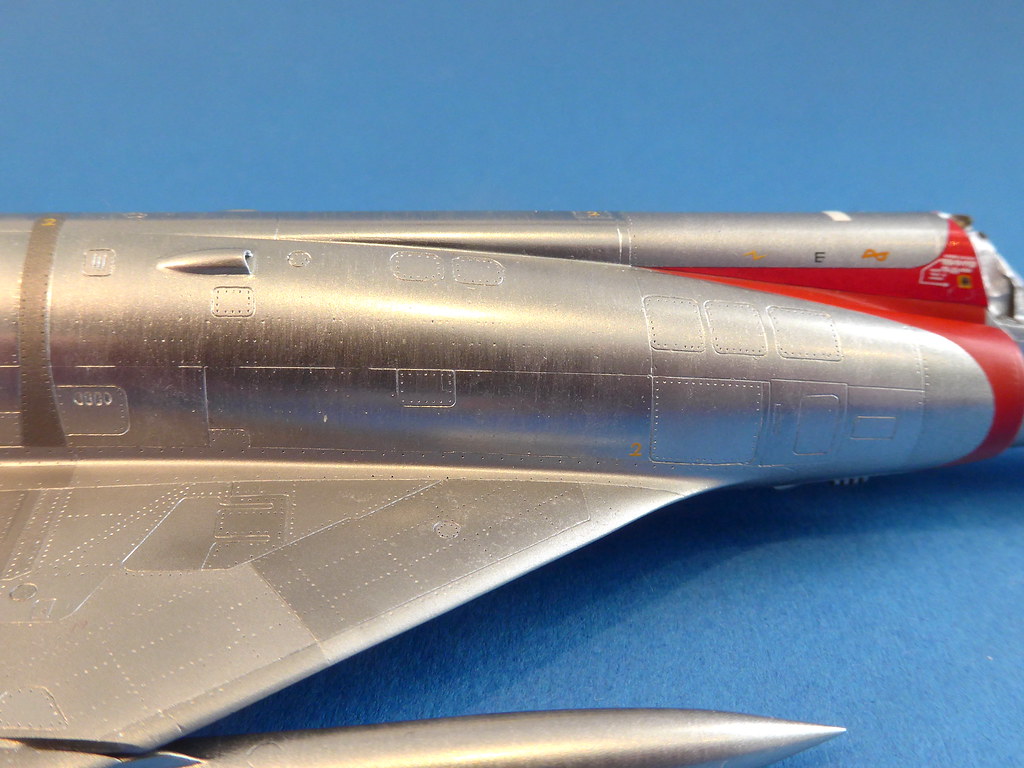
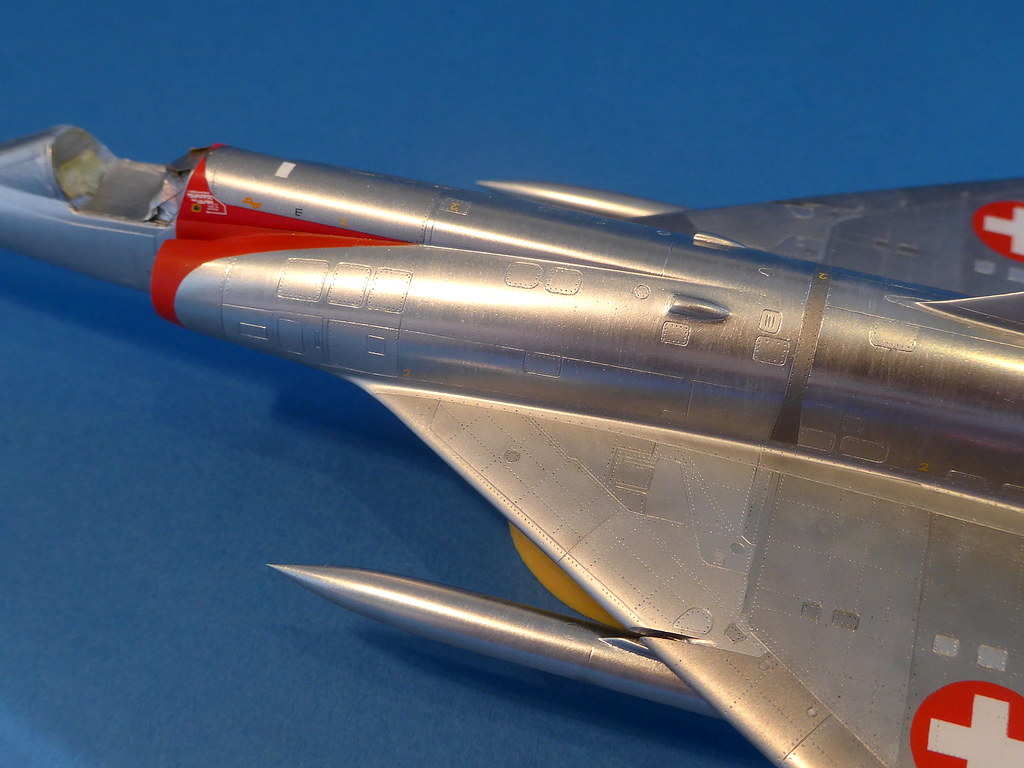
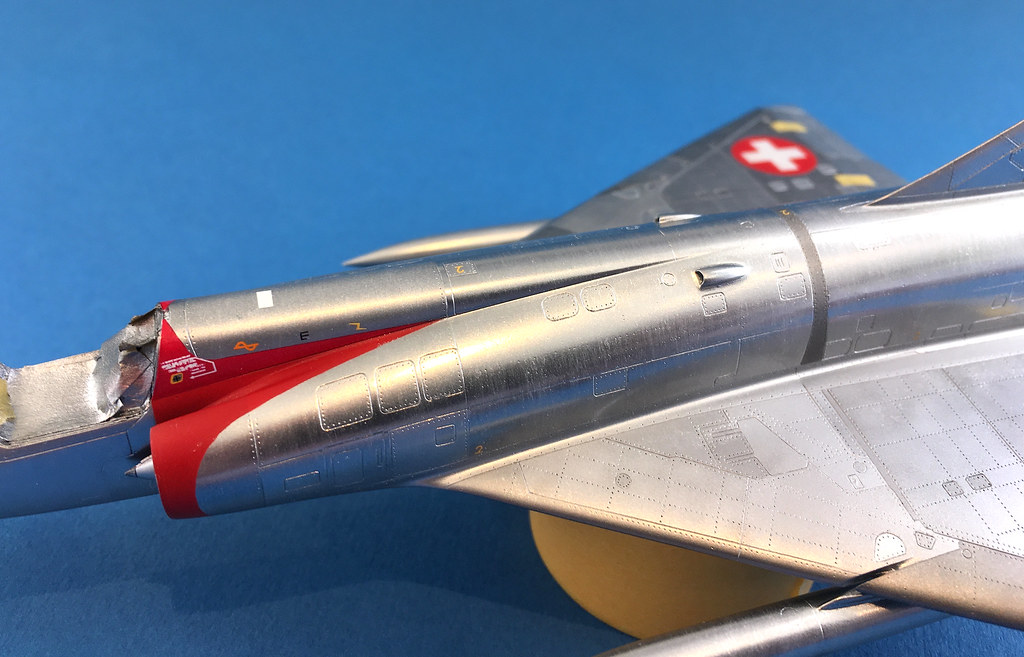
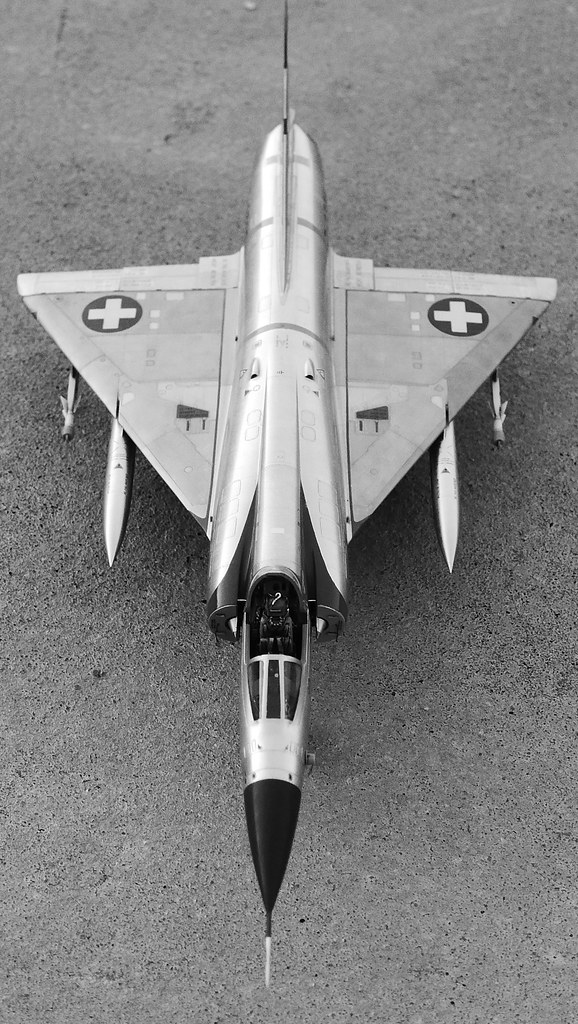
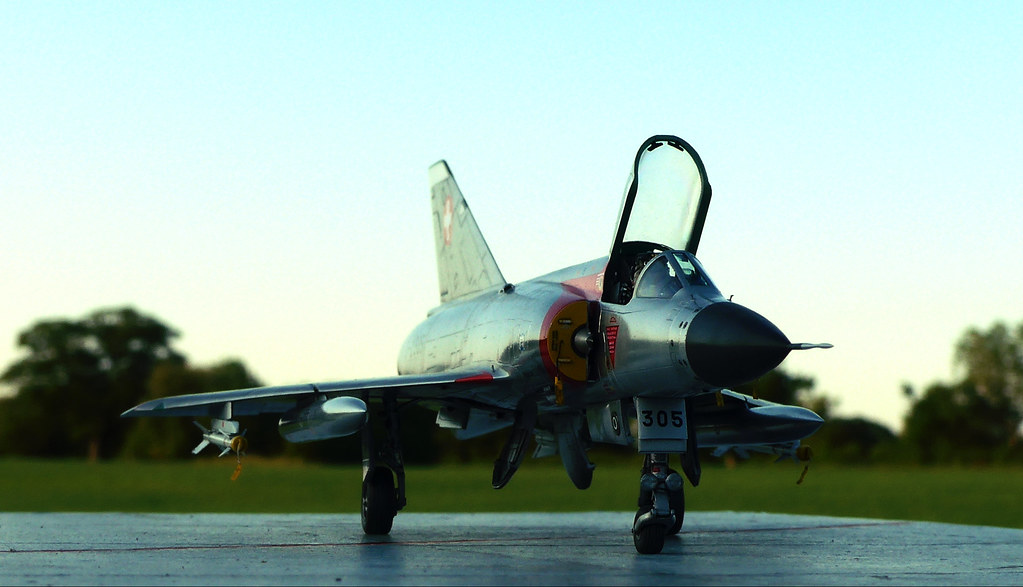
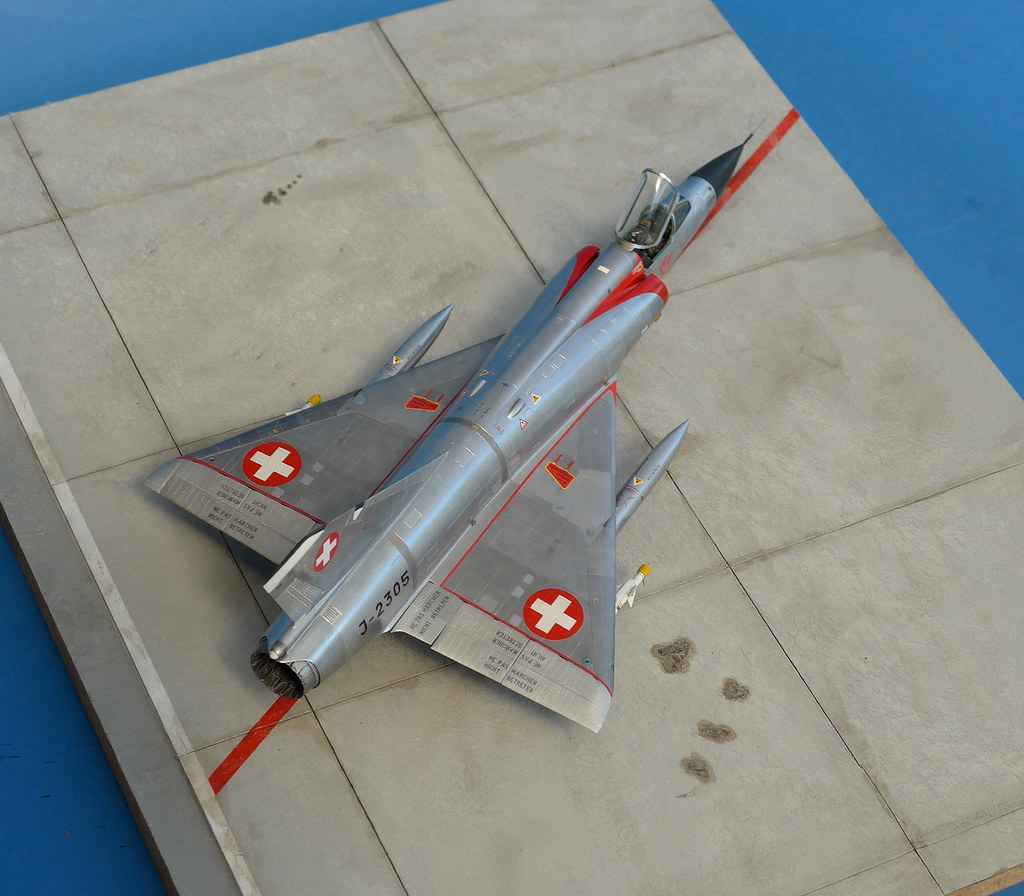
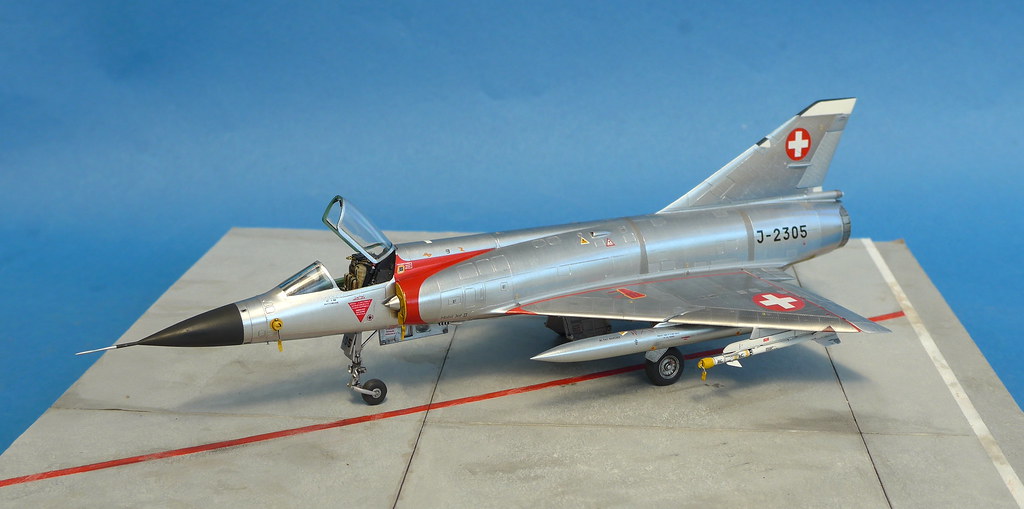
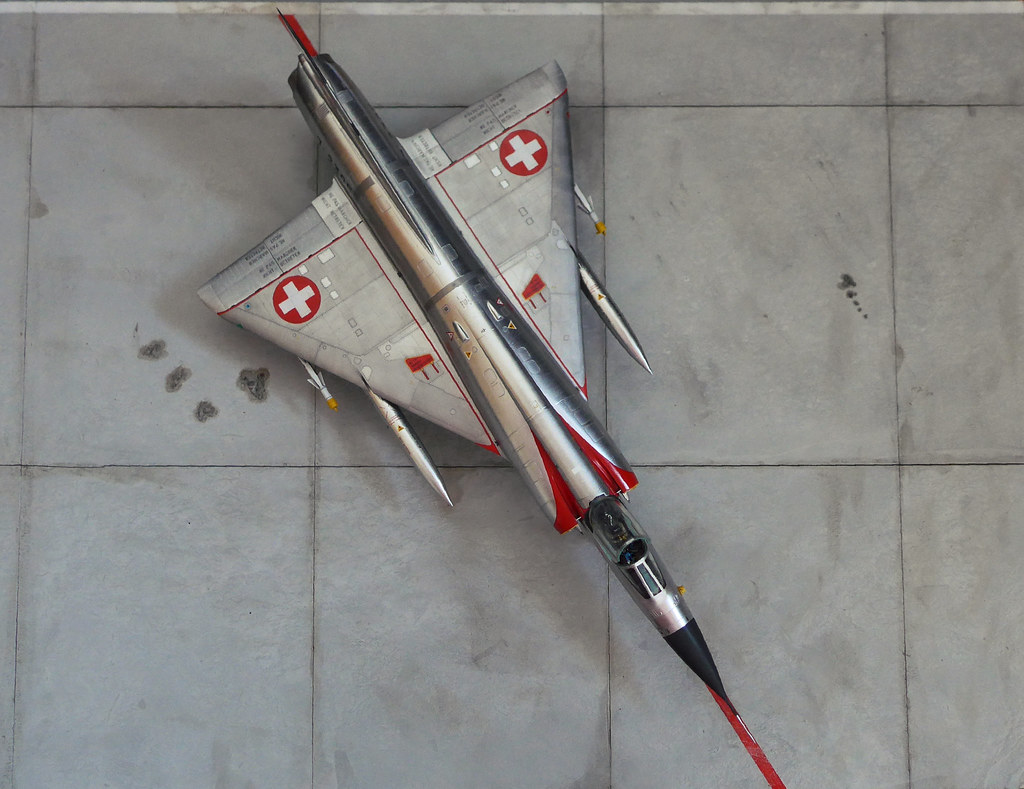
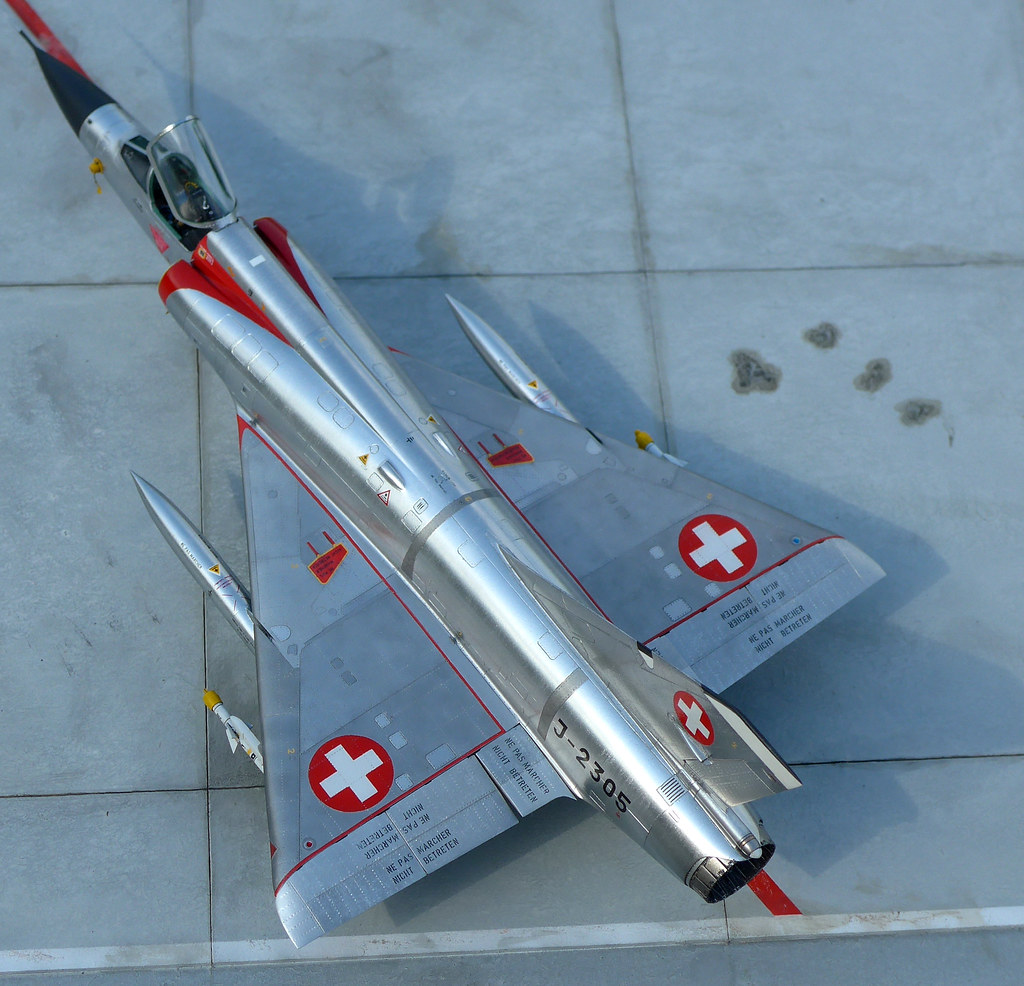
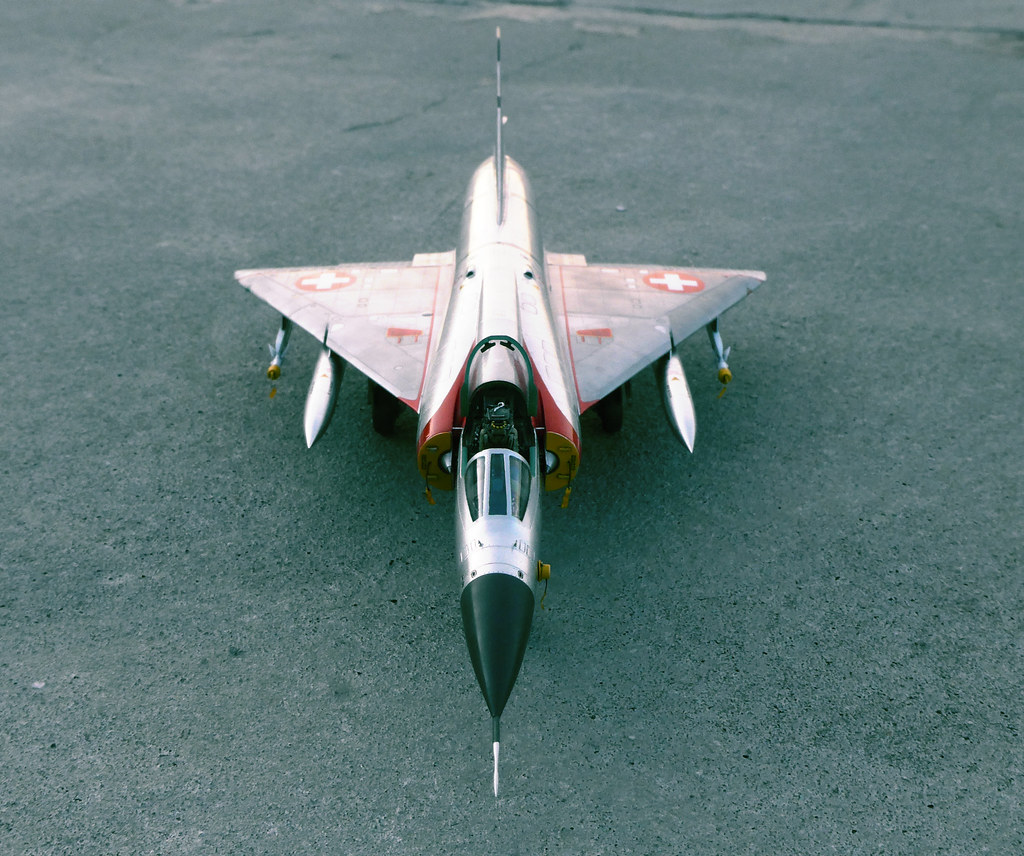
I finished this one,
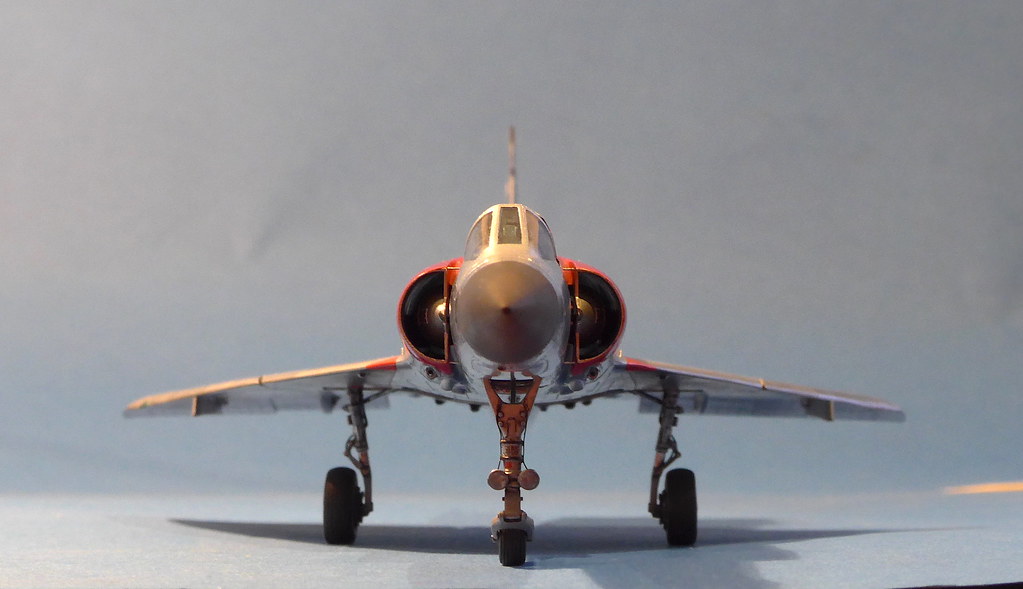
Here is the 1/72 Modelsvit Mirage IIIE converted to Mirage IIIS specification of the Swiss Airforce.
For full details on the modifications done check this BM WIP IIIS thread here. The kit itself has some crazy details for this scale but can be a bit tricky to work with when modifying because everything is rather small, overall a nice one though.
I used Alclad for the paints and required two attempts at it due to my daft ideas. I tried focusing on replicating the contrast between the varied panel tones and matt-ish finish of the wings compared to the more reflective fuselage and fin. I attempted to add some sort of wear and grain to the paint as the plain fresh Alclad looked a bit off by itself, it mostly looks ok in the flesh if a little overdone in bright sunlight. Still, it's no foil.
I used Matterhorn decals which were very good, probably the most important aspect for me was that the film was super thin so it vanished into the NMF.
I made 'J-2305', one of the very early Mirage IIIS deliveries and displayed it as was during the 60's before unit markings were applied on the fin. Unfortunately I managed to loose one my the Maestro Aim-26B missiles but I loaded the other anyways (lets pretend its awaiting the second missile :D) , I'm hoping Eduard Brassin comes to the rescue!
The irony with this model is that whilst being the smallest one on my shelf, it took by far the most work!


ACCUEIL | ME CONTACTER | LIENS

